Pages

Showing posts with label gorgeous grape. Show all posts

Thursday, October 13, 2022

Make this Cute, Bright Halloween Card Using Stampin' Up!s Bewitching Bundle and Gingham Cottage Designer Series Paper! Very Easy!

I like Halloween, but just not all the horror, scary stuff. I happen to be a screamer when I get startled, so that is why I avoid those types of movies and shows.

If you feel the same way I do, then making this darling "Best Witches" Halloween card is a fun alternative for Halloween celebrations

The Bewitching Bundle is available in Stampin' Up!s July-Dec. Mini Catalog will solve your "what should I make?" problem quite nicely. Look at those three hats! They are so cute! The coordinating Witch Hat Builder Punch helps you punch out the hats easily. 


In coordination with the Bewitching Bundle, I used Gorgeous Grape cardstock for the card base. The plaid patterned paper is called Cottage Gingham. The Pumpkin Pie/Basic Black sheet I selected worked nicely for cutting two sections for the card front and just flipping one piece over to get the two plaids.


The Bewitching Layer is built on Basic Black cardstock. The pair of witch feet are stamped directly on the Basic White layer in Memento Tuxedo Black Ink. The Dark Daffodil Delight Stampin' Blend colored the shoe buckles. Do not affix the layers together yet.

The Polka Dot Witch Hat was stamped on Basic White cardstock in Gorgeous Grape ink then punched out. The Witch Hat band was two pieces of the Pumpkin Pie Glitter Washi Tape from the Glitter Washi Four Pack put on a scrap of Basic White, then punched out the band with the Hat punch, and attached with liquid glue. The finished hat was raised on Dimensionals and set on top of the feet.

On a narrow scrap stripe of Basic White cardstock, stamp the "Best Witches" in Pumpkin Pie ink. With liquid glue affix the tag at an angle and trim off the excess hanging over. Now you can adhere the layers together and affix to the card front. 

Add a layer of Basic White Cardstock to the inside of the card. Decorate the Basic White envelope flap with matching Cottage Gingham Designer Series Paper. All done!

 Click on any image below and you can purchase the item at my online store.


I hope this card idea has inspired you with some possibilities for the Bewitching Bundle! Have fun!

Learn how to get more done in less time by signing up for my exclusive "Insider" weekly newsletter. Each week the news will share card class information, Stampin' Up! promotions, hot tips from me, and two free tutorials! Subscribe to my Weekly Newsletter today. Plus you’ll receive a FREE 14 Card One Sheet Wonder Tutorial to download when you receive my thank you email for signing up.


Please contact me or email me at stampinwitheva@gmail.com if you have any questions about products, techniques, or card designs. Comments below are welcomed too!

Tuesday, September 13, 2022

Stampin' Up!s Amazing Silhouettes Stamp Set Makes the Prettiest Happy Birthday Card When Paired with Hand-Penned Petals Designer Series Paper. Give This a Try!

Us cardmakers never have enough ideas to create from and we are always looking for more ideas to try. So today I'm bringing you two versions of a "Window" or "Peek a Boo" Card. 


You will be able to make a bunch of these cards easily. They are quite simple.

CARD DIRECTIONS:

Cut Cardstock Base - 8-1/2" x 5-1/2", score at 4-1/4", top fold
Basic White for inner layer 4" x 5-1/4" and glue inside
Cut your choice of Designer Series Paper 3-1/4" x 5-1/2" along with 
another piece 3/4" x 5 1/2" for the inner card layer (go ahead and glue this strip inside)

3" x 3" Basic White to stamp the butterfly image on in your choice of matching ink

To make the window, decide if you are using a punch or a die. Pay attention to the amount of space you have on your left edge. (When you look at my two cards, you'll see the heart punch has more room on the left side than my circle die does.)

After you cut or punch your window, you will place your butterfly image in the window to see how it looks. You will be attaching your butterfly with dimensionals to the back of the patterned paper before applying it to the card front. You may find you'll need to trim some of the excess from the 3" square so it won't show in spots. After you have the butterfly attached, then add dimensionals to the patterned paper on each side of the butterfly and close to the corners, so when that section is applied to the card front the layer will be one consistent height.

3/4" x 3" Basic White for greeting of choice from the Go To Greetings Stamp set. Stamped in Memento Tuxedo Black Ink. Banner ends of tag were cut by hand with paper snips.

Finish with embellishing your butterfly with Pearl Basic Jewels.


I hope your card turned out beautifully!

At the link below I have compiled an extensive shopping list for this card and the needed tools. You have several options when you use this shopping list. You can add all to the cart if you want everything. But if you already have some of the items in your stamping collection, just uncheck each box by the items you have, and the rest of the items you need will go to your shopping cart when you click the "add to cart" button. Once in the online store you can set up a free account or check out as a guest. Either way this link goes to my store and I appreciate your business so much! Thank YOU!

One Retired Item is the Hand Penned Designer Series Paper but you can substitute any other patterne paper you already own.
**************

**************
Learn how to make beautiful cards by signing up for my exclusive "Insider" weekly newsletter. Each week the news will share card class information, Stampin' Up! promotions, hot tips from me, and two free tutorials! Subscribe to my Weekly Newsletter today. Plus you’ll receive a FREE 14 Card One Sheet Wonder Tutorial to download when you receive my thank you email for signing up.


Please contact me or email me at stampinwitheva@gmail.com if you have any questions about products, techniques, or card designs. Comments below are welcomed too!

Thursday, August 18, 2022

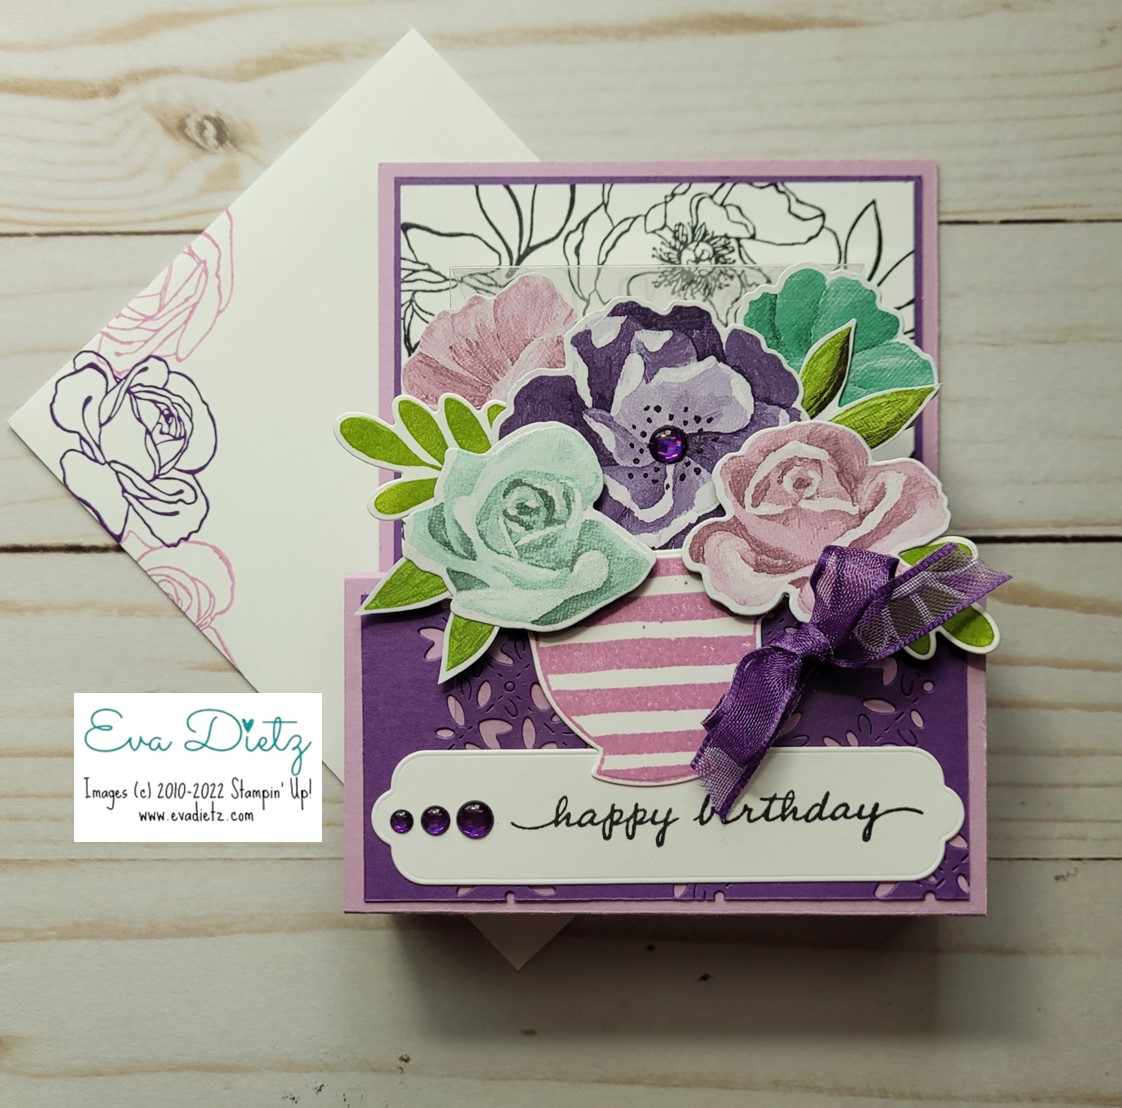
The Stampin' Up! Happiness Abounds Bundle is Fantastic! Look at the Beautiful Floral Birthday Card You Can Create and Give to Friends or Family!

Do you love floral images? If you do, then the Happiness Abounds Bundle from Stampin' Up! will quickly become your favorite Bundle to work with from the 2022-23 Annual Catalog.

I have created something different for you to try with this Pop-up Front-Step Fun Fold. A piece of Window Sheet is used to create a see-though look. The Window Sheet allows more of the back panel to show where I stamped a variety of black floral images. By doing this, the front floral tea cup layered image POPS off the front of the step fold. 


Focus on the envelope design between these two photos, above and below.
 
The front of the envelope had some floral images stamped in two colors. 
The back of the envelope flap has an all over floral design stamped in Memento Black Ink.

This envelope has beauty on both sides!


When the Front Step Card is turned over below, there is a panel on the back for your message. Fussy cut some of the edge florals from the Hues of Happiness Designer Series Paper to incorporate into this lovely floral edge look.


Let's get Creating!

Cutting Measurements

Fresh Freesia cardstock - cut 4 1/4 x 11"
 
Gorgeous Grape cardstock - cut two pieces. Front Upper Panel 4 x 3" 
and Lower Front Die Cut Panel 4 x 2" 

Basic White cardstock - Front Upper Panel - cut 3 7/8 x 2 7/8"
Back of Card Sentiment Panel - 4 x 5 1/4"
For Teacup - cut 3 x 2"
For Happy Birthday tag - cut 4 1/4 x 1 1/4" 
For 2 Leaves - 2 1/2" square piece
 
Window Sheet - 2 3/4 x 5 1/2"


Scoring and Assembly Instructions:


Fresh Freesia card base - score at 5-1/2", 6-3/4", 9", 10-1/4". 
Fold on each score line, use bone folder. 
Add Tear and Tape as shown in diagram. 

Helpful Hint! Practice Fold the card base at the 5-1/2" line, then fold again at the 9" line to the inside. See how that allows the cardbase to lay flat? 
Referring to the side view photo below, peel off the protective layer on the Tear and Tape and 
adhere to create foldable/pop up base, replicating what you just did on your practice fold. 

Gorgeous Grape cardstock piece - adhere to upper front panel section. 

Basic White cardstock upper front panel piece- stamp with variety of floral and leaf images from the Happiness Abounds stamp set in Memento ink. Adhere to Gorgeous Grape Layer. 

Gorgeous Grape cardstock lower front panel piece - use Blossoming Happiness die to create peekaboo look. Adhere to Fresh Freesia lower panel of card base. 


Window Sheet - score at 3/4" and 2". Fold plastic on each score line until there is a good crease but plastic isn't cracking. Position the larger area of the window sheet on top of the die cut Gorgeous Grape panel, centering it from side to side. 

Apply one pass of Stampin' Seal adhesive at the plastic bottom edge only, so it will be covered up by the tag later. Press in place. 

Fold up the card like it will fit in an envelope as shown in the image below. That will give you the placement of where to run the one pass of Stampin' Seal to attach the top section of the window sheet on the basic white stamped floral layer.


Tea Cup image - stamp Basic White with Fresh Freesia ink and die cut out. 

Happy Birthday tag - stamp sentiment as shown in photos using Memento ink. Die cut out. With Stampin' Seal, adhere tag so it covers the bottom edge of the window sheet covering the adhesive line. Add the three Gorgeous Grape Glossy Dots to the tag. 

Prepare floral and leaf images - Die cut out florals and pointy leaves like shown in the photo from the Designer Series Paper. Stamp the two rounded leaf images in Granny Apple Green ink and die cut out. 

Assemble the images using the photo above for reference, as a unit on and behind the tea cup. Use Stampin' Seal and Mini Dimensionals as needed but do not attach to card base yet. Lightly apply some Wink of Stella to flowers. Apply one Gorgeous Grape Glossy Dot in the center of the middle flower. 

Tie 8" ribbon piece around tea cup handle in a bow. Trim excess ribbon as needed. 

Now close the card like it will go into your envelope. Place the prepared floral tea cup on the window sheet and lower section to see how it fits. You want to make sure the flowers do not go above the fold in the window sheet so it will still fit in the envelope. Once you have decided where to place, use the Stampin' Seal and securely attach to window sheet panel. 

Using the photos for reference prepare the back of the card with the fussy cut flower and leaf images glued down on the Basic White cardstock. Stamp the sentiment in Memento Ink. 

On your envelope - stamp front floral images in Gorgeous Grape and Fresh Freesia. 
On back flap stamp multiple floral images in Memento Black ink.

Well Done! You have made a very special birthday card for a loved one or friend.

List of Supplies available to order at my online store. Click each photo to shop.
 

Explore these other Hues of Happiness Suite cards via the links below.


Please contact me anytime if you have an questions 
or email at 
stampinwitheva@gmail.com
Thank you for taking the time to comment on my post, you've made my day!

Sunday, June 12, 2022

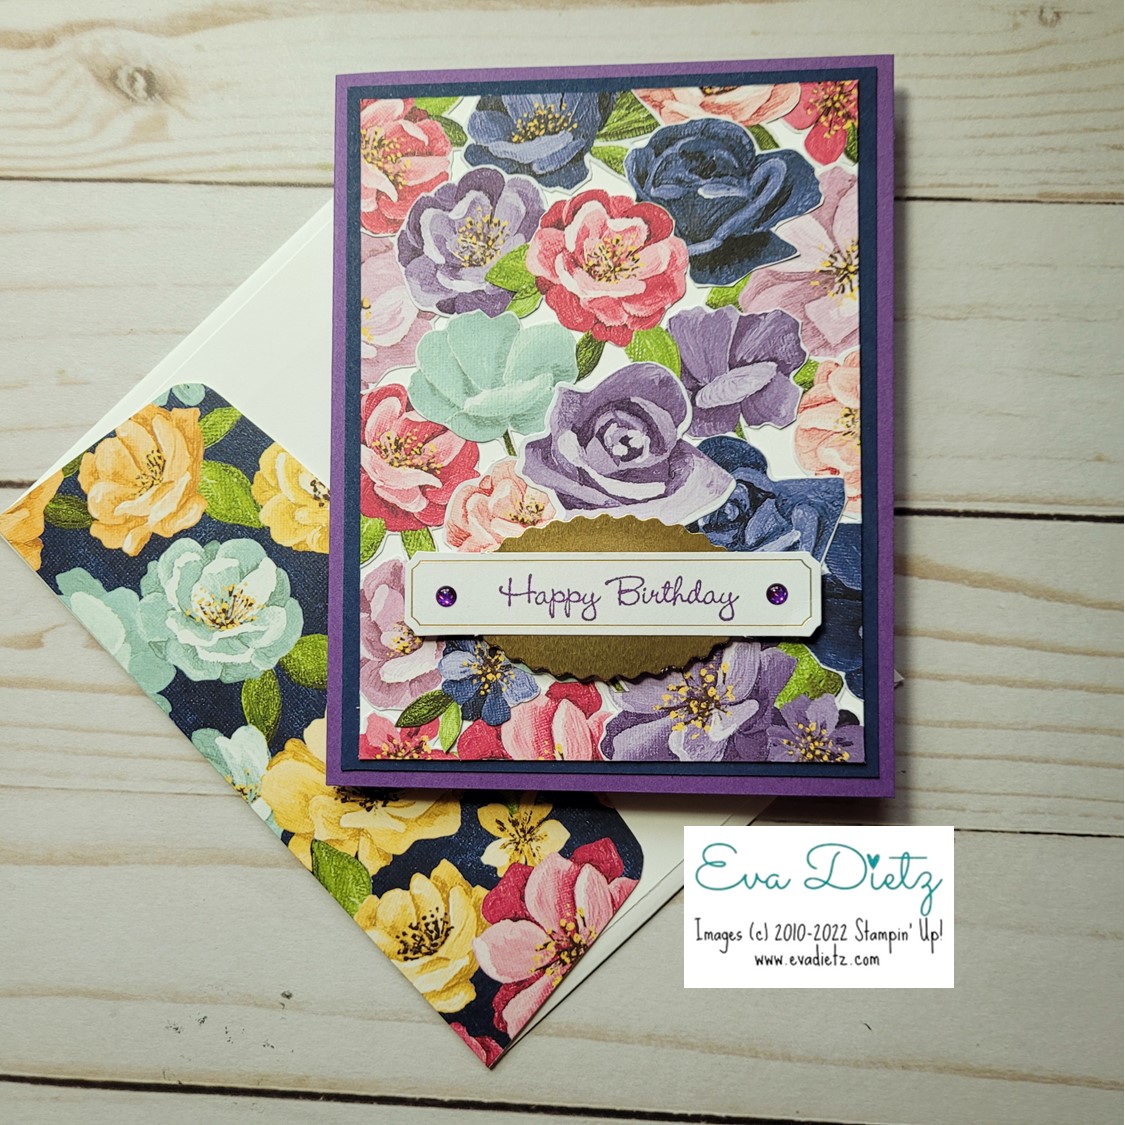
Using Hues of Happiness Flowers to Create a Original Card Front

 Phew, what a week it has been! I've had trouble sticking to my Monday-Friday posting schedule this week. Life and travel got in the way a bit. So here comes Friday's card on Sunday! You get to see two similar cards today, so I hope it was worth the wait.

In the flowers I fussy cut out from the one sheet of the Hues of Happiness Designer Series Paper (DSP), I STILL had some left over, so this time I covered the 3-3/4" x 5" Basic White cardstock layer almost completely with flowers. I did move them around before adhering so I had a design pleasing to my eye.

The two cards I'm showing today are similar in layout, but you will see how a change in one color can make the cards look different.

Today's cards are using the smallest sized greetings in the Go To Greetings stamp set. 


Above, you see the color combination of Gorgeous Grape card base with a Night of Navy layer. Looks a little more subdued, I think. The tag the Happy Birthday is stamped on in Gorgeous Grape ink is a leftover tag I had from one of my monthly Paper Pumpkin kits. Gold Foil was punched with the Double Oval Punch. The tag and the oval were adhered together, then raised up on mini-dimensionals. Two Gorgeous Grape dots came from the Glossy Dots Assortment to complete the card design.


The card above only has two things changed on it but to me the card seems brighter and more fun. The Night of Navy layer changed to a Melon Mambo layer. Two Melon Mambo dots were added to another Paper Pumpkin tag I had on hand. 

The inside of both cards have a layer of Basic White and a couple small flowers glued in the lower right corner.

Each envelope flap had coordinating DSP added, because you never want a naked envelope!

Overall List of Products Used in these two Cards and are available to purchase at the link below:

Gorgeous Grape cardstock
Melon Mambo or Night of Navy cardstock
Basic White cardstock
Hues of Happiness Designer Series Paper
Go To Greetings Stamp Set
Tags are from assorted Paper Pumpkin kits
Gorgeous Grape Ink
Gold Foil
Double Oval Punch
Glossy Dots Assortment
Mini Dimensionals
Paper Snips
Basic White Envelope with decorated flap

Tell me in the comments which card is your favorite - Night of Navy layer or Melon Mambo layer.

Shop or Join Stampin' Up!

Please contact me or email me at stampinwitheva@gmail.com if you have any questions about products, techniques, or card designs.

Tuesday, May 24, 2022

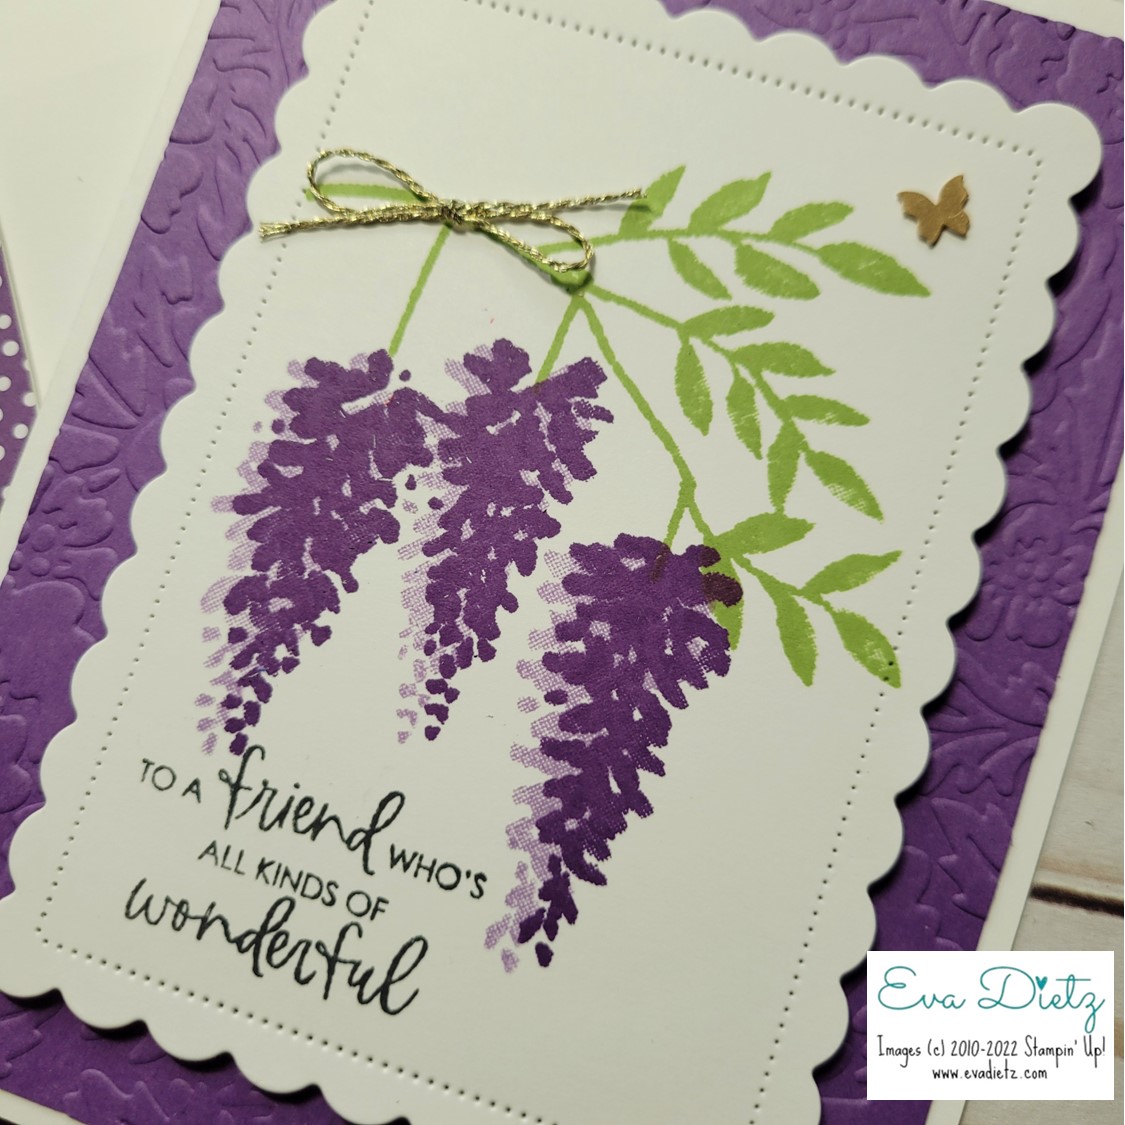
Introducing the Wisteria Wishes Stamp Set

 Have you ever grown Wisteria? I haven't, but I have always admired those that can. So when Stampin' Up! placed the Wisteria Wishes stamp set in the new Annual Catalog, I had to get it. That way I can "grow' some beautiful Wisteria cards instead! You can "grow" some too!


Cutting and Assembly Directions:
1. Basic White cardbase 5.5" x 8.5" scored at 4.25"
2. 4" x 5.25" Gorgeous Grape cardstock embossed with the Pretty Flowers folder. Adhere to cardbase.
3. Die Cut Basic White cardstock 3.5" x 4.25" with Scalloped Contour Die as shown. 
4. With Pear Pizzazz ink stamp branch.
4. With Highland Heather ink stamp triple flower stamp.
5. With Gorgeous Grape ink stamp triple flower stamp over just a smidge.
6. With Memento ink stamp greeting.
7. With Dimensionals raise Scalloped stamped layer on Gorgeous Grape layer.
8. Add gold bow and butterfly
9. Decorate envelope flap with 2-3/8" x 6" piece of matching Designer Series Paper.

One thing I learned is you have to pay attention to stamp the leaf branch so the wisteria stems hang vertically. Stamp  the triple floral image first in Highland Heather, then again moved just a bit to the right in Gorgeous Grape ink.


Products Used to Create this Card:

159434 Wisteria Wishes $18.00 

159276 Basic White Cardstock $10.25

146987 Gorgeous Grape Cardstock $9.25

155428 Pretty Flowers Embossing Folder $7.50

155560 Scalloped Contour Dies $35.00

132708 Memento Tuxedo Black Ink $6

147099 Gorgeous Grape Classic Stampin’ Pad $8.00

147103 Highland Heather Classic Stampin’ Pad $8.00

147104 Pear Pizzazz Classic Stampin’ Pad $8.00

158136 Brushed Brass Butterflies $10

Retired – Fine Gold Cording

159236 Basic White Medium Envelopes $7.50

Envelope Flap paper is retired

Adhesives

104430 Stampin’ Dimensionals $4.25

144108 Mini Dimensionals $4.25

152803 Stampin’ Seal Adhesive $8.00

152814 Stampin’ Seal Refill $5.50

103683 Glue Dots $5.25

Tools

152392 Paper Trimmer $25.00

152391 Cutting Blades Multipack $12.00

103579 Paper Snips $11.00

149653 Cut & Emboss Machine $125.00

150673 Mini Cut & Emboss Machine $63.00

144107 Take Your Pick Tool $10.00

147042 Simply Shammy $8.50

Clear Stamp Blocks various sizes on page 149 of Annual Catalog


Please contact me anytime if you have any questions 
or 
stampinwitheva@gmail.com

With love and gratitude,

Thank you for taking the time to comment on my post, you've made my day!

Tuesday, March 22, 2022

Beautiful Spring Sampler Class Coming

A group of my customers has requested making some seasonal samplers this year. So here is the spring one we will be making in early April.

This sampler incorporates over 60 different products in it! WOW! Some of the products are current and others retired, but for this one-of-a-kind masterpiece, it doesn't really matter. (My stamp studio is like a reference library of products for this project!)

It is my original design and took several days of working a bit, then coming back to it until I was happy with the final result.


The sampler always looks better in a frame!

Layout Sizes:

Left column of three squares: Basic White are 2-3/4" square, Highland Heather Layer are 2-7/8" square, and Crushed Curry layer are 3-1/8" square.

Top Middle Rectangle: Basic White is 3-1/2" x 4", Highland Heather Layer is 3-5/8" x 4-1/8" and Crushed Curry layer is 3-7/8" x 4-3/8".

Lower Middle Rectangle: Basic White is 3-1/2" x 5", Highland Heather Layer is 3-5/8" x 5-1/8", and Crushed Curry layer is 3-7/8" x 5-3/8".

Top Right Rectangle: Basic White is 2-3/4" x 6", Highland Heather Layer are 2-7/8" x 6-1/8", and Crushed Curry layer is 3-1/8" x 6-3/8".

Lower Right Square: Basic White is 2-3/4" square, Highland Heather Layer is 2-7/8" square, and Crushed Curry layer is 3-1/8" square


Stamp Sets Used:
Little Lady Bug
Jar of Love
Dragonfly Garden and matching punch
Blossoming Basket
Soft Spring
Wildly Happy
Under My Umbrella and matching punch
Colorful Seasons
Butterfly Basics
Inspiring Iris
Abstract Impressions
I'll Bee Yours 1/2020, Lovely Day 2/2020, and Bouquet of Hope 2/2021 stamp sets from previous Paper Pumpkin kits for bee, raindrop and small flower

Designer Series Paper:
Flowering Fields
Bird Ballad
You're a Peach
Botanical Butterfly and Butterfly Duet Punch

Designer Series Paper Selections for Purple 12 x 12 backing:
Hydrangea Haven
Sweet Talk
Hand Penned


Cardstock:
Granny Apple Green
Crushed Curry
Highland Heather
Basic White

Tasteful Label Dies

Black Embossing Powder
Versa Mark ink pad
Heat Tool

Stampin' Blends:
SU300 - shade of skin tone
Light Granny Apple Green
Light Old Olive
Light Highland Heather
Light Calypso Coral
Light Flirty Flamingo
Light Smoky Slate
Light and Dark Daffodil Delight

Stampin' Write Marker in Granny Apple Green

Ink Pads:
Gorgeous Grape
Granny Apple Green
Old Olive
Calypso Coral
Flirty Flamingo
So Saffron
Soft Sea Foam

Ribbon:
3/8" Gorgeous Grape Sheer Ribbon
1/8" Calypso Coral Sheer Ribbon

Embellishments:
Garden Gem
Holiday Rhinestone Jewels
Iridescent Rhinestones

Tools:
Paper Trimmer
Paper Snips
Fringe Scissors
Cut and Emboss Machine
Assorted Clear Stamp Blocks
Stampin' Seal Adhesive
Art Glitter Glue (available on Amazon)

Thanks for stopping by. I'd love to know in the comments who is your life would love a spring sampler as home decor?


Thursday, December 30, 2021

OnStage at Home Make and Take Alternate Ideas

Here are three ideas to inspire you! I used the Hand-Penned Designer Series Paper, Hand-Penned Petals Stamp Set, and Penned Flower Dies for my OnStage at Home make and take cards last month.


The card above uses an inlaid technique for the flower bunch. You just die-cut out the images twice and build the bouquet the way you want it. I did put some scotch tape on the back for security.


This card used sponge daubers and ink pads to lightly color the flower image. I had not done this technique before and it took a little practice to keep the ink light and airy. 
I am also the type of person who likes even borders, but I went out of my comfort zone and put the papers at interesting angles. It didn't hurt too much LOL!


This card used also used sponge daubers and ink pads to lightly color the flower image.  I think this card is my favorite of the three shared with you today!

Give these ideas a try! Thanks for looking today!


#stampinwitheva #sudemo #floralcards

Sunday, October 31, 2021

Happy Halloween With One Extra Card for YOU


I hope everyone has a Halloween that they love!


I had not tried a Criss Cross Card Fun Fold before. Oh my, they are so easy! 

You need one piece of 4-1/4" x 11" cardstock, scored at 5-1/2". Then you will make one diagonal cut on your paper trimmer from the scoreline to the downward front corner. The cardstock piece you cut off is flipped over and will become the other front piece once the Designer Series Paper is attached.

 However, don't use one-directional Designer Series Paper like I did. I wanted to use the Cute Halloween Designer Series Paper, but guess what? It was one-directional, so I ended up using two pieces instead of the one 4" x 5-1/4" piece that you need to slice diagonally and flip over one side. Both of the scalene triangles will fit precisely on the front cardstock pieces.

I also dug through my leftover Paper Pumpkin kit materials and came up with the cute Boo and skeleton to decorate the Scalloped Rectangle Die shapes that I die cut out. You can position those rectangles however you'd like. They are meant to cover up whatever you stamp inside on your card liner.


Just search YouTube for Criss Cross Cards as there are many videos to show you this fun fold.

Of course, don't forget to decorate your envelope flap either!

Have a Happy Halloween!


#stampinwitheva #sudemo
#stampinup #crisscrossfunfold

Monday, October 11, 2021

Treat Yourself to a Sweet Halloween Card

It's that time of the month again to share the cards that we made in our monthly Stamp & Chat classes in my home. Here is the first to enjoy:

Do you have a friendly Halloween Goblin or Ghoul that could use a sweet treat of a Halloween Card? If so make them this card and include a gift card for a favorite sweet treat place they can enjoy!

This card's layout was inspired by Julie Petrie.

Products used to create this card:

Some items are available to order here by clicking the words "Shop Now" 

or check out Etsy or Ebay for some great deals.

Thick Basic White card base
Basic White layer embossed with retired Brick Wall embossing folder
Pattern Party Designer Series Paper for canopy and envelope flap
Retired Large Scallop Edgelit Die
Very retired Spider Web Doilies
Cute Halloween 6" x 6" Designer Series Paper, fussy cut-out pumpkin
Retired Ice Cream Corner Designer Series Paper for ice cream cone
Ice Cream Builder Punch
Gorgeous Grape, Mango Melody, and Old Olive cardstock scraps for punched scoops
Scrap of Basic White for tag that will be fussy cut
Sweet Ice Cream stamp set
Celebration Tiding stamp set for spider
Basic Black Stampin Write marker for the drawn line
Memento Tuxedo Black ink
Matte Black Dots
Basic White Envelopes
Stamp and Emboss Machine
Adhesives and Dimensionsals

Halloween will be here before we know it, so I hope this card idea will help you create your Halloween cards. 


#stampinwitheva #sudemo
#stampinup #halloweencard

Monday, May 10, 2021

Make Your Own Designer Series Paper Four Card Set

I have two sets of four cards to share with you today. The idea to make your own Designer Series Paper has been around for a while I believe, but I hadn't tried it. It is really fun and easy to do. You should give it a try.

Start with a stamp set that has a lot of similar images like the Forever Fern Stamp set does. 

Prepare 4 Basic White card bases 5-1/2" x 8-1/2", scored at 4-1/4"

Select the ink colors you want to try. I used:
Crumb Cake for the mini dots
Garden Green
Pretty Peacock
Pear Pizzazz
Just Jade
Rich Razzleberry
Gorgeous Grape

Decide on what color cardstock you want to layer with. Cut four pieces 4" x 5-1/4".

Cut one piece of Basic White 7-1/2" x 10-1/2" and divide into fourths with a light pencil line intersecting the middle. That pencil line will end up being your cutting line following the stamping.


So you start stamping all the leaves images, each in a different color. It will look like a cross on your Basic White cardstock. Finish with the dot stamp to fill in some of the space.

Cut the sheet into fourths and start assembling your cards. You can choose to make them all vertical or all horizontal like the second set of photos I've included.

I used a 1-3/4" and 2" circle punch and my choice of greetings.  The vertical set I stamped in a matching ink. The horizontal set I stamped in Tuxedo Black Memento Ink.  Assemble your circle layers and attach to card front with dimensionals.

Finish off with any embellishments you have that match your color scheme.


Of course this card set isn't complete without matching envelope flaps. This four card set would make a wonderful gift for a friend, or neighborly hostess gift.

I hope you'll give it a try!
Happy Stamping!


If you enjoyed this post, please be sure to click on the buttons below…


#stampinwitheva #stampinupproducts