Pages

Monday, January 31, 2022

Hello Ladybug Valentine to Melt For

Have you ever caught a ladybug? These Ladybugs are easy to catch and make into a beautiful card. 

Ladybugs are a promise that spring is just around the corner. But in the meantime, they sure make a fun Valentine to give family or friends. This card was inspired by Christie Redding but I made it my own with a different greeting and different black dots on the wings.


Don't you just love the bold color combination of Black, White and RED? It is one of my favorites!


Products used in creating this card:

Basic White cardstock for card base
Real Red cardstock for layer and ladybug wings
Scalloped Contour Dies
Ladybug Builder Punch
Pattern Party Designer Series Paper for plaid layer (3-1/4" x 4-9/16") and ladybug bodies
Cardstock Vellum
Retired Stitched Be Mine Dies
Sweet Ice Cream stamp set for greeting
Memento Tuxedo Black Ink
Retired Heart Punch
Resin Hearts embellishments
Mini and Regular Dimensionals
Paper Trimmer
Take Your Pick Tool
Paper Snips for trimming Vellum Heart
Your favorite Adhesives

Envelope Flap - 2-3/8" x 6" piece of Hand Penned Designer Series Paper


A little story...

This ladybug's spots are actually very retired flat metal adhesive dots that came in a variety of color families at least 7-8 years ago when I was a newish demonstrator. As the years have passed, I have used a few here and there, but for this class card I needed 12 dots per card and my customers wanted a total of 22 cards over those three class sessions I had last weekend. So I needed 264 dots! I didn't have 264 black dots! So what did I do? I pulled out my black Sharpie pen and started coloring those dots. That worked perfectly! So I solved two problems at once - use up some old dots and create plenty of black ones for those ladybugs! Once again - Sharpies came to the rescue!

I encourage you to give this card layout a try and make it your own! The majority of the products used in this card are current and available at my online store at the yellow box link below.

Happy Stamping!


#stampinwitheva #sudemo

Friday, January 28, 2022

What's Cookin'? Blondie Bars and a Beary Lovely Valentines Card

What's Cookin' for Valentine's Day in your house? I've cooked up a "beary" cute card and tried a new bar cookie recipe last night.

I made some Valentine Blondies Bars that I found on Pinterest from https://ahelicoptermom.com/valentine-blondie-bars-recipe
for my Valentine Sampler Class tonight and tomorrow morning. I'll be posting about the Sampler with the next week.

True confession time! I made one mistake and accidentally added 1 teaspoon of baking soda instead of the 1/4 teaspoon, so my bars are more "poofy" than the bars in the recipe photo. The other thing I did was I only had Valentine Peanut M&Ms instead of just the Milk Chocolate Valentine M&Ms. But the good news is you can hardly taste the peanuts, the chocolate chips cover them up nicely. Of course, I had to try a couple to make sure they were edible for my guests. I give them 4.5 out of 5 stars due to my baking soda boo-boo.


I had so much fun creating this What's Cookin' Beary Lovely Valentine's Card for you! This card uses a wide variety of current and retired products, but I think it turned out so cute.


Do you get the greeting? A dash of kindness relates to the salt and pepper shaker. A spoonful of love relates to the spoon in the bowl. I thought that greeting went so well with my original card design.


The Baby Bear Stamp Set (Spring 2017) is retired. The set has three stamps to build the bear, but I only used two of the stamps. Crumb Cake ink for the base layer, and Soft Suede for the facial features.  I wanted to show some fur so I dusted off my very old Fiskars Deckle Edged Scissors to fussy cut around him. What do you think? Does he look furry?


To get that bowl full of hearts and the spoon "in" the bowl, I carefully cut about 3/4 of the way across the bowl just above the front stamped rim edge. After I added the spoon and a few hearts, I scotch taped on the back side of the bowl to hold it all together. Raised the bowl up with dimensionals as I set the bowl in front of the bear, then continued to add the mini hearts with mini dimensionals until I had a pleasant amount.

Here are the products I used to create this card:

CURRENT Products:
Basic White Thick cardstock for card base
Hand Penned Designer Series Paper for card front 
Stitched with Whimsy Dies
Tasteful Label Dies
Shimmery White cardstock for tag
What's Cookin' Stamp Set
Real Red Ink - bowl and tag
Cajun Craze Ink - salt and pepper shakers
Crumb Cake Ink - first layer of bear and spoon
Soft Suede Ink - facial features on bear
Die Cutting Machine
Paper Trimmer
Glue Dots
Dimensionals
Mini Dimensionals

RETIRED Products:
Baby Bear Stamp Set
Triple Heart Punch, use the smallest heart to fill the bowl
So Saffron striped Designer Series Paper
Love You Always Foil set
Real Red Foil
1/8" Whisper White Sheer Ribbon

Not a Stampin' Up Products:
Fiskars Deckle Edged Scissors (photo to help) originally from big box craft store long ago

The current products are available at my online store by clicking the yellow box link below. The retired products might be able to be found on eBay, Etsy, or other selling sites.

I'd love to read your comments about the bear card or if you tried the recipe. 
What do you think about both or either?


#stampinwitheva #sudemo

Thursday, January 27, 2022

Friends Are Like Seashells Valentine Card

I love visiting the ocean walking up and down the sand, watching the waves, and looking for seashells. I haven't been in a while, but I feel the ocean calling me! Need to breathe that salty sea air and maybe get some saltwater taffy too!

Until I saw this card designed by Su Mohr I would have never in a million years thought of a beachy Valentine card using the Friends are Like Seashells products, but since I have the products I thought I'd give her layout a try. (I did change it up a bit!)

HINT:
Using the Seaside Shells Dies, die-cut your piece of Basic White.
 You won't be using the entire Seashells 3D Embossing Folder, just the upper right corner area. Be sure to match your die-cut to the folder image so it will emboss correctly before you run it through your die-cutting machine.

A perfect Valentine for all your beach lovin' friends!


Close-up picture for the layering above.


Another close-up for the embossing details.

Here are the products needed to make this card:

Basic White, Pool Party, and Soft Sea Foam cardstock
Sahara Sand Foil 
Retired Small Heart punch
Sweet Talk Designer Series Paper for the two conversation hearts.
Seaside Shells Dies 
Seashells 3D Embossing Folder
Scalloped Contour Dies
2021-23 In Color Jewels - Soft Succulent
Pattern Party Designer Series Paper for envelope flap
Adhesives, Dimensionals, Glue Dots
Die Cutting Machine
Paper Snips
Take-a-Pick Tool

If you'd like to try this card, the majority of the products are available to purchase at my online store at the yellow box link below.

Have a wonderful day being creative!


#stampinwitheva #sudemo

Wednesday, January 26, 2022

Sweet Conversations Double Heart Card

 Hello Stamping Friends! Sorry to be absent here on the blog for the last couple of days, but I have been training my replacement at my church bookkeeping job. I only have two more training days and I am "free" starting Feb. 1, 2022!  I hope I've taught her everything she needs to know!

Last weekend I held my in-home stamping classes with a great group of 14 ladies over three sessions. This cute card I cased from Simply Sweet in Ink Designs because it was so darn cute! It was a popular one in class too!

The Sweet Talk Suite in the January - June 2022 Mini Catalog makes up a beautiful card.


The envelope flap paper was retired "From My Heart" Designer Series Paper. Cut a piece 2-3/8" x 6." Adhere and trim off excess.


The Sweet Conversations stamp set makes for a cute inner card greeting and accent!


Here are the details you'll need to make your own cute card:

Cutting and Assembly Directions:

Blushing Bride card base - 5-1/2" x 8-1/2", scored at 4-1/4"

Sweet Talk Designer Series Paper (DSP) - two pieces - 1) 2" x 4" and 2) 3-1/4" x 4"

Scotch tape the two DSP pieces together on the backside before adhering to the card front.

Basic White cardstock cut 4" x 5-1/4" for inner card liner. 

Stamp with word greeting and heart border in Real Red ink, and the heart shading in Blushing Bride ink before adhering to the card inside. 

Next, you'll need 2-3/4" square of Highland Heather and Blushing Bride cardstock for the scalloped heart using the Heart Punch Pack.

Two DSP pieces 2-1/2" square with the plain heart punch from the Heart Punch Pack
.
Using the Sweet Heart Dies you'll die cut one 1-1/2" square piece of Blushing Bride cardstock. Then with a 1-1/2" piece of Basic White stamp another heart like you did on the inner layer exactly the same, then die cut.

Assemble the three heart layers like the photograph. Using Dimensionals arrange and attach to card front as shown.

Tie a pretty bow with the Real Red Faux Linen Ribbon and attach it to the left heart with a couple of glue dots.

Finish the card with two red rhinestone jewel embellishments as shown.

What do you think? Darling card isn't it? Perfect to give to someone you LOVE for Valentines Day.

All the products used in this card can be purchased at the yellow box link below in my online store. 
If you don't have your own Demonstrator, I'd love to be yours! 

Have a Sweet Day!


#stampinwitheva #sudemo

Friday, January 21, 2022

You Can Make This Bridge Card Easily

 Do you ever have one of those days where you have such good intentions to get something accomplished in the morning, but you finally get it done by late afternoon. That was me today.

When I got up this morning I went straight to my stamp room in my jammies to get busy cutting 70 card kits for tomorrow's three sessions of classes in my home. Breakfast was Hershey's nuggets and I kept on slicing, scoring, gathering, and putting the pieces in the envelopes for each stamper as the minutes ticked by.

I listened to a mix of Facebook - Dry Bar Comedy and my direct sales coach Brenda Ster continuing with her valuable advice on making my business better every day.

By 11 am I was getting hungry. So downstairs I went to grab a couple of slices of pizza from the other night. I sat at my desktop computer munching my pizza when I realized, "Oh no, today's blog post posted an hour ago with nothing in it but a photo and my signature stuff at the bottom.  Yikes! 

It's embarrassing to admit this isn't the first time this empty posting has occurred. So I quickly deleted that post and set up a new one for late this afternoon at 5 p.m.

I finished my pizza, took a shower, then went back to slicing and dicing for a couple more hours. I'm 98% done with all the prep work.

At 3 pm I needed to buzz to the grocery store for the munchies I needed for class tomorrow. That took an hour because I kept running into people I knew. It was good to see them, just bad timing for me.

So here it is 4 pm and I'm back at the desktop computer in my office to write about the last card I'm sharing with you from the Friendly Hello Stamp Set and matching Designer Series Paper this week.

A Bridge Fun Fold Card!


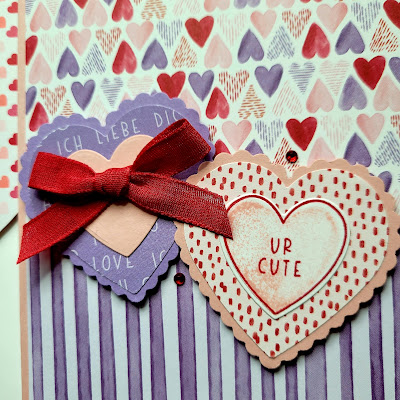
I hope you've loved seeing all the beautiful designs that are part of this Designer Series Paper (DSP). I absolutely LOVE that bold "Hello Friend" stamp too.

The best part about a Bridge Fun Fold card is it folds down to fit in the standard A2 envelope that Stampin' Up! sells.

Here's how to create this card:

Cutting Directions:
Petal Pink Card Base 4-1/4" x 8", score at 1-1/4", 2-1/2, 5-1/2", and 6-3/4" 
2 pieces of Side Panel DSP - 1" x 4"
Center back DSP with Bird Stamped in Memento Tuxedo Black Ink - 3" x 4"
Petal Pink Bridge piece - 1" x 5-1/2"
DSP for Bridge 3/4" x 5-1/4"
Pool Party Tag 1-5/8" x 3"
Basic White Tag with greeting Stamped in Memento Tuxedo Black Ink - 1-3/8" x 2-3/4"

Assembly:
With a bone folder crease all the score lines.
Adhere the center back section DSP with bird image.
Adhere the two side panel DSP pieces.
Adhere the Bridge DSP to the Petal Pink Bridge piece (don't attach it yet!)
Stamp and Assemble your tag.
Tag is glued to the bridge starting about 1/2" from the left end of the bridge.

Now is the time to attach the bridge piece, but you MUST fold the left side in so it lays flat. 
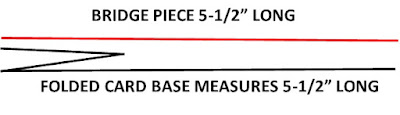
See Diagram below:
The bridge piece is attached 1/2" from the bottom of the card and lines up with the sides of the base as shown in the above diagram. You only put glue on each end of the bridge. Approximately a 1" square area on each end. Press firmly to the folded card base.

You are welcome to add embellishment if you desire.
As always add a 2-3/8" x 6" piece of DSP to the envelope flap. Glue well, When dry, trim off excess.

Stand up and admire your beautiful card!

Now if you have loved all the card designs this week, now is the perfect time to place a $100 online order with me before shipping and tax, so you can receive this bonus reward set for free! A value of $28!

Just click on the yellow box below and you'll go straight to my online store. Stock up on cardstock, adhesives, a new Memento Inkpad, some blades for your paper trimmer, envelopes, and whatever else your stash needs to be replenished with. Even check out the Clearance Rack. There are always some great deals there! Then when you are checking out, you can add #159990 to your Sale-a-bration Rewards area and the Friendly Hello stamp set and DSP will be arriving in your order box with all your other products right to your door. 

If you don't already have a Stampin' Up! Demonstrator I'd love to be yours!

Thank you! Phew - made it by 5 pm!


#stampinwitheva #sudemo

Thursday, January 20, 2022

Pretty Friendly Hello Book Binding Card

Want to make a very easy card design? Yes? Then this one packs a fun fold into an easy card to create.

This design is called Book Binding Fun Fold. It looks extra pretty with the Friendly Hello Designer Series Paper from the current Sale-a-Bration brochure with its matching envelope. 

You can receive this stamp set and Designer Series Paper by making a $100 qualifying order before shipping and tax at my online store link below my name at the end of this post.


Here's how you can create this card:

Cutting:
Petal Pink Card Base - 4-1/4" x 11", scored at 4-1/4" and  5-1/2"
Two pieces of the Designer Series Paper (DSP) 1" x 4" strip and 4" square piece
Basic White inner layer - 4" square
Scraps for tag of your choice
I used Granny Apple Green ink.
Any ribbon that coordinates with DSP. The ribbon I used is retired but 5/8" wide.

Assembly:
With your bone folder or fingernail, crease your score lines. 
With strong adhesive adhere just the narrow section to the card back, so it will open like a book.
Adhere the DSP to both front sections.
Prepare and stamp your tag, then mount on a cardstock piece. 
Apply to the card front with dimensionals.
Wrap matching ribbon completely around the end of card, tying with a bow. Secure bow with glue dot.
Add embellishments of your choice.

There is one more card project to go tomorrow using this Sale-a-Bration product set. I'll be showing you how to make a Bridge card. Another pretty but easy card to make.

See you tomorrow!


#stampinwitheva #sudemo

Wednesday, January 19, 2022

Two Friendly Hello Sectional Card Ideas

Hey there, thanks for coming back to see the next couple of card designs I have for you. Today's theme is Sectional cards, meaning more than one piece of paper makes up the card front. The Friendly Hello stamp set and Designer Series Paper (DSP) works so nicely with this style of card.


Three Piece Sectional!

Cutting Dimensions & Directions:
Card Base - 5-1/2" x 8-1/2", score at 4-1/4"
2 pieces of Basic White layer 4" x 5-1/4" (one is for card liner)
Striped piece 1-7/8" x 5"
Pool Party floral  1-3/4" x 2-1/2"
Fresh Freesia dot 1-3/4" x 2-3/8"

The gap between the sections is approximately 1/8" around each piece. Adhere the Basic White and DSP layer directly to the card front.

Wrap Fresh Freesia Ribbon around the entire front of the card, thread on your stamped tag, and finish tying the bow. Use a glue dot to secure the bow. I added a dimensional under the end of the tag to secure it to the card front.

No embellishment is needed this DSP does all the work!

Adhere the Basic White inner layer to the inside of the card.

Decorate your envelope flap with a coordinating piece of DSP 2-3/8" x 6" adhered securely. 
Trim off excess.


Coordinating Triple Panel Card

Cutting Dimensions & Directions:
Card Base - 5-1/2" x 8-1/2", score at 4-1/4"
Basic White layer 4" x 5-1/4" for inner card layer
Three coordinating pieces of DSP each 1-3/4 x 3-3/4"
Scotch Tape those three pieces on the reverse side.

Basic Black cardstock 4" x 5-1/4" and adhere to the panel letting an even amount of black show on the top and bottom. 

Wrap a 6" piece of Fresh Freesia 3/8" Organza Ribbon across the front and secure ends with scotch tape on the reverse side. Then adhere the entire front layer to the card base. 

For "Hello Friend" tag - cut Basic White 1-3/8" x 2-5/8"
Stamp greeting with Memento Tuxedo Black ink
Adhere Basic Black to back of tag 1-5/8" x 2-5/8" to mimic the card front. Attach to card front with dimensions at an angle.
Finish with Tied  Bow attached with glue dots. Embellish with Matt Black Dots, one in each corner.

Adhere the Basic White inner layer to the inside of the card.

Decorate your envelope flap with a coordinating piece of DSP 2-3/8" x 6" adhered securely. 
Trim off excess.

I hope you love today's designs. Invite your stamping friends to visit my blog. If you haven't subscribed to my email list yet, please do at the tinyurl link below my name. You'll receive a free 14 card One Sheet Wonder tutorial that can be used any time of year!

Tomorrow's post will be a Book style fun fold. See you then!


#stampinwitheva #sudemo

Tuesday, January 18, 2022

Friendly Hello Easy Horizontal Split Cards

Welcome back! In yesterday's blog post I shared with you two easy cards using the Angle Cut technique. Today's post shows the fun you can have when you cut one piece of the Friendly Hello Designer Series Paper horizontally wherever you'd like. Then you have the hard decision of deciding where the smaller section will go when you flip it over. Top or bottom of the card front? Decisions, decisions!


Cutting Dimensions:
Card base - 5-1/2" x 8-1/2", scored at 4-1/4"
Basic White or Basic Black depending on the color combination you want to achieve - 4" x 5-1/4"
Friendly Hello Designer Series Paper (DSP)- 3-3/4" x 5"
On the 5" side of the DSP decide where you would like to cut it into two pieces. My cut is 2", so that way I have a piece 2" x 3-3/4" and a flipped over piece 3" x 3-3/4". Scotch tape them together on the reverse for ease of applying to the black or white layer.

Assembly:
Next, decide if you will be stamping the greeting of your choice directly onto the DSP with Memento Black ink, or onto a tag/shape of your choice.

After adhering the  DSP to the next layer, then cut a 6" piece of your choice of coordinating ribbon. Wrap the ribbon ends around to the backside and scotch tape down. Then you can decide if you want to adhere the two layers directly to the card front (like the above card) or raise the layers with dimensionals (like the lower card).

Tie a bow and attach it to the flat ribbon with glue dots. Attach your greeting if it is a separate piece.
Embellish as desired.

Decorate your envelope flap with a 2-3/8" x 6" piece of matching DSP and trim off the excess around the flap edges.


The beautiful colors in the Friendly Hello Designer Series Paper are amazing! I'm loving everyone I've worked with so far. 

Be sure to come back tomorrow where we will be making card fronts with three pieces of DSP. It's a great way to use up scraps! 

Thanks for stopping by!


#stampinwitheva #sudemo

Monday, January 17, 2022

Make Easy Angle Front Cards Using Friendly Hello

Do you love getting something for free? I sure do! I always love the Sale-a-Bration months throughout the Stampin' Up! year. Last year and this year Stampin' Up! is having a total of 4 months of extras! That's one-third of a year of extra value!

Sale-a-Bration is the months of January and February, and then again in July and August. These timings coincide with the release of the two Mini Catalogs. There is always something new to want from these catalogs so why not get another new product for free too!

We, paper crafters, are always needing to resupply something in our stash (like cardstock or adhesives), so if you plan ahead a bit and accumulate your shopping list to equal either $50 or $100 increments before shipping and sales tax, you can select additional "rewards" from the Sale-a-Bration brochure. 

This week I'll be focusing on the BIG Reward of the Friendly Hello Stamp Set and matching Designer Series Paper. I hope you'll be inspired by some easy and quick cards to make with this set.


Here's the set that you can receive for FREE with a qualifying $100 order.
The value of these items are at least $28! A 13 piece photopolymer stamp set and 12 sheets of 12" x 12" double-sided Designer Series Paper That's a great reward for you!

The colors in this set are Basic Black, Fresh Freesia, Granny Apple Green, Petal Pink, Pool Party and Shaded Spruce.


The two cards I'm sharing today use the angle cut technique to create two patterned card fronts. The cool part about this cut is all you have to do is cut two pieces of 3-3/4" x 5" Designer Series Paper. Stack them together and cut them at your desired angle at the same time with your paper trimmer. Voila! Then switch two of the four pieces and you get two card fronts from that. I chose to do one landscape and one portrait mode. Just scotch tape the two angled pieces together before adhering to your next layer.


Have you ever tried stamping directly on Designer Series Paper?  Don't you think the greeting above and the bird on the branch below look good?  All you have to do is to make sure your stamp is well inked and HOLD it down to the Designer Series Paper with EVEN pressure for at least five seconds. That gives the ink a chance to absorb into the printed paper. Gently lift the stamp away from the paper.

Don't forget to add a 2-3/8" x 6" piece of Designer Series Paper to your envelope flap. Glue securely, let dry, then trim off the excess. That way to get a stylish set to give to a friend or family member!


Cutting Instructions: 
Pool Party cardstock - 5-1/2" x 8-1/2", scored at 4-1/4"
Basic Black cardstock - 3-7/8" x 5-1/8"
Friendly Hello Designer Series Paper - 3-3/4" x 5" 2 pieces for angle cut
Basic White card liner - 4" x 5-1/4"

Supplies:
Clear Stamp Blocks
Paper Trimmer
Memento Tuxedo Black Ink
Adhesives of your choice plus glue dots
Dimensionals
Ribbons of your choice
Scotch Tape for ribbon ends on the card back
Your choice of tags (I used an extra one I had leftover from a previous Paper Pumpkin kit.)

Set a reminder to come back to my blog all week to see the rest of the cards I've designed for you!


#stampinwitheva #sudemo
#saleabration

Thursday, January 13, 2022

Sale-a-Bration Fun!

Hey Friends, give this short video a view to see how wonderful Sale-a-Bration is!


Starting on Monday I'll be sharing card ideas using some of these products I've received free with my preorders when I spent $50 before shipping and tax. 

I hope you will be inspired.

Don't forget to subscribe to my email list here and receive your free 14 card One Sheet Wonder tutorial from me. If you don't have your own Stampin' Up! Demonstrator I'd love to be yours!


#stampinwitheva #sudemo #saleabration