Pages

Thursday, June 30, 2022

Amazing Silhouettes Stamp Set - Stamp and Chat Class

The Amazing Silhouettes stamp set is a nature set, but done in a negative image, meaning, the border area is what gets inked and the image stays white or whatever color of cardstock you are using. I decided to go bold with using Granny Apple Green cardstock along with Basic White cardstock.

This card was inspired by Inkyfingers Papercrafting, but I made it my own.


The coloring technique I used was to ink up the image in Granny Apple Green ink first, then with a sponge dauber I gently added Bermuda Bay ink around the edges only with a light touch. With both colors on the stamp, I gave it a big "breath of life" breath, then pressed the stamp to the paper. Isn't it beautiful? I love this technique but don't do it often enough. 


To make the card, cut a Granny Apple Green card base 5.5" x 8.5", scored at 4.25".

Basic White Layer 4" x 5.25", dry embossed with the Hive 3D Embossing Folder. Adhere to card front.

Adhere an exact same size layer of Basic White on the inside of the card for your future message.

Strip of Granny Apple Green cut 2" x 4.25" adhered in the middle to the Hive layer.

Using the Deckled Rectangle dies, cut one piece out from Granny Apple Green, and a slightly smaller piece from Basic White.

Stamp the Happy Birthday greeting from the Go To Greetings Stamp set in Bermuda Bay ink.

Stamp the leaf image next after doing the two color dauber technique mentioned above.

Attach the two layers together and raise up on dimensionals on the card from.

Embellish with bling of your choice.

Add a decorated flap to your envelope from a coordinating piece of Designer Series Paper in your stash cut 2-3/8" x 6". Adhere and trim excess.


Go Straight to My Online Store with Filled Shopping Cart for You

The shopping cart is filled with the current products used to make this card.  You will need to creatively substitute for products not on the list which have retired. The tools listed below are not added, but you sure can. You can delete anything out of the cart you already have or add additional products you need.

Amazing Silhouettes Happy Birthday Card

146990 Granny Apple Green Cardstock $9.25

159276 Basic White Cardstock $10.25

157995 Hive 3 D Embossing Folder $9

159173 Deckled Rectangle Dies $30

157814 Amazing Silhouettes Stamp Set $22

158737 Go to Greetings Stamp Set $24

147096 Bermuda Bay Classic Stampin’ Pad $8.00

133773 Sponge Daubers $5

147095 Granny Apple Green Classic Stampin’ Pad $8.00

Retired – Rhinestone Waves Basic Jewels

9 current products in shopping cart - total cost $125.50 before shipping & sales tax.

If the shopping cart doesn't match my quantity and total above that means some items are currently unavailable, but should be returning to inventory pretty soon when more are received. 


Adhesives

104430 Stampin’ Dimensionals $4.25

144108 Mini Dimensionals $4.25

152803 Stampin’ Seal Adhesive $8

152814 Stampin’ Seal Refill $5.50

103683 Glue Dots $5.25


Glitter Glue from Amazon

Tools

152392 Paper Trimmer $25

152391 Cutting Blades Multipack $12

103579 Paper Snips $11

149653 Cut & Emboss Machine $125

150673 Mini Cut & Emboss Machine $63

144107 Take Your Pick Tool $10

147042 Simply Shammy $8.50

Clear Stamp Blocks various sizes on page 149 of Annual Catalog

I'd love to know in the comments if you have ever done this dauber technique before. If you haven't, will you give it a try soon?

Join my Sunflower Friends team at https://evadietz.stampinup.net/

Please contact me anytime if you have any questions 
or 
stampinwitheva@gmail.com

Wednesday, June 29, 2022

Wonderful World Sale-a-Bration Preview Card - June Stamp and Chat Class

As I was creating cards for my June Stamp and Chat classes, I wanted to share a card from the upcoming (on July 1, 2022) Second Sale-a-Bration offering. This original card design used the Wonderful World stamp set and matching Designer Series Paper which will be free with a qualifying $100 purchase. These two products have a total value of at least $28. 

The bachelor button floral stamp caught my eye first, so I designed with that in mind. I used Orchid Oasis and Mossy Meadow Stampin' Write Markers to color the cling stamp in their individual sections and then gave it "the breath of life" to stamp it on the Basic White cardstock piece. I fussy cut around the image and mounted it on Rich Razzleberry cardstock and mirrored my previously cut edge. Set that aside for a few minutes.


This Rich Razzleberry card base is 4.25" x 11", scored at 5.5". 

The Wonderful World Designer Series Paper layer is 4" x 5.25". Adhere to card front.

Use a 4" x 5.25" layer of Basic White cardstock adhered on the inside of the card to write your personal message.

The Orchid Oasis Flap starts out as a 4.25" x 2.25" piece.  Use the "pocket" edge die from the Basic Borders Die set to create the "flap". Then score 1/2" on the opposite long side which will be attached to the back of the card opening. Using a 1/4" hole punch, punch a hole near the pocket tip of the flap for the ribbon to thread through.

A 22" long piece of Daffodil Delight Ruched ribbon is wrapped around the card. Feed the top piece ot ribbon through the hold in the flap, even up the ends, then tie a bow on the Orchid Oasis flap area.

Now attach your prepared Bachelor Button piece directly to the card front, as that is what will hold the closing ribbon in place.

The Friend tag is a 2" x 3/4" piece of Basic White cardstock stamped in Rich Razzleberry ink, mounted on a 2-1/8" x 7/8" piece of Orchid Oasis cardstock. Raise on dimensionals placing it over the base of the floral image.

Embellish with bling of your choice.

Decorate your Basic White envelope flap with a 2-3/8" x 6" piece of coordinating Designer Series Paper. Adhere and trim off excess.

Now you have a unique, one-of-a-kind card!


Go Straight to My Online Store with Filled Shopping Cart for You

The shopping cart is filled with the current products used to make this card.  You will need to creatively substitute for products not on the list which have retired. The tools listed below are not added, but you sure can. You can delete anything out of the cart you already have or add additional products you need.

Flap Over Fun Fold Card

115316 Rich Razzleberry Cardstock $9.25

159267 Orchid Oasis Cardstock $9.25

155558 Basic Border Dies $29

159238 Happiness Abounds Stamp Set for greeting $23

147091 Rich Razzleberry Classic Stampin’ Pad $8

159276 Basic White Cardstock $10.25

147158 Set of Neutrals including Mossy Meadow Stampin’ Write Marker $30

159219 Set of 5 including Orchid Oasis Stampin’ Write Marker $15

159236 Basic White Medium Envelopes $7.50

Retired – Daffodil Delight Ruched Ribbon

Retired – It’s My Party Enamel Dots (Daffodil Delight)

¼” hole punch – non Stampin’ Up!

9 products without the Sale-a-Bration freebie, cost $141.25
Select 159918 Wonderful World Stamp Set & Wonderful World Designer Series Paper – FREE with $100 purchase before Ship/Tax

If the shopping cart doesn't match my quantity and total above that means some items are currently unavailable, but should be returning to inventory pretty soon when more are received. 


Adhesives

104430 Stampin’ Dimensionals $4.25

144108 Mini Dimensionals $4.25

152803 Stampin’ Seal Adhesive $8

152814 Stampin’ Seal Refill $5.50

103683 Glue Dots $5.25


Tools

152392 Paper Trimmer $25

152391 Cutting Blades Multipack $12

103579 Paper Snips $11

149653 Cut & Emboss Machine $125

150673 Mini Cut & Emboss Machine $63

144107 Take Your Pick Tool $10

147042 Simply Shammy $8.50

Clear Stamp Blocks various sizes on page 149 of Annual Catalog

I'd love to read a comment about my original card design. What do you think of it?

Join my Sunflower Friends team at https://evadietz.stampinup.net/

Please contact me anytime if you have any questions 
or 
stampinwitheva@gmail.com

Tuesday, June 28, 2022

Limited Edition Set - June Stamp and Chat Class

I loved this saying from the Limited Edition stamp set, because isn't that really what sending a card to a friend is? It tells your recipient that you are thinking of them and when they open the card, it kinda is like a paper hug. 

Using the package of new 2022-24 In Color 6" x 6" Designer Series Paper (DSP), it is easy to cut one inch squares and make this fun paper piecing design. 

Start with a Starry Sky cardstock base cut at 5.5" x 8.5", scored at 4.25". 

Then cut Basic White cardstock at 4" x 5.25". Don't adhere to the card front just yet. Using a pencil, measure and draw a faint line in the center of the Basic White piece. Erase exposed line at the end of all the square gluing.

You will start building your design from the center out. Make sure you start your first square on point about a quarter inch from the top edge. That way you have room for the greeting later. Keep adhering your squares as shown in the photo. The last two squares will have a little bit that hangs off and trim with your paper snips.

Stamp the saying in Starry Sky ink on the card front. On a small scrap of Basic White, stamp the saying again in Sweet Sorbet ink. Cut the "HUG" out and adhere on top of the other "HUG" to create the two tone effect.

Finish off with a couple 2022-24 Matte Decorative Dots. 

Use another piece of the other design of Starry Sky DSP to cover the envelope flap. Cut piece 2-3/8" x 6", trim excess. 

This card is so easy you could make one in every In Color!


What I love about this Limited Edition stamp set, is there are so many possibilities in how you can use this stamp set.  Labels, Tags, Cards, and so much more!


The shopping cart is filled with the products used to make this card. The tools listed below are not added, but you sure can. You can delete anything out of the cart you already have or add additional products you need.

In Color Squares Paper Hug Card
159263 Starry Sky Cardstock $9.25
159276 Basic White Cardstock $10.25
159253 In Color 6” x 6” Designer Series Paper Asst. $12
158754 Limited Edition Stamp Set $19
159212 Starry Sky Classic Stampin’ Pad $8
159216 Sweet Sorbet Classic Stampin’ Pad $8
159186 2022-24 Matte Decorative Dots $8
159236 Basic White Medium Envelopes $7.50

8 items in the shopping cart, total is $82.00 before shipping and sales tax.

If the shopping cart doesn't match my quantity and total above that means some items are currently unavailable, but should be returning to inventory pretty soon when more are received. 

Adhesives

104430 Stampin’ Dimensionals $4.25

144108 Mini Dimensionals $4.25

152803 Stampin’ Seal Adhesive $8

152814 Stampin’ Seal Refill $5.50

103683 Glue Dots $5.25


Tools

152392 Paper Trimmer $25

152391 Cutting Blades Multipack $12

103579 Paper Snips $11

149653 Cut & Emboss Machine $125

150673 Mini Cut & Emboss Machine $63

144107 Take Your Pick Tool $10

147042 Simply Shammy $8.50

Clear Stamp Blocks various sizes on page 149 of Annual Catalog

I'd love to know in the comments if paper piecing is a new technique for you, or if you have a favorite stamp in this set, or any other question you may have.

Join my Sunflower Friends team at https://evadietz.stampinup.net/

Please contact me anytime if you have any questions 
or 
stampinwitheva@gmail.com

Monday, June 27, 2022

June Stamp and Chat Class Card + Favor Box

Do you ever have something catch your eye, then you have to go find out what it is, and then purchase it? That is what happened to me with the Split Card Textures Dies. I started noticing other demonstrators using using them in their card creations and I had to get my own set. They were hiding in the 2022-23 Annual Catalog and I'd never noticed them! 

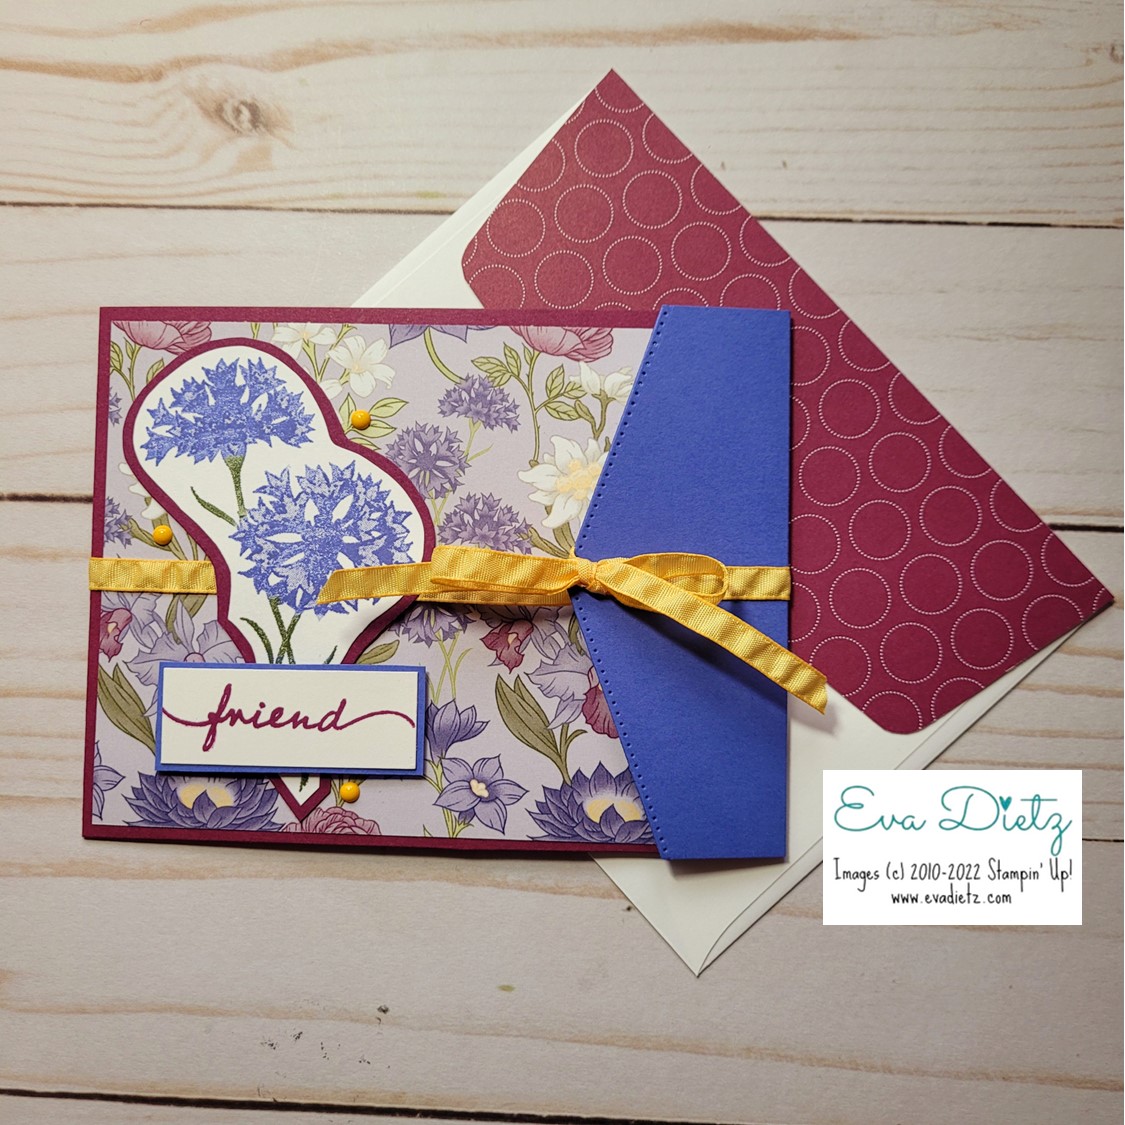
This original card was a popular card this past weekend at my Stamp and Chat classes. 

It is very easy to make with only 5 cardstock pieces, plus ribbon and embellishments.

Start with Evening Evergreen cardstock base cut at 5.5" x 8.5", scored at 4.25". Add inside layer of Basic White cut 4" x 5.25" for handwritten message.

Retired – Beautifully Penned Designer Series Paper (Sale-A- Bration freebie) but you can substitute whatever you think looks best from your stash of Designer Series Papers. Cut 4" x 5.25", then die cut with Split Card Texture die. Glue down to card front.

Pale Papaya cardstock cut at 3.25" x 4.25" and die cut with Scalloped Contours Die.

Stamp greeting from Happiness Abounds stamp set with Evening Evergreen ink near bottom of Pale Papaya piece.

Wrap a 5" piece of Evening Evergreen Organza ribbon around top of Pale Papaya layer. Secure with scotch tape on reverse side. Adhere Pale Papaya layer flat to card front as shown in photo.

Basic White cardstock cut 3" x 4", stamped in Memento Ink with Hand Penned Petals stamp set image. Die Cut out and affix with dimensionals to card front as shown in photo.

Add Evening Evergreen ribbon bow, glue dotted down as shown. Add bling of your choice.

Finish with a matching envelope flap of 2-3/8" x 6" adhered to back of envelope. Trim off excess paper.


The shopping cart is filled with the products used to make this card. The tools listed below are not added, but you sure can. You can delete anything out of the cart you already have or add additional products you need.

Hand Penned Happy Birthday Card

155574 Evening Evergreen Cardstock $9.25

159162 Split Card Textures Dies $35

155668 Pale Papaya Cardstock $9.25

155560 Scalloped Contour Dies $35

155070 Hand Penned Petals $22

155557 Penned Flowers Dies $30

159276 Basic White Cardstock $10.25

132708 Memento Tuxedo Black Ink $6

159238 Happiness Abounds Stamp Set for greeting $23

155576 Evening Evergreen Classic Stampin’ Pad $8

155573 Evening Evergreen 3/8” Open Weave Ribbon $7

159185 In Color Opal Rounds $8.50

159236 Basic White Medium Envelopes $7.50

Retired – Beautifully Penned Designer Series Paper (SAB)

Envelope Flap paper is retired

13 current products in shopping cart - total cost $210.75 before shipping & sales tax.

If the shopping cart doesn't match my quantity and total above that means some items are currently unavailable, but should be returning to inventory pretty soon when more are received. 

--------------------------------------------------------

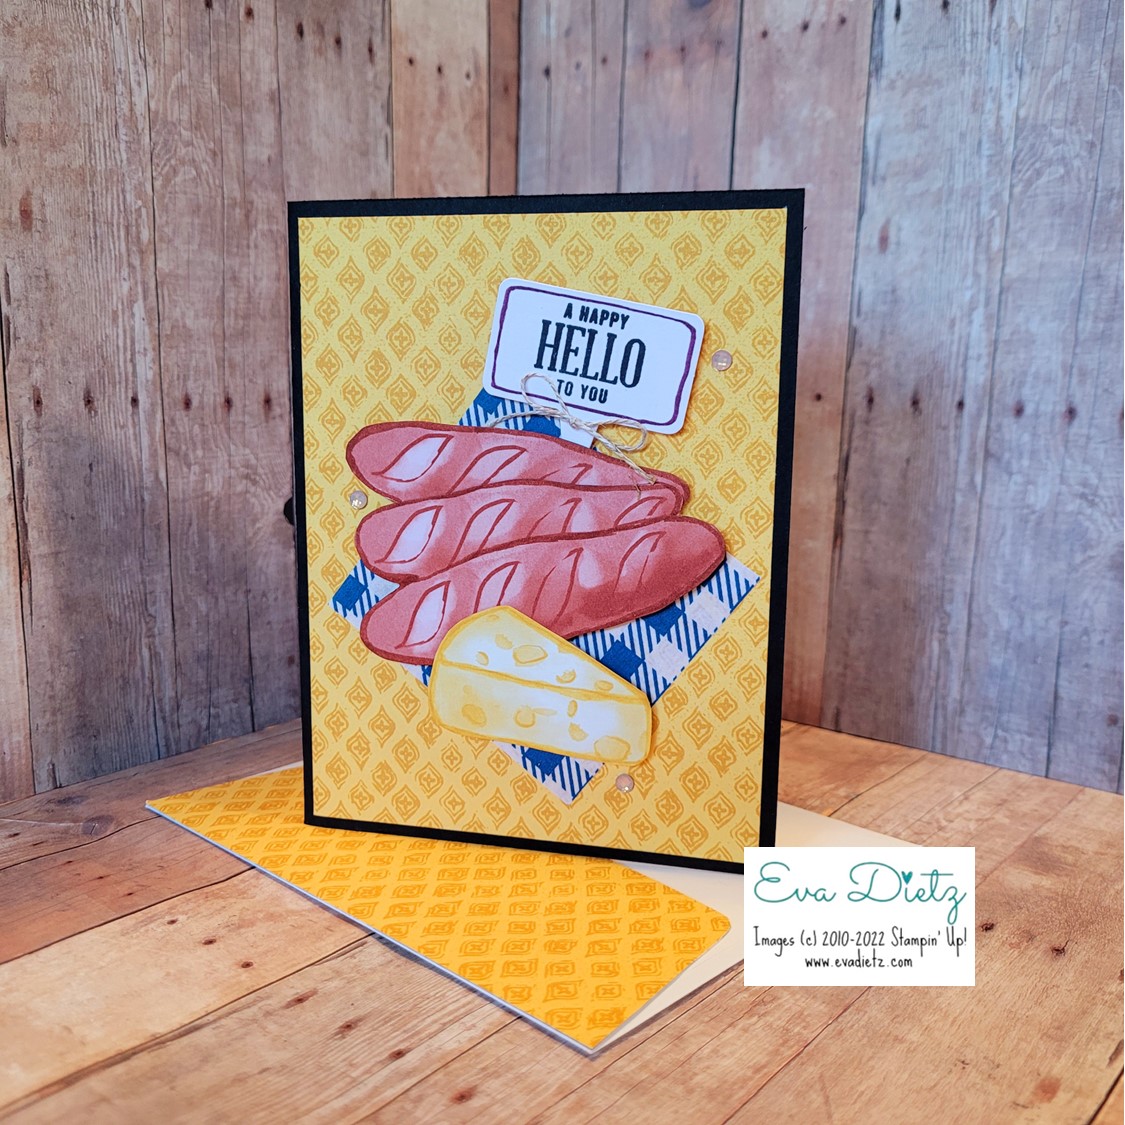
Every time I hold card classes in my home I always give my stampers a little table favor. This month was a simple one created with items I already had on hand. 

The mini pizza boxes received a top layer of Strawberry Designer Series Paper then I added a Sweet Strawberry stamped in Poppy Parade and Real Red on a punched out Basic White circle. Little greeting was in Memento ink. Heart embellishment was very retired and needed to be used up. Finished circle was raised on dimensionals.


Inside the mini pizza box were two different cards that were created with extra pieces from the June 2022 Pick of the Crop Paper Pumpkin kit I had just received plus other items I had on hand.  My guests loved there treat!


Below are additional tools you will need to cut, die cut, and assemble the card shown.

Adhesives

104430 Stampin’ Dimensionals $4.25

144108 Mini Dimensionals $4.25

152803 Stampin’ Seal Adhesive $8

152814 Stampin’ Seal Refill $5.50

103683 Glue Dots $5.25


Tools

152392 Paper Trimmer $25

152391 Cutting Blades Multipack $12

103579 Paper Snips $11

149653 Cut & Emboss Machine $125

150673 Mini Cut & Emboss Machine $63

144107 Take Your Pick Tool $10

147042 Simply Shammy $8.50

Clear Stamp Blocks various sizes on page 149 of Annual Catalog


Have you joined my email list yet? When you do, you will receive a free 14 card One Sheet Wonder tutorial!

Join my Sunflower Friends team at https://evadietz.stampinup.net/   Join Now

Please contact me anytime if you have any questions 
or 
stampinwitheva@gmail.com

Sunday, June 26, 2022

June Paper Pumpkin Kit Pick of the Crop

 When my June Paper Pumpkin kit arrived, I dug right in, which is not typical for me. I usually wait a few days to see what others are posting on the Facebook Paper Pumpkin Fan Club page. But not this time, I finished so fast I was able to post my alternative creations on the Paper Pumpkin Demonstrator Page and got lots of positive feedback. I hope you'll enjoy my creations below.


Each kit came with one small canvas bag that will hold some of the cards you create so you can give it as a gift.

The Hello was stamped in Night of Navy ink, looks black I know.
The lavender was stamped in Rich Razzleberry or you could stamp in Blackberry Bliss. I folded one of the left over tags in half, punched a rectangular hole, and stamped "for you" which came from a retired set. Soft Succulent 3/8" Organza Ribbon tied it to the handle.

These next three photos are of the kit cards made exactly following the instructions included.


When I was done with the 9 cards, there were a lot of assorted pieces left, so I started making alternative designs.


I had to trim the bread loaves as they looked like banana slugs to me.
The gingham tissue and greeting are from prior Paper Pumpkin kit leftovers I had around.


Next I decided to use the Jar Punch with the Rainbow Glimmer Paper and create some assorted Lavender cards.


As I was digging around through my older Paper Pumpkin kit leftovers I discovered I had some 3" x 3" Crumb Cake cards and matching "fruity" envelopes. So that got me creating with the (retired) Sweet Strawberry stamp set and matching Strawberry Builder punch. Also found I had some more Berry Delightful Designer Series Paper which coordinated nicely with my design ideas.


Next I located my Harvest Hellos stamp set and Apple Builder punch for the next set of cards below.


Back to the Berry Delightful DSP and the current kit blueberry stamp that I colored and punched out.


Next came the Full Basket dies to weave myself some baskets in Soft Suede to place the strawberries, blueberries, and trimmed small breads. I really like how all these turned out.


I repurposed some of the mini pizza boxes I had into holders for the 3" x 3" cards I created.


This June kit and all the extras I played with made these creations I'm sharing with you extra special! 
I hope you enjoyed viewing these ideas.

I'd love to know in the comments which of my alternate cards you liked the most.

Shop or Join at https://evadietz.stampinup.net/

Please contact me anytime if you have any questions 
or 
stampinwitheva@gmail.com

Saturday, June 25, 2022

Sharing Creativity Now Event Splendid Day Suite Gift Bag Finale

Hello! Today's the final day to celebrate the Creativity Now event from last Saturday with the beautiful gift bag that will hold the four cards made and shown earlier this weekhere on my blog.

Just as a reminder, these products will be live and available to order on July 1 at my online store (link at bottom) since they are part of the new July-December 2022 Mini Catalog.


Below is Stampin' Up!s sample. I think my project is darn close to the one below.


Here are my five projects all together. Overall they look very coordinated and would be a lovely gift for a neighbor or friend.


Now you can see the Splendid Thoughts stamp set and Splendid Stems Dies, the Soft Sea Foam Seam Binding Ribbon, the Open Leaf Trinkets, and Fine Sparkle Adhesive Backed Gems.


Splendid Day Designer Series Paper - all beautiful Foils in a variety of color shades.


I hope you have enjoyed seeing some new paper crafting ideas with the soon to be released Splendid Day Suite. So many elegant possibilities!

Shop or Join at https://evadietz.stampinup.net/

Please contact me anytime if you have any questions 
or 
stampinwitheva@gmail.com

Thursday, June 23, 2022

Sharing Creativity Now Event Splendid Day Suite Card 4

Sorry if I sound like I am complaining in today's blog post, but Card 4 of mine is a mish-mash of items and hardly looks anything like the sample. The biggest reason is I have misplaced my container of white embossing powder in my craft room somewhere.  That is very frustrating because I don't like not knowing where something is. The container isn't small either it is about 6" x 8" x 2" so that is why I'm so bugged about not being able to find it. I'll keep hunting. Hopefully it will surprise me soon!

But in the meantime, I resorted to using some retired Dazzling Diamonds Glitter Powder and that wasn't a great decision either. You know glitter goes everywhere! I have figured out to use a super sticky tape roller to keep the little sparkles under control, but a few escape anyway!

I had an extra white leafy die cut from Card 2 that I used in this card. 

Overall, this particular card isn't something I would make normally. It just seems so messy to me. What do you think? I'd love to know in the comments.


Be sure to return tomorrow to see the fabulous Gift Bag that will hold all four cards. It's going to make a fabulous hostess gift in the near future!

Shop or Join at https://evadietz.stampinup.net/

Please contact me anytime if you have any questions 
or 
stampinwitheva@gmail.com

Wednesday, June 22, 2022

Sharing Creativity Now Event Splendid Day Suite Card 3

As with the past two days of blog posts using this Suite, you'll see artistic differences between my card and the Stampin' Up! version. What I didn't notice until I saw the picture again  as I was writing this post was that I missed putting on the metal leaf embellishment. Next time I will put it on when I do another card!

There was a technique used on this card that I had never tried before. Use the cutting side of your paper snips to "rough" up the four sides of the Basic White paper. 


Be sure to visit again tomorrow for Card 4 and on Friday to see the Gift Bag!


Please contact me anytime if you have any questions 
or 
stampinwitheva@gmail.com