Pages

Monday, February 28, 2022

Simply Marbleous Rainbow Birthday Card

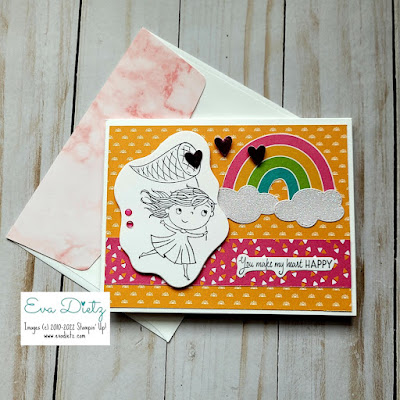
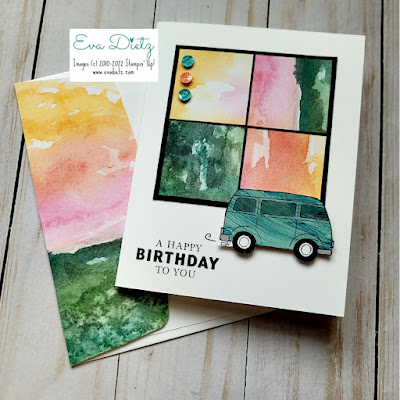
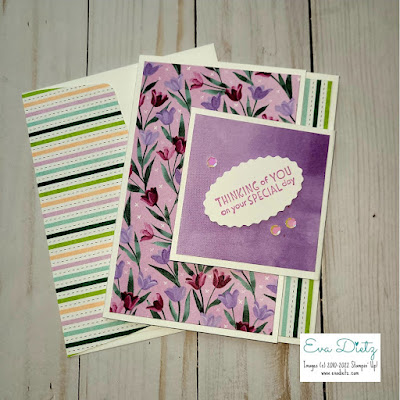
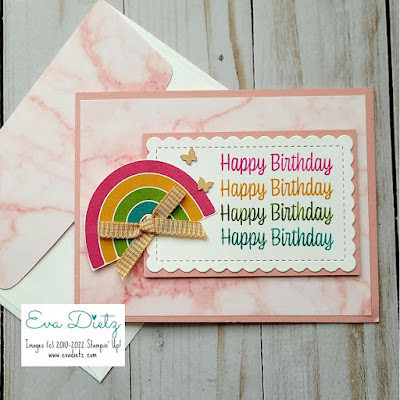
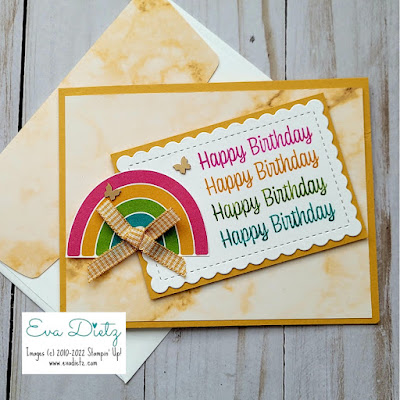
Wahoo! I have made another YouTube video! These cute cards I'll be sharing today are made with the Sunshine & Rainbows Designer Series Paper and the Simply Marbleous Designer Series Paper from the current Sale-a-Bration brochure. 

If you love these cards, then you won't want to miss out on getting the products I used, since today is the last day to select Jan. & Feb. 2022 Sale-a-Bration rewards with a purchase of $50 before shipping and tax.  You can order using the link at the end of this post.

Cutting Sizes and Supplies needed to make these cards:

Blushing Bride or Bumble Bee or Bermuda Bay cardstock for the card base
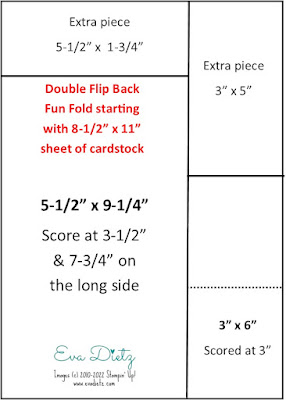
 cut 4-1/4" x 11", score at 5-1/2"

Simply Marbleous Designer Series Paper (DSP) layer cut at 4" x 5-1/4"

Blushing Bride or Bumble Bee or Bermuda Bay cardstock cut at 2-5/8" x 3-7/8"

Basic White cardstock cut at 2-3/4" x 4"
Scalloped Contour Dies - 3rd size die
Cut and Emboss Machine

Stamp Happy Birthday greeting from Sweet as a Peach photopolymer stamp set 
using clear stamp block H with Magenta Madness, Bumble Bee, Granny Apple Green, and Bermuda Bay ink pads.

Fussy cut the rainbow image from the Sunshine and Rainbows Designer Series Paper.

Adhere the smaller cardstock rectangle to the stamped scalloped rectangle, the with liquid glue affix the rainbow to the side as shown in the photo at whatever angle you think looks best. Raise this grouping up with Dimensionals.

Tie a bow with the 1/4" Bumblebee Gingham ribbon and affix it with a glue dot to raised layer.

Using a Take Your Pick tool add two Brushed Brass Butterflies to finish the card front.

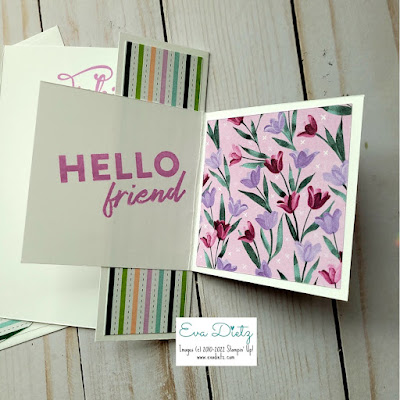
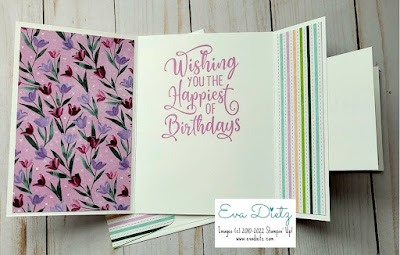
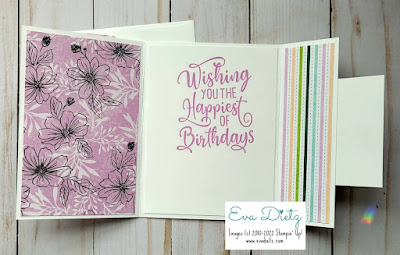
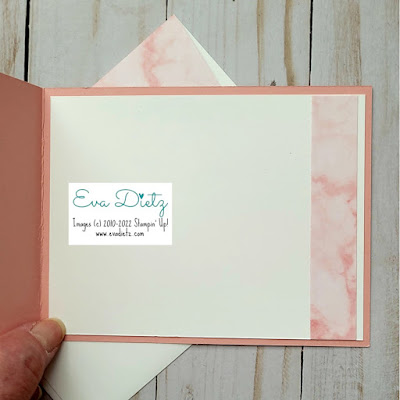
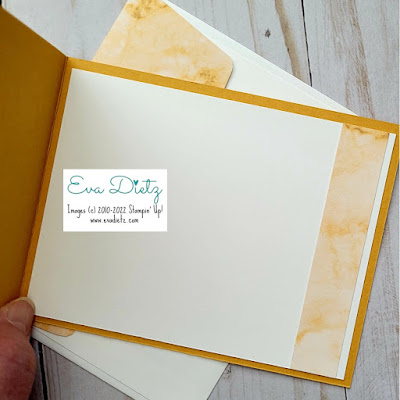
For the inside of the card - cut a piece of Basic White 4" x 5-1/4" and a strip of the Simply Marbleous DSP cut 3/4" x 4" to the side of the inner layer as shown in photos.

Be sure to stamp your name stamp on the back of your card.

For the matching envelope flap, use the Simply Marbleous DSP cutting a piece 2-3/8" x 6", adhere securely to the exterior of the Basic White envelope flap, then trim off excess using paper snips.

All done! 


Have fun creating these cards. Leave me a comment too!


Friday, February 25, 2022

Sweet Daffodil Daydream Window Card

As I started to write today's post about a daffodil card, I realized I have blooming daffodils just outside my front door. So out I went to snap a couple pics to share with you.

These daffodils come back every year and they are always a wonderful sign that spring is on its way. It's a small grouping, but when they are all blooming, they are so cheerful to see.


Decided to try a close-up. Look how perfect this one is!

So now, are we in the mood for this darling daffodil card?

The sweet Daffodil Daydream Window Card will be one my class attendees have the choice to make at my Stamp & Chat Classes this weekend. Using a die-cut to create a window that is layered above the stamped image is a fun way to highlight your card's focal point of this lovely daffodil.

The Daffodil Daydream stamp set colors so nicely when you use Stampin' Blends alcohol pens. There are a few days left (Feb. 28 to be exact) to select the Daffodil Afternoon Designer Series Paper as one of your Sale-a-Bration rewards when you place a $50 order before shipping and tax. That's a value of $11.50 worth of 12" x 12" Designer Series Paper. That's almost a 25% bonus for free!


This window technique requires a lot of dimensionals to give the Designer Series Paper even support on the front of the card. But it is worth doing this way.


The piece I die-cut out works nicely inside the card don't you think? (I try not to waste anything!)

Products Used to Create this Card:

Mossy Meadow cardstock card base - 5-1/2" x 8-1/2", score at 4-1/4"

Daffodil Afternoon Designer Series Paper - cut 4" x 5-1/4"

Tasteful Labels Dies for cutting a window out of Daffodil Afternoon Designer Series Paper

Daffodil Daydream stamp set
Basic White cardstock for Daffodil image cut 3-3/4" x 5" so this layer will not show at the edges.

Daffodil Dies for die-cutting butterfly image
Stampin' Blends Alcohol Markers to color daffodil image:
Light and Dark Mossy Meadow for leaves
Light and Dark Daffodil Delight
Dark Pale Papaya for butterfly

Basic White cardstock for inner card layer - cut 4" x 5-1/4"

Friendly Hello stamp for the inner greeting and clear block
Memento Tuxedo Black Ink

Champagne Rhinestones for front daffodil

3/8" Open Weave Ribbon in Pale Papaya for the bow on the card front

Dimensionals. Glue Dots, Adhesive of your choice

Die Cutting Machine, Paper Trimmer, Take Your Pick tool, Paper Snips, Simple Shammy

Basic White Envelope with Designer Series Paper flap - cut 2-3/8" x 6", glue, and trim.

This Window technique is useful for many types of cards. Think about how you might use it on the next card you create.

Have a lovely day!

Thursday, February 24, 2022

Catching Love with the Chasing Butterflies Set

Here is a technique idea to try in your cardmaking. How about incorporating a Black and White image with a colorful background? I like how the girl image "soars" off the page.

I was inspired by Stamp with Nellie's design but made it my own.

Several of the products are available for a few more days in the January-February Sale-a-Bration catalog. With every $50 qualifying order before shipping and tax, you can select a free item, such as the Catching Butterflies stamp set, or the Sunshine and Rainbows 6" x 6" Designer Series Paper.


Products used to Create this Card:

Thick Basic White card base - cut 5-1/2" x 8-1/2", score at 4-1/4"
Layering Diorama Dies with a piece of Basic White cardstock
Scrap of Basic White cardstock for greeting that you will fussy cut out
Give it a Whirl Dies for glimmer clouds - small scrap pieces
Catching Butterflies stamp set
Memento Tuxedo Black Ink
Sunshine and Rainbows Designer Series Paper - 
Bumblebee layer is 4" x 5-1/4", the Magenta Madness strip is 1" x 5-1/4"
White Glimmer Paper for clouds
Blushing Bride Foil for hearts
Retired Triple Heart Punch
2020-22 In Color Enamel Dots or Square Gems

For Basic White Envelope flap - Simply Marbleous Designer Series Paper - 2-3/8" x 6" piece

Paper Snips, Paper Trimmer, Dimensionals, Mini Dimensionals, Adhesives of your choice.
Cut and Emboss Machine

It's not too late to place an order to receive your Sale-a-Bration rewards. Just click the Shop Online box link below and have fun! I recommend using the search function to find the products easily.

Have fun catching some love with this card.

Wednesday, February 23, 2022

Man Card for Birthday

The Beyond the Horizon Suite in the January-June 2022 Mini Catalog is a watercolor explosion of beautiful colors. I used the On The Horizon 6" x 6" Designer Series Paper to create the background blocks for this Masculine Birthday Card.

 Have you stamped on Designer Series Paper, then fussy cut out your image? That's exactly what I did for the vehicle image. If you trim carefully, you will get a lovely result.

This card was inspired by Deb Joy Smeak.


Products Used to Create this Card:

Thick Basic White cardstock card base 5-1/2" x 8-1/2", scored at 4-1/4"
Basic Black cardstock cut 3-1/4" square
On The Horizon Designer Series Paper - cut four assorted 1-1/2" squares
Handsomely Suited stamp set for Birthday greeting
Sale-a-Bration - Driving By stamp set
Fine Art Floral Designer Series Paper for the car
Memento Tuxedo Black Ink
Basic Black Stampin' Write Marker for hand-drawn exhaust and tires and coloring the cut edged of the vehicle in case your trimming isn't super smooth
Dark Smoky Slate Stampin' Blends to color bumpers
retired Sequins
Glue Dots, Adhesives of your choice for the paper
Dimensionals to raise the car up
Paper Snips
Paper  Trimmer
Basic White Envelope
Matching Designer Series Paper for envelope flap - 2-3/8" x 6"

Have fun experimenting with the gorgeous papers in this Suite. Each card will be different but still amazing! If you'd like to order these items, just click the yellow box link below.

Have a Creative Day!

Tuesday, February 22, 2022

Pool Party Friendly Hello Double Flip Back Fun Fold

As promised yesterday, here are the other two cards I made using the Double Flip Back Fun Fold. This time I used Pool Party ink in all my stamping. I really like how these turned out!

I exclusively used the Sale-a-Bration Friendly Hello stamp set and Designer Series Paper, along with two other stamp sets - Inspired Thoughts and Happiest of Birthdays.


First Card - Front View


First Card - Small card view


First Card - Inside View


Second Card - Front View


Second Card - Small Card View


Second Card - Inside View


Cutting Dimensions:
Basic White Cardstock Base cut 5-1/2" x 9-1/4"
Score on the long side at 3-1/2" and 7-3/4"

Two pieces of coordinating Designer Series Paper, cut 3-1/4" x 5-1/4"
Two pieces of coordinating Designer Series Paper, cut 1-1/4" x 5-1/4"

Basic White Small Card on Front 3" x 6", score at 3"
Two pieces of coordinating Designer Series Paper cut 2-3/4" square

Basic White Envelope Flap - Coordinating Designer Series Paper, cut 2-3/8" x 6", 
glue to the exterior of flap and trim off excess when dry.

Sale-a-Bration ends on Monday, Feb. 28, 2022 so only a few days are left to select the Friendly Hello Set with a $100 order before shipping and tax. Now is the perfect time to stock up on cardstock, inks, ink refills, and Basic White envelopes. You can click the yellow box below to order. If you don't have your own demonstrator, I'd love to be yours!

Have a lovely day!

Monday, February 21, 2022

Fresh Freesia Double Flip Back Fun Fold

This fun fold holds two surprises inside instead of one.  It is called the Double Flip-Back Fun Fold. I was introduced to it by my demo friend, Lori. I made a total of 4 cards. Today, you'll see two and tomorrow's post will show the other two. I had fun using the Fresh Freesia In Color ink on these two cards.


Front closed view above. This card combines two different Designer Series Papers (DSP). The tulip pattern comes from the Flowering Fields 12" x 12" Designer Series Paper in the January - June 2022 Mini Catalog. The other products I used are the current Sale-a-Bration Friendly Hello stamp set and matching DSP. Also used the Inspired Thoughts stamp set for the greeting on the oval tag. Used Double Oval Punch (scalloped oval), and some Iridescent Sequins I had leftover from my January Paper Pumpkin kit, but you can use whatever you like.


First Surprise - the small card opens first. Greeting is from Friendly Hello stamp set.
Use strong adhesive like Stampin' Seal to attach the small card to the larger base.


Second Surprise - the full inside look using the Happiest of Birthdays stamp set.


Second Card - The front of this card uses only the Friendly Hello DSP. 


On the small flap on the right side the Flowering Fields DSP again. 
I thought those purples worked well together.


I love how the Fresh Freesia ink works so nicely with this entire card.


Cutting Dimensions:
Basic White Cardstock Base cut 5-1/2" x 9-1/4"
Score on the long side at 3-1/2" and 7-3/4"

Two pieces of coordinating Designer Series Paper, cut 3-1/4" x 5-1/4"
Two pieces of coordinating Designer Series Paper, cut 1-1/4" x 5-1/4"

Basic White Small Card on Front 3" x 6", score at 3"
Two pieces of coordinating Designer Series Paper cut 2-3/4" square

Basic White Envelope Flap - Coordinating Designer Series Paper, cut 2-3/8" x 6", 
glue to the exterior of flap and trim off excess when dry.

See how creative you can be using what you have on hand to try this fun fold. Once you make a couple, you won't want to stop!

Friday, February 18, 2022

Sharing Joy by Sending a Handmade Card


Do you sometimes get discouraged? A friend notices and sends you a card to help you feel better. What makes it even more special is when the card is not a store-bought card but a beautiful handmade encouragement card. This gift of love from your friend will probably be set in a place where you can see it frequently so it will continue to lift your spirits.

It really is special when someone sends you a card, made by hand, in the mail because they were thinking of you, wishing you well, or they want to say thank you.

We all have busy lives, so in this day and age, it is often easier and faster to write a quick email or send an ecard rather than personally handwrite something. I'm thankful that through Stampin' Up! I have learned how to make pretty, unique, one-of-a-kind handmade cards that I can send to others to share joy, love, and encouragement with them. I love the fact that I can create a card with that special person in mind. It becomes so much more special. A store-bought card is mass-produced, cold, and impersonal. Handmade cards are much more meaningful to the recipient and just as (if not more so) attractive as any store-bought card.

Handmade cards using Stampin' Up! products are sure to win you over and melt someone's heart. Stampin' Up! has high-quality cardstock, designer papers, ink in color families, and stamp sets galore. There is something for everyone. You can be proud of the handmade card you send when you use their color-coordinated products. Your handmade cards will be a treasure to be kept forever. What better way to show someone that you really care about them than to take the time to create a special card just for them. Then the recipient should place that special card they have received on a mantle, buffet, or bookcase alongside other special mementos and treasures.

Gift-giving is an important part of life and a handmade greeting card is a gift of time and love. Every handmade card is a work of art! When you send one of your works of art, you are sending an emotional piece of yourself. What better way to tell someone you care and bring joy to them.

Making your own handmade Christmas cards are especially fun to send during the holidays. Receiving a handmade holiday card is like receiving a present, just in a smaller form. What a treat it is to receive them!   

Your handmade cards are even more personal and extra special when you handwrite something in the card. That is why many cardmakers leave the inside of their cards blank. So you can write that special message. It is also a cool keepsake of that person's handwriting to treasure forever. It is almost like they are still there right inside the card, as memories of them flood your mind. That is why many people hang on to handmade cards longer. 

Children often love to keep the handmade cards they are given for a very long time. If you are a parent, making a special keepsake box for your child is a great place to keep these very special works of art. Wouldn't it be so cool that when your child is an adult, they can look back through that keepsake box to find a handmade card from their grandma there?

How often have you thought of someone, but because of distance or hard times you can't go see them? Sending a Thinking of You card is the next best thing, especially when you write a special message inside. It is the cheapest way to travel for under a dollar!

There are so many benefits to sharing joy through a handmade card with others. You are making someone happy - which makes you happy. It is fun to create an original work of art just for them. These feelings are beneficial to our well-being. These good benefits keep our handmade greeting cardmakers around and companies like Stampin' Up! continuing to design amazing products for paper crafters to use. I am glad to be a part of this group of creative and talented people because we all make each other better through our friendships, design challenges, and sharing our ideas for making beautiful, joyful cards.

What could be better than being a cardmaker? If you would like to get involved with cardmaking I encourage you to do so. I can help you. Contact me here. It was one of the best decisions I have made in my life and Stampin' Up! is a great company to represent as an Independent Demonstrator. 

Send some happy mail today!

Happy Creating,


#stampinwitheva #handmadecards

Thursday, February 17, 2022

Stepped-Up Diagonal Joy Fold Card

Wasn't that Simple Diagonal Joy Fold Card fun to make yesterday? Today's stepped-up version only has one additional layer of die-cut cardstock. Plus the iridescent sequins were placed on the scalloped rectangle instead of the heart. These two small changes sure make the card fancier.

 However, in order to keep the card from becoming too thick to mail, I did not add my closing mechanism to this card. If you have some mini self-sticking velcro, you could cut a small piece and attach them to the upper right corner of the Scalloped Rectangle to keep the card closed. 


The photo below helps you to see how the two pieces of the Flirty Flamingo cardstock are assembled. The two back sections are overlapped and glued together.
 

Products needed to make this card:

Two pieces of Flirty Flamingo Cardstock - cut 4 1/4" x 11 and score both at 5-1/2." Then using the photo as a guide you will cut the triangular front sections by using your paper trimmer cutting channel to line up the top of the scoreline with the opposite diagonal corner. After double-checking, you are well lined up, make the cut with your paper trimmer,  Repeat for the second piece of cardstock. Then burnish your fold lines with your bone folder.  Slide the two card base pieces together to see how the front lines up. When you are happy, then you can adhere the two card backs together.

Two pieces of Pattern Party Designer Series Paper -  cut 4" x 5-1/4", then trim 3/8" off the side that will be next to the fold to get the triangle to fit perfectly with equal borders. Affix each piece to each of the triangle card fronts.

Flirty Flamingo Cardstock - a piece 4-1/4" x 5-1/2" die cut with the largest solid scalloped rectangle die from the Scalloped Contours Dies. Make sure the scalloped rectangle has an even border on all sides of the card front. Hint - you may want to draw a light pencil line on the backside of the rectangle for ease in gluing. Adhere flat to the lower triangle section only.   

Basic White Cardstock - for inner card layer, cut 4" x 5-1/4".

Heart paper piece and sequins from the January 2022 Paper Pumpkin kit or use a heart die-cut to make your own.
Happy and Heartfelt stamp set for the greeting of your choice
Flirty Flamingo ink to stamp the greeting
Raise stamped heart up on dimensionals on the lower front triangle piece.

Make a bow with retired 1/8" gold ribbon or something similar, affix with Glue Dots on the heart as shown.

Cut a matching piece of the Pattern Party Designer Series Paper for your Basic White Envelope flap 
 2-3/8" x 6", adhere with tape runner or liquid glue to the exterior of the envelope flap. When dry, trim off excess.

This Diagonal Joy Fun Fold sure makes a card look fantastic. I hope you'll give both cards a try.

Happy Creating,


#stampinwitheva #paperpumpkin

Wednesday, February 16, 2022

Simple Diagonal Joy Fold Card

If you are a Stampin' Up! Paper Pumpkin Monthly Subscription Kit Subscriber you know you sometimes have leftover pieces that you just don't know how you want to use them. I had a ton of fun with the January 2022 Kit called Kisses and Hugs. From the kit that was supposed to make 9 cards, I ended up with 24 cards. You can see the cards I made in this post by clicking here.

One of the pieces I had leftover was the white heart with a gold border. As I was surfing the internet I spied an idea using the Diagonal Joy Fun Fold. "That's it!" I thought to myself. So I whipped up this card to share with all of you. I hope it inspires you!


Three things to know about this fun fold:

1) The back of this card will be two layers of cardstock thick.

2) When you cut your Designer Series Paper for the card front, you will have enough pieces to make two cards of this fun fold. Come back tomorrow to this blog to see a stepped-up version of this fun fold.

3) I have added a way to close the card. All you have to do is raise the heart up on dimensionals.
Punch 1-1/4" circle out of Poppy Parade. Place it inside the space created by the heart, add some liquid glue to the top half of the circle that is exposed, be careful to not have any spill out and accidentally glue the card shut! then just close the front piece of the card and let it dry.


Products needed to make this card:

Two pieces of Poppy Parade Cardstock - cut 4 1/4" x 11 and score both at 5-1/2." Then using the photo as a guide you will cut the triangular front sections by using your paper trimmer cutting channel to line up the top of the scoreline with the opposite diagonal corner. After double-checking, you are well lined up, make the cut with your paper trimmer,  Repeat for the second piece of cardstock. Then burnish your fold lines with your bone folder.  Slide the two card base pieces together to see how the front has lined up. When you are happy, then you can adhere the two card backs together.

Basic White Cardstock - for inner card layer, cut 4" x 5-1/4"

Two pieces of Pattern Party Designer Series Paper -  cut 4" x 5-1/4", then trim 3/8" off the side that will be next to the fold to get the triangle to fit perfectly with equal borders.

A scrap of Poppy Parade Cardstock for 1-1/4" circle punch for the closing mechanism.
Follow the directions above for how to assemble. 

Heart paper piece and sequins from the January 2022 Paper Pumpkin kit or use a heart die-cut to make your own.
Happy and Heartfelt stamp set for the greeting of your choice
Flirty Flamingo ink to stamp the greeting
Raise stamped heart up on dimensionals on the lower front triangle piece. Only the lower half of the heart receives dimensionals.

Make a bow with retired 1/8" gold ribbon or something similar, affix with Glue Dots on the heart as shown.

Cut a matching piece of the Pattern Party Designer Series Paper for your Basic White Envelope flap 
 2-3/8" x 6", adhere with tape runner or liquid glue to the exterior of the envelope flap. When dry, trim off excess.

Come back tomorrow to view the stepped-up version of this fun fold. I'd love to read your comments if you've ever heard of or made this fun fold before.

Happy Stamping,


#stampinwitheva #paperpumpkin

Tuesday, February 15, 2022

Paper Pumpkin Subscription Value has Grown Over the Years

Paper Pumpkin Monthly Subscription Kits started in March of 2013. How this subscription box originated was the idea of having a fairy godmother, namely Stampin' Up!, deliver a darling orange box (the color of a pumpkin) giving you the ability to magically create awesome projects each month. It was advertised as "Creativity in a Box!" When you opened your kit you found the contents lovingly wrapped in Cinderalla Ballgown Blue tissue paper. Up until May 2017, the original logo, shown below, resembled a pale blue pumpkin carriage with curling vines (the preferred delivery method of course!)
Who doesn't love a fairy tale?


The Very First Paper Pumpkin Kit in March 2013!

Early Kits did not live up to the hype. The red rubber stamp offerings were tiny. The projects were kind of... blah. People canceled their subscriptions. Back then, it just wasn't worth people's time or money.

As of February 2014, stamp sets changed to an early version of photopolymer.  But the greatest addition wasn't the type of stamp, but the quantity of stamps given. This benefit became evident between 2015 and 2016. And in March each year, for Paper Pumpkin's birthday month, Stampin' Up! gives subscribers a bonus gift in their kit! Birthday's need gifts, right, so Stampin' Up! rewards their customers with this extra freebie to thank them for being a loyal subscriber!


May 2014 Kit - notice the photopolymer stamps, not a huge quantity but still more than a year earlier.


June 2015 - simple designs, fewer cards to make


October 2016 - increase in photopolymer stamps and more cards to make, shaker ones at that!


July 2019 - kits starting to come with lots of parts and pieces, some preprinted, some to stamp yourself.

Fast forward to 2020. Stampin' Up! listened to their customer feedback, corrected their course, and began to deliver real value with each kit. Most kits are card kits, with a couple a year being food/favor related for Valentines or Halloween. Upping Social Media sharing, alerted the masses that this program was too good to miss out on! More and more subscribers signed up, some kits even sold out early.


March 2020 Birthday Month with the free stamp set. Look at how many stamps are in the kits now!

2021 - Some of the Kits started to coordinate with products in the Stampin' Up! Annual or Mini Catalogs and that really increased their usability exponentally! Subscribers had more options with how to use their kit.

August 2021 Kit - Look at all that came in this kit!


I even made a 5x7 framed Shadow Box!

All this history brings us to the "present" literally.

Happy 9th Anniversary Paper Pumpkin! This means you'll get TWO Stamp Sets in your March Kit if you are a current subscriber! 

You can sign up for March 2022 Beyond the Horizon kit between now and March 10! Notice the beautiful watercolor look. This kit will coordinate with the On the Horizon Suite in the Jan.- June Mini Catalog.


You don't want to have FOMO, do you? Sign up today and you won't, plus you'll receive extra gifts if you do so before Feb. 28th and save a little money too.

Now is the PERFECT time to sign up for a 3, 6, or 12-month prepaid subscription before the Price Increase (on March 1) and you'll receive Sale-a-Bration rewards too if you purchase by February 28, 2022. After you purchase your prepaid subscription here, Stampin' Up! will email you a coupon code to insert into your Paper Pumpkin account here.  (You'll need to set up your free account first, so you'll be able to manage your subscription.)

I'd love to have you become one of my subscribers! I have a special Facebook Group where I share Alternate Card ideas with my subscribers each month. There is also a Facebook Group called Paper Pumpkin Fan Club where lots of people post many different ways to use your kit - cards, tags, home decor, and more!

If you'd like to read more about how Paper Pumpkin works, click here,

I hope you'll think about this great opportunity and see the value you'll receive with an all-inclusive kit each month to help you fulfill all your crafting needs on a budget. Your fairy godmother and Cinderella will be very happy too!

#stampinwitheva #paperpumpkin