Pages

Showing posts with label Blossoming Happiness Dies. Show all posts

Thursday, October 27, 2022

It May Not Be Spring But Stampin' Up!s Hues of Happiness Suite Can Be Used Year Round With This Locking Tent Easel Fun Fold Card

This Happy Birthday card may seem too springy and out of season at this time of the year, but let's focus on learning how to make the Locking Tent Easel Fun Fold portion of this card. You can incorporate any occasion stamp set, cardstock colors and matching Designer Series Papers you have in your craft collection. 


Front View

Side View Showing How the Locking Portion Workds on Tent Easel Fun Fold

CUTTING DIRECTIONS:

 First Base Piece - Daffodil Delight cardstock 4-1/4” x 11, scored at 2-3/4” and 5-1/2”

Second Base Piece – Daffodil Delight cardstock 3-1/2” x 9”, score at 4-1/2”

For Inside of Back - Hues of Happiness Designer Series Paper 4” x 5-1/4”

Basic White Inner Layer for Greeting 3-1/4”x 4-1/4”

Hues of Happiness Designer Series Paper for front under front flap 2-1/2” x 4"

Basic White cardstock 3-1/4” x 4-1/4”, then slice 1’’ from right side to left bottom corner to create diagonal

Scrap of DD for Tags die holes

Basic White Envelope Flap with Hues of Happiness Designer Series Paper  cut 2-3/8” x 6”

Fussy Cut out Flowers and leaves as show and adhere as shown


Online Shopping is easy with these links below for the products used in this project.


Tools Needed:

1/16 th hole punch – available commercially

Paper Trimmer 152392 $25

Bone Folder 102300 $7

Paper Snips Scissors 103579 $11

Take Your Pick Tool 144107 $10

Stampin’ Seal Adhesive 152813 $8

Glue Dots 103683 $5.25

Foam Adhesive Sheets 152815 $8

I hope you'll give this Fun Fold a try. It is a unique one, but worth the effort!

Here's another fun idea using Hues of Happiness, visit here!

Learn how to get more done in less time by signing up for my exclusive "Insider" weekly newsletter. Each week the news will share card class information, Stampin' Up! promotions, hot tips from me, and two free tutorials! Subscribe to my Weekly Newsletter today. Plus you’ll receive a FREE 14 Card One Sheet Wonder Tutorial to download when you receive my thank you email for signing up.

Shop or Join Stampin' Up!

Please contact me or email me at stampinwitheva@gmail.com if you have any questions about products, techniques, or card designs. 

Thursday, August 18, 2022

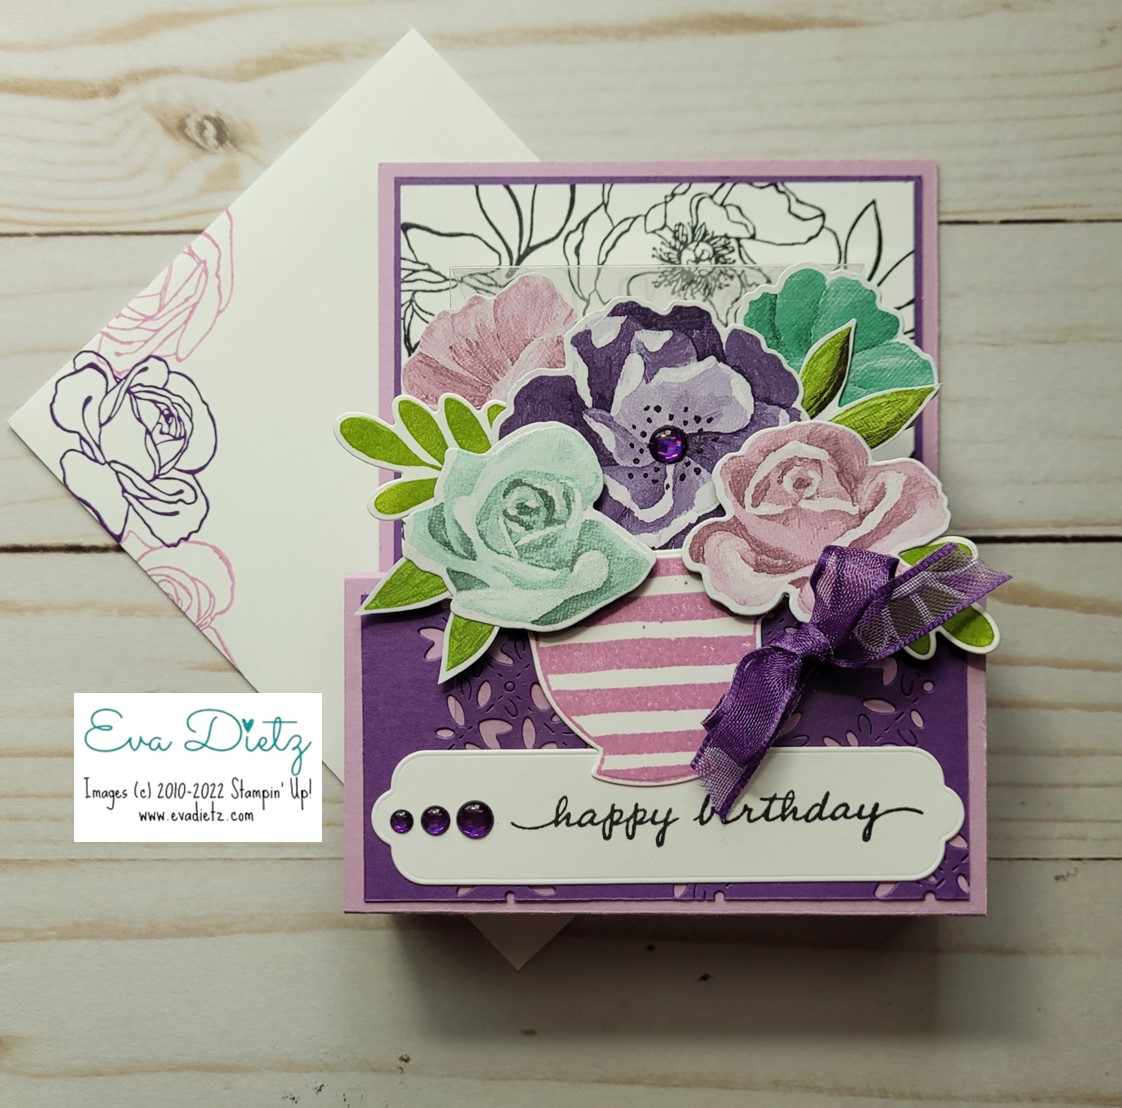
The Stampin' Up! Happiness Abounds Bundle is Fantastic! Look at the Beautiful Floral Birthday Card You Can Create and Give to Friends or Family!

Do you love floral images? If you do, then the Happiness Abounds Bundle from Stampin' Up! will quickly become your favorite Bundle to work with from the 2022-23 Annual Catalog.

I have created something different for you to try with this Pop-up Front-Step Fun Fold. A piece of Window Sheet is used to create a see-though look. The Window Sheet allows more of the back panel to show where I stamped a variety of black floral images. By doing this, the front floral tea cup layered image POPS off the front of the step fold. 


Focus on the envelope design between these two photos, above and below.
 
The front of the envelope had some floral images stamped in two colors. 
The back of the envelope flap has an all over floral design stamped in Memento Black Ink.

This envelope has beauty on both sides!


When the Front Step Card is turned over below, there is a panel on the back for your message. Fussy cut some of the edge florals from the Hues of Happiness Designer Series Paper to incorporate into this lovely floral edge look.


Let's get Creating!

Cutting Measurements

Fresh Freesia cardstock - cut 4 1/4 x 11"
 
Gorgeous Grape cardstock - cut two pieces. Front Upper Panel 4 x 3" 
and Lower Front Die Cut Panel 4 x 2" 

Basic White cardstock - Front Upper Panel - cut 3 7/8 x 2 7/8"
Back of Card Sentiment Panel - 4 x 5 1/4"
For Teacup - cut 3 x 2"
For Happy Birthday tag - cut 4 1/4 x 1 1/4" 
For 2 Leaves - 2 1/2" square piece
 
Window Sheet - 2 3/4 x 5 1/2"


Scoring and Assembly Instructions:


Fresh Freesia card base - score at 5-1/2", 6-3/4", 9", 10-1/4". 
Fold on each score line, use bone folder. 
Add Tear and Tape as shown in diagram. 

Helpful Hint! Practice Fold the card base at the 5-1/2" line, then fold again at the 9" line to the inside. See how that allows the cardbase to lay flat? 
Referring to the side view photo below, peel off the protective layer on the Tear and Tape and 
adhere to create foldable/pop up base, replicating what you just did on your practice fold. 

Gorgeous Grape cardstock piece - adhere to upper front panel section. 

Basic White cardstock upper front panel piece- stamp with variety of floral and leaf images from the Happiness Abounds stamp set in Memento ink. Adhere to Gorgeous Grape Layer. 

Gorgeous Grape cardstock lower front panel piece - use Blossoming Happiness die to create peekaboo look. Adhere to Fresh Freesia lower panel of card base. 


Window Sheet - score at 3/4" and 2". Fold plastic on each score line until there is a good crease but plastic isn't cracking. Position the larger area of the window sheet on top of the die cut Gorgeous Grape panel, centering it from side to side. 

Apply one pass of Stampin' Seal adhesive at the plastic bottom edge only, so it will be covered up by the tag later. Press in place. 

Fold up the card like it will fit in an envelope as shown in the image below. That will give you the placement of where to run the one pass of Stampin' Seal to attach the top section of the window sheet on the basic white stamped floral layer.


Tea Cup image - stamp Basic White with Fresh Freesia ink and die cut out. 

Happy Birthday tag - stamp sentiment as shown in photos using Memento ink. Die cut out. With Stampin' Seal, adhere tag so it covers the bottom edge of the window sheet covering the adhesive line. Add the three Gorgeous Grape Glossy Dots to the tag. 

Prepare floral and leaf images - Die cut out florals and pointy leaves like shown in the photo from the Designer Series Paper. Stamp the two rounded leaf images in Granny Apple Green ink and die cut out. 

Assemble the images using the photo above for reference, as a unit on and behind the tea cup. Use Stampin' Seal and Mini Dimensionals as needed but do not attach to card base yet. Lightly apply some Wink of Stella to flowers. Apply one Gorgeous Grape Glossy Dot in the center of the middle flower. 

Tie 8" ribbon piece around tea cup handle in a bow. Trim excess ribbon as needed. 

Now close the card like it will go into your envelope. Place the prepared floral tea cup on the window sheet and lower section to see how it fits. You want to make sure the flowers do not go above the fold in the window sheet so it will still fit in the envelope. Once you have decided where to place, use the Stampin' Seal and securely attach to window sheet panel. 

Using the photos for reference prepare the back of the card with the fussy cut flower and leaf images glued down on the Basic White cardstock. Stamp the sentiment in Memento Ink. 

On your envelope - stamp front floral images in Gorgeous Grape and Fresh Freesia. 
On back flap stamp multiple floral images in Memento Black ink.

Well Done! You have made a very special birthday card for a loved one or friend.

List of Supplies available to order at my online store. Click each photo to shop.
 

Explore these other Hues of Happiness Suite cards via the links below.


Please contact me anytime if you have an questions 
or email at 
stampinwitheva@gmail.com
Thank you for taking the time to comment on my post, you've made my day!

Tuesday, May 10, 2022

Hues of Happiness Suite Video

Enjoy this short video sharing about this new Suite!


Come back tomorrow, I'll have a Pop Up Front Step card to share with you made with these products.

Friday, April 22, 2022

Happy Birthday Card with Hues of Happiness

Here's a Happy Birthday card for you using the Hues of Happiness Suite that will be available to order on May 3, 2022. I hope you saw yesterday's blog post that showed the stamp set, dies, and Designer Series Paper. It is all amazing and soooo gorgeous!

Have you ever had one of those projects that was going along so well (or so you thought) only to have a happy surprise at the end? This card was that kind of project for me.

My original design in my head looked like this photo below.


Then I put in the Basic White inner layer and the extra die cut flower for a little pizzazz. Later I realized, I put the flower in the wrong corner if I wanted a portrait card. LOL.


So that is why you have the photo below to show you that this particular design was a happy accident as it will work either direction. Portrait or Landscape!
It just depends which direction you write your message inside the card.

Have you ever had a project that turned out this way? Share your story in the comments.


Products used in this Card:

Hues of Happiness Suite = Happiness Abounds Stamp Set and Blossoming Happiness Dies and Hues of Happiness Designer Series Paper

Gorgeous Grape Cardstock and Ink Pad

Fresh Freesia Cardstock

Basic White Cardstock inner layer and tag

Glossy Dot Assortment

Decorated Flap of Basic White Envelope

Adhesives used were Stampin' Seal and Mini Dimensionals

Tools used were the regular Cut and Emboss Machine, Paper Trimmer, and Take Your Pick Tool.
*****
I hope you will give this layout a try, no matter which way it turns out!

Have a wonderful spring day!

Thursday, April 21, 2022

Hues of Happiness Suite Floral Card

Say Hello to another amazing Suite coming in the new 2022-23 Annual Catalog which will be available May 3, 2022. 

Hello to the Hues of Happiness Suite.  

The whole suite of stamp set, dies, Designer Series Paper and Glossy Dots Embellishments is $69.50.

 The color scheme of this Suite is amazing! Melon Mambo, Daffodil Delight, Granny Apple Green, Pool Party, Night of Navy and Fresh Freesia are the beautiful colors in the collection. I LOVE them all!


Happiness Abounds Bundle of Stamp set and Blossoming Happiness Dies will be $49.50 
(save 10% with the bundle deal.)


Hues of Happiness Designer Series Paper will be $12.00 
Both photos above and below show you every side of the 12 sheets of paper, two of each double sided design.
The Blossoming Happiness Dies cut out some of the floral images on the Designer Series Paper. 


The card I've designed to share with you today is a simple, stunning card because I've only used Stamp, Ink and Paper plus a few Embellishments.

By using the dies set to die cut the flowers and leaves, it makes for a quick to assemble card. 


Use another die cut flower for the inside liner surprise. Don't forget to do your matching envelope flap too!


Products used in this Card:

Hues of Happiness Suite = Happiness Abounds Stamp Set and Blossoming Happiness Dies and Hues of Happiness Designer Series Paper

Night of Navy Cardstock cut 5.5" x 8.5" scored at 4.25"

Pool Party Cardstock cut at 4" x 5.25"

Hues of Happiness Designer Series Paper 3.75" x 5"

Basic White Cardstock inner layer cut at 4" x 5.25" 

Happiness Abounds Stamp Set and Basic White tag 3/4" x 3.5" stamped in Night of Navy ink

Glossy Dot Assortment, used Pool Party dots

Decorated Flap of Basic White Envelope 2-3/8" x 6"

Adhesives used were Stampin' Seal and Mini Dimensionals

Tools used were the regular Cut and Emboss Machine, Paper Trimmer, Take Your Pick Tool.
******

I'd love to know in the comments if you like this new Suite in the upcoming catalog. There are several floral suites but this one knocked my socks off!

If you don't have your own Stampin' Up! Demonstrator I'd love to be yours! You can request a catalog here at this link.

Have a great day!