Pages

Showing posts with label gold foil. Show all posts

Sunday, September 3, 2023

Shining Brightly Specialty Designer Series Paper Stuns with Beauty when You Use the Classic Letters Stamp Set for a Gorgeous Holiday Card

Do you think of Navy as a holiday color? I don't normally, but I think you will agree this card layout combined with several new soon-to-be released products would make you think otherwise.

On September 6th this gorgeous Shining Brightly Specialty Designer Series Paper (DSP) will be in my online store. It is so elegant with the gold foil accents that are built into this paper that it will make your holiday cards look fit for royalty! Combine that DSP with some more gold foil layered in, and I think the balance of Night of Navy and Very Vanilla works nicely.

You may be asking yourself, ok then, why does she have a Basic White tag on the front? Good question! Have you ever made some practice pieces, in this case, I was experimenting with layering Versamark ink on top of the Night of Navy inked letters from the Classic Letters stamp set, then heat embossing them with Clear Embossing Powder. It worked so nicely I had to use it in a card design!

I actually think by using the Basic White tag it helps it "pop" on the card front. 


I always like to make a matching envelope flap too. Just cut a piece of the DSP 2 3/8' x 6", then adhere to the exterior flap and trim off the excess.


This holiday card starts with a 4 1/4" x 11" piece of Night of Navy cardstock, scored at 5 1/2".

The Gold Foil layer is 4" x 5 1/4".

Next a 2" x 5 1/8" of the DSP in the Very Vanilla star pattern is adhered to the right side of the Gold Foil Layer allowing for a 1/16" margin on the three sides.

Next cut a 2 1/4" x 5 1/8" Night of Navy leaf pattern section from the DSP and a 1/2" x 5 1/8" strip of Gold Foil. You will adhere the strip of gold underneath the right edge of the navy so only a 1/16" of Gold Foil shows. Now you are ready to affix the combined piece to the card face. Start adhering on the left side allowing for a 1/16" margin just like the right edge of the Very Vanilla. The Navy will overlap the Very Vanilla some.


For the Inner Card Layer, cut a 4" x 5 1/4" piece of Very Vanilla cardstock. You can add some decorative pieces of the DSP if you so desire. The greeting comes from a new set releasing on Sept. 6 called Joy to You stamped in Night of Navy ink. Adhere layer to the inside of the card.

Some of the Products Used:

Classic Letters Photopolymer Stamp Set #161267  $25 USD
(Stamps are 1" tall.)

Versamark Ink (is a sticky ink that holds embossing powder very well)
#102283 $9.50

Images © Stampin' Up!

Stampin' Emboss Powders - Basic Set of Clear, White and Black (Lasts a very long time!)
#155554  $18

Images © Stampin' Up!

Heat Tool (used to melt the embossing powder quickly)
#129053  $31

Images © Stampin' Up!


Since Stampin' Up! doesn't have Night of Navy embossing powder, the next best thing to do is use the technique of stamping the letters first in Night of Navy ink, then stamping again on top with Versamark Ink and Heat embossing with Clear Embossing Powder and the Heat Tool. That way you get a fancy look in any color you want! Thanks to the Classic Letters stamps being see-through photopolymer material, it is very easy to line them up perfectly! I started with a 1" strip of Basic White by 4 1/8".
Finish with a Gold Foil 1 1/8" x 4 1 /4" piece that you mount the Basic White to. Raise the double layers with dimensionals.

The card is finished off the two Blooming Gold Pearls in the upper right corner, which are also coming out on Sept. 6.

The product items with links attached are available right now in my online store.

 Check out another card idea using the Classic Letters stamp set HERE.
And another holiday card idea HERE.

If you are looking for a demonstrator to help you, I would be happy to mentor you and provide you with guidance and support through my bi-monthly newsletter. Please subscribe HERE.


\

Friday, March 17, 2023

Good Luck Gnome Flying a Clover Kite for St. Patrick's Day

 Happy St. Patrick's Day! I donned my lucky scarf to share with you this darling gnome who'se flying his shamrock kite to bring you good luck for St. Patrick's Day!


You can make this easy card if you happen to have either Stampin' Up!s recently retired Storybook Gnomes Designer Series Paper that you can fussy cut a cute preprinted gnome from or maybe you have the current Friendly Gnomes stamp set where you can stamp a cute gnome in matching colors to the shade of green Designer Series Paper that you choose. 

My piece comes from the retired Celebrate Everything Designer Series Paper. It is layered on Basic White and Pear Pizzazz cardstock layers on a Basic White card base. I finished up this cutie with four small gold foil punched hearts topped with a gold gem and used some yellow bakers twine with a gold metallic thread in it for the kite string. 

My gnome is mounted on a very retired piece of Pear Pizzazz foil, and the good luck is stamped from the retired Special Moments set. Simple but cute! Give something like this a try with what you have in your crafting stash. 


I hope you'll give this card layout a try and that it brings you good luck!

If you don't already have your own Stampin' Up! Independent Demonstrator, I'd love to be yours! Let me know if I can be of any help to you!

Learn how to get more done in less time by signing up for my exclusive "Insider" bi-monthly newsletter. Twice a month the news will share card class information, Stampin' Up! promotions, hot tips from me, and free tutorials! Subscribe to my Bi-Monthly Newsletter today. Plus you’ll receive a FREE 14 Card One Sheet Wonder Tutorial to download when you receive my thank you email for signing up.


Please contact me or email me at stampinwitheva@gmail.com if you have any questions about products, techniques, or card designs. Comments below are welcomed too!

Monday, March 13, 2023

Pinwheel Technique Used for St. Patrick's Day Card Idea

St. Patrick's Day is coming later this week, so I felt like having a little fun here. This card is so shiny like a Pot of Gold! It definitely has an abundance of dots and spots all over it too! The little Leprechauns helped me design this wacky card layout.

The main focal point is the Pinwheel technique which is really easy to do using eight 1 1/4" squares. I used two different sheets from the Regals 6" x 6" Designer Series Paper assortment.


For the base - Cut two squares 2 5/8" of Gold Foil and using your grid paper placemat, position them so all 8 points are precisely aligned. Once you have that, then go ahead and adhere them together. 

Lay your 1 1/4" squares out as shown in the diagram above. You will carefully only adhere half of the each square to the base, with the last square being slid under the 7th square and ending up over on the 1st square. I suggest you practice before doing any adhering so you understand the pinwheel well.

I did my pinwheel a little different, by gluing just the squares together using my grid paper, then I mounted on a Gold Foil layer, with careful fussy cutting the edges until it looked good. 

With another scrap of gold foil I punched out four mini hearts, adhered with glue dots to the center of the pinwheel and finished off with a Gilded Gem.

The card base is Stampin' Up!s Shaded Spruce color (my fav!) with a layer of (retired) Pear Pizzazz foil die cut with the (retired) Spots and Dots die. I suggest to use a sticky lint Tape Roller to get all those dots out before they fall on the floor or stick to your clothes!

Once that is adhered to the card front, mount your pinwheel on dimensionals and affix as shown in the photo.

The lucky day stamp came from (retired) Itty Bitty Greetings stamp set stamped in Shaded Spruce ink on Basic White, then punched out with a 1" circle punch and mounted on a 1 1/4" circle punch also raised up with Dimensionals.

Finish up your card by applying a 4" x 5 1/4" Basic White layer inside the card for your personal message. Adhere and trim some matching Shaded Spruce Designer Series Paper 2 3/8" x 6" to the exterior flap of the envelope.

************
I hope you have fun giving the pinwheel technique a try. Let me know if I can be of any help to you!

If you don't already have your own Stampin' Up! Independent Demonstrator, I'd love to be yours!

Learn how to get more done in less time by signing up for my exclusive "Insider" bi-monthly newsletter. Twice a month the news will share card class information, Stampin' Up! promotions, hot tips from me, and free tutorials! Subscribe to my Bi-Monthly Newsletter today. Plus you’ll receive a FREE 14 Card One Sheet Wonder Tutorial to download when you receive my thank you email for signing up.


Please contact me or email me at stampinwitheva@gmail.com if you have any questions about products, techniques, or card designs. Comments below are welcomed too!

Tuesday, January 31, 2023

Make This Beautiful Valentine with Stampin' Up!s Country Floral Lane Suite

One of the benefits of being an Independent Stampin' Up! Demonstrator is being able to preorder products a month ahead before they are released to the public. Occasionally a product is so popular that it sells out quickly and Stampin' Up! has difficultly getting more from their suppliers in a timely manner. Well, that is the case with some of the products that made this card. 

When I designed this beauty at the end of 2022, there was plently of Country Floral Lane Suite products available, but today when I planned to share this card, none are available and won't be until mid April. Yes, this is a bummer for my customers and readers, but I have learned a lesson too. Share my designs sooner than later.

My hope is that you can use this layout as inspiration for a similar Valentine using products you already own. No matter what products you have to work with, your labor of love will be a welcome surprise to your recipient. People (friends and family) love getting surprises in person and in their mailbox. Even though postage has now risen to 63 cents for a 1 ounce letter, it still the cheapest way to send a gift telling someone you are thinking of them.


Country Floral Lane Bundle
Images (c) Stampin' Up!

Country Floral Lane Designer Series Paper
Images (c) Stampin' Up!

Cottage Gingham 6" x 6" Designer Series Paper
Images (c) Stampin' Up!

I have a tutorial about this card that is available for purchase. So if you happen to be one of the lucky ones who already purchased the Country Floral Lane Suite, then click on the link below. You'll get a shopping list of all products used, measurements and step by step assembly directions.


Learn how to get more done in less time by signing up for my exclusive "Insider" bi-monthly newsletter. Twice a month the news will share card class information, Stampin' Up! promotions, hot tips from me, and free tutorials! Subscribe to my Bi-Monthly Newsletter today. Plus you’ll receive a FREE 14 Card One Sheet Wonder Tutorial to download when you receive my thank you email for signing up.


Please contact me or email me at stampinwitheva@gmail.com if you have any questions about products, techniques, or card designs. Comments below are welcomed too!

Sunday, June 12, 2022

Using Hues of Happiness Flowers to Create a Original Card Front

 Phew, what a week it has been! I've had trouble sticking to my Monday-Friday posting schedule this week. Life and travel got in the way a bit. So here comes Friday's card on Sunday! You get to see two similar cards today, so I hope it was worth the wait.

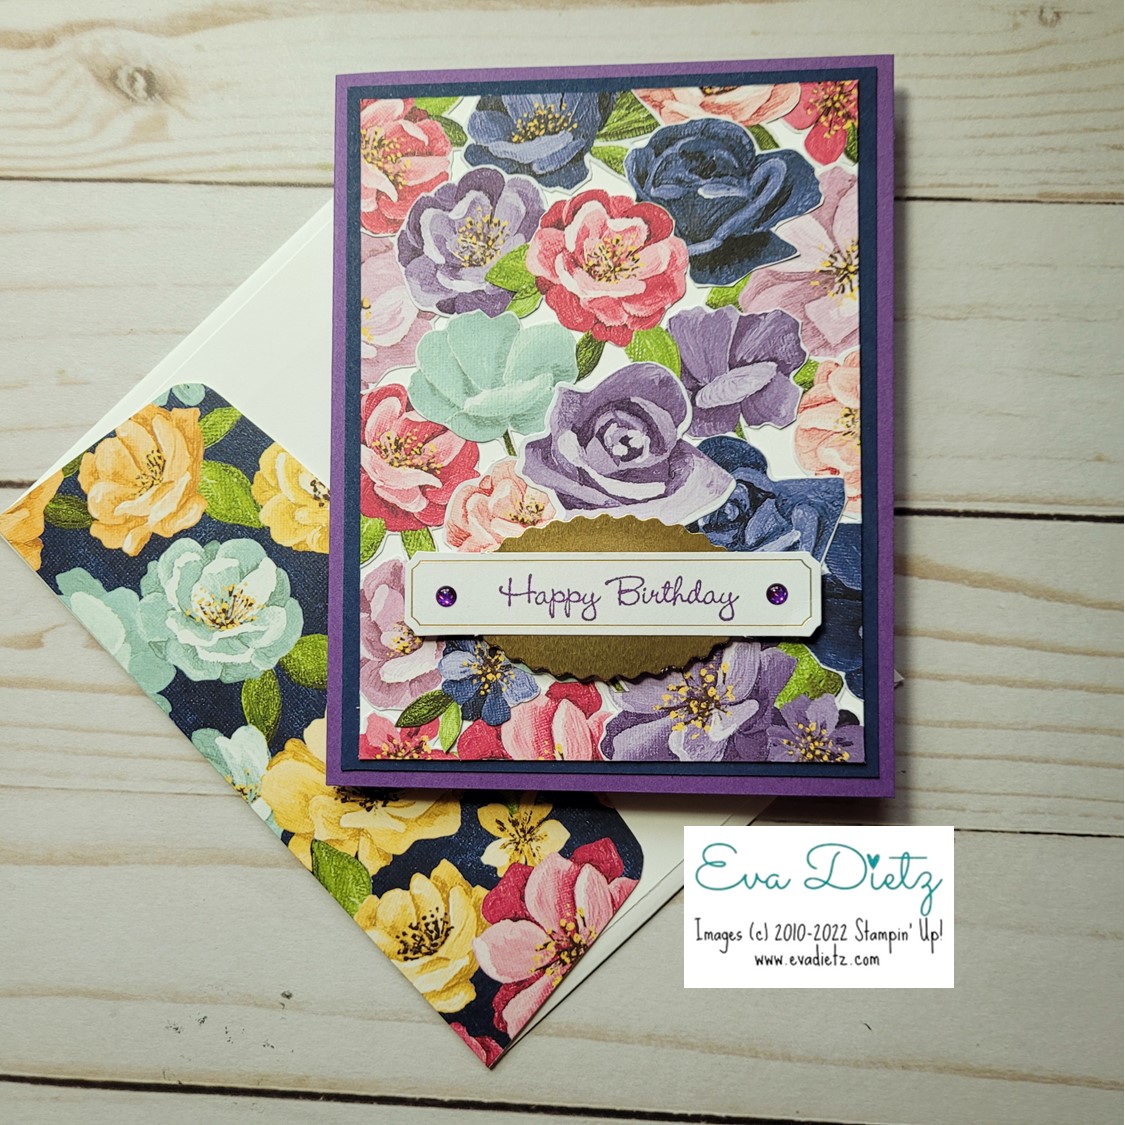
In the flowers I fussy cut out from the one sheet of the Hues of Happiness Designer Series Paper (DSP), I STILL had some left over, so this time I covered the 3-3/4" x 5" Basic White cardstock layer almost completely with flowers. I did move them around before adhering so I had a design pleasing to my eye.

The two cards I'm showing today are similar in layout, but you will see how a change in one color can make the cards look different.

Today's cards are using the smallest sized greetings in the Go To Greetings stamp set. 


Above, you see the color combination of Gorgeous Grape card base with a Night of Navy layer. Looks a little more subdued, I think. The tag the Happy Birthday is stamped on in Gorgeous Grape ink is a leftover tag I had from one of my monthly Paper Pumpkin kits. Gold Foil was punched with the Double Oval Punch. The tag and the oval were adhered together, then raised up on mini-dimensionals. Two Gorgeous Grape dots came from the Glossy Dots Assortment to complete the card design.


The card above only has two things changed on it but to me the card seems brighter and more fun. The Night of Navy layer changed to a Melon Mambo layer. Two Melon Mambo dots were added to another Paper Pumpkin tag I had on hand. 

The inside of both cards have a layer of Basic White and a couple small flowers glued in the lower right corner.

Each envelope flap had coordinating DSP added, because you never want a naked envelope!

Overall List of Products Used in these two Cards and are available to purchase at the link below:

Gorgeous Grape cardstock
Melon Mambo or Night of Navy cardstock
Basic White cardstock
Hues of Happiness Designer Series Paper
Go To Greetings Stamp Set
Tags are from assorted Paper Pumpkin kits
Gorgeous Grape Ink
Gold Foil
Double Oval Punch
Glossy Dots Assortment
Mini Dimensionals
Paper Snips
Basic White Envelope with decorated flap

Tell me in the comments which card is your favorite - Night of Navy layer or Melon Mambo layer.

Shop or Join Stampin' Up!

Please contact me or email me at stampinwitheva@gmail.com if you have any questions about products, techniques, or card designs.

Tuesday, June 29, 2021

June 2021 Paper Pumpkin Alternate Card Designs

Each month when I receive my Paper Pumpkin subscription, I like to make alternates that are different from the included directions. I like to challenge myself to see what I can come up with. I made 8 originals and I cased Rachel Tessman's idea for the last card, but I still changed it up a bit.

I apologize for the darkness of my photos. I took them in natural light, but it was a very hot day so maybe the camera didn't like that. I did try to correct in the editing process, but not as great as I'd like!


Card 1: Stamped the included floral image all around the edge of the included layer. Then made a tag using the Create with Friends stamp set (Happy) and Biggest Wish stamp set (Birthday) stamped in Evening Evergreen and mounted the white tag on Evening Evergreen cardstock raised up with Dimensionals. Accented with the included sequins.  Stamped floral image on Envelope in Evening Evergreen ink for Cards 1, 2, and 3.


Card 2: Did the same as Card 1 for creating the floral layer. Then for the "thanks" I adhered a piece of adhesive sheet to the back and attached it to Basic Black cardstock, then fussy cut out and raised with dimensionals. Accented with sequins.


Card 3: I used a piece from my Expressions in Ink Designer Series Paper added to the note card front. Then made the same tag as Card 1, but mounted it on Gold Foil. Embellishments are 2021-2023 In Color Jewels.


Card 4: Made my own card base in Polished Pink. Added a 4" x 5-1/4" piece of Expressions in Ink Designer Series Paper, but extended it with two 3/4" x 4" strips of Gold Foil. I sponge daubered Polished Pink ink to the back of the Thanks Vellum. When dry, I used my Fine Tip Glue Pen to adhere to the card front. Finished off with a gold braid bow and the provided sequins.


Card 5: Super simple. Used provided base and added tag like above but stamped in Polished Pink ink. Added sequins.


Card 6: On provided base, added a piece of Blackberry Bliss cardstock and attached the vellum flowers. Wrapped both layers with the gold braid and raised up with dimensionals. Using a previous Paper Pumpkin stamp set, I stamped in Tuxedo Black ink on the included small tags. Raised those tags up with Mini Dimensionals. Added sequins to finish.


Card 7: On provided base, I added adhesive sheet to the back of the leaf vellum and attached to entire card front. Using Polished Pink, Fresh Freesia and Evening Evergreen inks, I sponge daubered on the back of the vellum to colorize the image. Let it dry. Using the provided glue dots, carefully placed them where they would show the least and attached to card front. Stamped provided tag in Polished Pink ink and raised with Dimensionals. Added provided sequins.


Card 8:  Repeated the card front vellum application. Added a scrap piece of Fine Art Floral Designer Series Paper. Added the birthday tag and provided sequins. Fast and easy!


Card 9: Cased from Rachel Tessman
Using a Basic White card base and additional layer, I placed 3/4" x 3-3/4" strips in the pattern shown. I stamped the floral image on a scrap of Basic White cardstock in Blackberry Bliss ink. Added a strip of the Expressions in Ink Designer Series Paper so I could have some more gold accenting the card front. I added a small banner to the floral image strip just to fill it in more. I wrapped gold braid around the top strip layer three times and tied a bow. Then raised that layer up with dimensionals.  Finished the envelope with the floral image stamped in Fresh Freesia.

I hope these cards are an inspiration to you and help to show you the amount of value you can get from subscribing to Paper Pumpkin monthly. Use the link below to sign up.


Have a crafty day!


#stampinwitheva #stampinupproducts   

Friday, June 25, 2021

Alcohol Ink Background Technique

The latest technique trend is the 91% Isopropyl Alcohol (can't be a less %) and Stampin' Blends on Vellum cardstock. Have you tried it? I hadn't until recently and I'm sharing my creations with you today. One thing about this technique is you will never have the same result twice. Each card will be unique!


Here's how I did the process:
1. Color spots, blotches, dots with whatever color's of Stampin' Blends you think will look nice together on the vellum cardstock.

2. I filled a retired aqua painter in my collection with the alcohol, but Stampin' Up! currently sells Water Painters (set of 3 for $12). I would use the pointy medium tip. Squeeze some alcohol so the brush tip is kinda drippy.

3. Tap the aqua painter/water painter on your index finger and let the alcohol drops fall where they may on the vellum cardstock. Try not to have the drips start pooling up too much. The larger the pool of alcohol the larger the "bleeding/running" of the Blends ink on the vellum cardstock. (You can see the variety of sizes of my dots.)

4. Keep dripping alcohol until you are pleased with the look. If you want to try blowing the puddles around with a straw that may help with color coverage.

5. Take your heat tool and on the lowest setting, heat up the vellum to help speed the alcohol to dry/evaporate. The vellum cardstock will start to curl up. Don't panic yet!

Here's where you have some choices to make! What color cardstock are you going to mount your artwork on? My top two photos above the vellum is mounted to Basic White. The bottom photo it is mounted to Gold Foil. Interesting change in look don't you think?

The trick to getting your vellum to lie flat again is to use the Adhesive sheets. Cut your adhesive sheet so it will cover the vellum completely. I love the fact that the adhesive doesn't show a bit!

Now you have more decisions to make about how you want to make your card. My cards are simple to accent the color, but they are still gorgeous in my opinion. Let me know what you think in the comments!
 

I highly recommend you try this technique, you'll have a lot of fun!

Have a great day being creative!


#stampinwitheva #stampinupproducts   

Tuesday, June 15, 2021

Expressions in Ink Hello Card

If you happen to be a beginner stamper, then this is a very easy card to make! 

The new Expressions in Ink Designer Series Paper is a wonderful example of ink spread with alcohol to create amazing watercolor-ish designs. 


Products Used:

The  Expression in Ink Designer Series Paper (DSP) does all the work! Along with retired Golden Honey Designer Series Paper this card comes alive. The new 2021-23 In Color of Polished Pink really helps to make the card "pop." You finish the card with the Double Oval Punch combined with Biggest Wishes Stamp set also stamped in Polished Pink and set on gold foil.  Cut a 2-3/8" x 6" piece of Expression in Ink DSP for your envelope flap.

Cutting Dimensions:

Card base 5-1/2" x 8-1/2", scored at 4-1/4"
Golden Honey DSP 4" x 5-1/4"
Expressions in Ink DSP 4" square
Gold Foil - 1-1/2 x 3"
Basic White - 1-1/2 x 3"

Adding a metallic, like the gold foil, really gives your card pizzazz. I love having that little bit of bling as part of my card designs. Give this design a try!

Have a lovely day!


#stampinwitheva #stampinupproducts   

Monday, November 9, 2020

Using Retired Products Creatively

 As I was planning my cards for this weekend's In Home Card Classes, I decided to dive into my retired products (for the most part) and see what I could come up with. Here's a lovely Thanksgiving Card for the result! This card was inspired by Mary Knabe.


Starting with a Early Espresso base, I layered on strips of the retired Painted Autumn Designer Series Paper (DSP). The bottom piece is 2" x 4" and the top three strips are 1" x 4" spread out evenly. On top of that went a layer of Mango Melody 2-3/4" x 3-1/2", then a layer of Very Vanilla 2-1/2" x 3-1/4", From my very old wooden block stamp set, Teeny Tiny Wishes, went the greeting stamped in Mango Melody.


For the focal point, I started with the 3/8" Early Espresso Woven Ribbon (retired) wrapped around the two layers as shown. Then I fussy cut  the triple pumpkin image from the Painted Autumn DSP. Next was a die cut leaf from retired Seasonal Layer dies cut on Granny Apple Green. Then a Gold Foil leaf from the Nature's Roots Dies was prepared (cut and embossed). I layered those as shown, scotch taped it all together on the back side, then used Dimensionals to attach to the card front. Last step was adding the bow with glue dots.

I think the result looks great! You can use this layout idea with any combination of paper, ink and stamps. Go crazy and give it a try!

Thanks so much for stopping by today. I'd love to read your thoughts/comments on this design. You can comment at the end of this post. 

You are also invited to sign up for my email list in the right margin. I'd love to be in touch with you.


Wednesday, November 4, 2020

Curvy Christmas Wreath

Here's an eye popping card that is full of rich texture and lovely holiday colors of Shaded Spruce, Cherry Cobbler, and Crumb Cake. These gorgeous collection was released early for sale from the new Jan.-May 2021 Mini Catalog. They are the Curvy Christmas Stamp set, the Curvy Dies, and the Classic Christmas Designer Series Paper (DSP) .

This is the first time Stampin' Up! has produced such fun dies with so many possibilities that you can create with. I decided to try the DSP vertically along with combining the patterns.  What do you think?


Combined with the lovely paper is the Arrange a Wreath Stamp set for the tag, and the Wreath Dies
done in green and gold foil.  


For a close up view, you can see I dived deep into my stash for the perfect Cherry Cobbler retired buttons that are only about 8-9 years old! The 3/8" Very Vanilla with gold trim ribbon is also retired, but I tried for the first time to color the ribbon with my dark Cherry Cobbler Blends marker. It worked! I colored both sides of the ribbon with the brush tip and it dried very quickly. The color didn't come off on my hands when I tied the bow either. I was a happy camper with that technique.


If you want to be one of the first to have these products right now, 
please visit my online store CLICK HERE

I hope this card design helped inspire you to give this set a try. Thanks for stopping by today. I'd love to read your comments about this card design.