Pages

Tuesday, September 13, 2022

Stampin' Up!s Amazing Silhouettes Stamp Set Makes the Prettiest Happy Birthday Card When Paired with Hand-Penned Petals Designer Series Paper. Give This a Try!

Us cardmakers never have enough ideas to create from and we are always looking for more ideas to try. So today I'm bringing you two versions of a "Window" or "Peek a Boo" Card. 


You will be able to make a bunch of these cards easily. They are quite simple.

CARD DIRECTIONS:

Cut Cardstock Base - 8-1/2" x 5-1/2", score at 4-1/4", top fold
Basic White for inner layer 4" x 5-1/4" and glue inside
Cut your choice of Designer Series Paper 3-1/4" x 5-1/2" along with 
another piece 3/4" x 5 1/2" for the inner card layer (go ahead and glue this strip inside)

3" x 3" Basic White to stamp the butterfly image on in your choice of matching ink

To make the window, decide if you are using a punch or a die. Pay attention to the amount of space you have on your left edge. (When you look at my two cards, you'll see the heart punch has more room on the left side than my circle die does.)

After you cut or punch your window, you will place your butterfly image in the window to see how it looks. You will be attaching your butterfly with dimensionals to the back of the patterned paper before applying it to the card front. You may find you'll need to trim some of the excess from the 3" square so it won't show in spots. After you have the butterfly attached, then add dimensionals to the patterned paper on each side of the butterfly and close to the corners, so when that section is applied to the card front the layer will be one consistent height.

3/4" x 3" Basic White for greeting of choice from the Go To Greetings Stamp set. Stamped in Memento Tuxedo Black Ink. Banner ends of tag were cut by hand with paper snips.

Finish with embellishing your butterfly with Pearl Basic Jewels.


I hope your card turned out beautifully!

At the link below I have compiled an extensive shopping list for this card and the needed tools. You have several options when you use this shopping list. You can add all to the cart if you want everything. But if you already have some of the items in your stamping collection, just uncheck each box by the items you have, and the rest of the items you need will go to your shopping cart when you click the "add to cart" button. Once in the online store you can set up a free account or check out as a guest. Either way this link goes to my store and I appreciate your business so much! Thank YOU!

One Retired Item is the Hand Penned Designer Series Paper but you can substitute any other patterne paper you already own.
**************

**************
Learn how to make beautiful cards by signing up for my exclusive "Insider" weekly newsletter. Each week the news will share card class information, Stampin' Up! promotions, hot tips from me, and two free tutorials! Subscribe to my Weekly Newsletter today. Plus you’ll receive a FREE 14 Card One Sheet Wonder Tutorial to download when you receive my thank you email for signing up.


Please contact me or email me at stampinwitheva@gmail.com if you have any questions about products, techniques, or card designs. Comments below are welcomed too!

Monday, September 12, 2022

Have You Tried Combining the Celebrate Sunflowers Stamp Set from Stampin' Up! With The Faux Silk Technique? Share This With A Friend! The Results Are Gorgeous!

Get excited! You are going to learn how to do the Faux Silk Technique right here! Sometimes as a seasoned cardmaker your inspiration can run dry. Here on this post is a very easy technique you can do over and over again for any type of occasion card you need. Then when you mail or give one of these style cards, you will get highly praised and thanked! Won't you feel great?!

 My sample card photos are a Fall Birthday card using the Celebrate Sunflowers and Go To Greetings stamp sets. The pretty fall themed paper comes from the Celebrate Everything Designer Series Paper (DSP) pack. 

Did you know Stampin' Up! has color-coordinated cardstock, patterned papers, inks, ribbons, and embellishments? Oh my goodness, it makes card designing so much easier. You don't have to rack your brain, saying to yourself, "Do these colors match?" because you've purchased items from the big box craft stores that really don't go together. You will never have to worry using Stampin' Up!s fabulous Color Collections. You will make beautiful cards that match perfectly everytime!

 From the Regals Collection on page 123 of the current Annual Catalog you will use Crushed Curry and Shaded Spruce cardstock and the matching ink. The Early Espresso ink is from the Neutrals Collection also on page 123.


In the photo above I always recommend decorating the exterior of your envelope flap with some matching DSP. Cut a 2-3/8" x 6" piece and adhere to the flap with Stampin' Seal and trim off the excess with your Paper Snips. It's so pretty!


Look at the above and below photos. Do you see the subtle wrinkly effect the white tissue paper has on the DSP? It softens the bright colors of the DSP and gives a fun unique texture that is definitely one-of-a-kind each time you do this technique. Your cards will reach a whole new level of beauty when you add this technique to your cardmaking designs.


LET'S BEING CRAFTING!

FAUX SILK TECHNIQUE:
1. With the paper trimmer cut a 3-3/4" x 5" piece of the Celebrate Everything DSP.
2. Look through your gift wrap supplies and find the white tissue paper. You'll need a piece 5" x 7".
3. Locate your white school glue stick.
4. Once back at your crafting station - crumple up the piece of tissue paper.
5. Run your white glue stick all over the face of the DSP making sure the edges have glue too. The paper may start to bend slightly, that's ok.
6. Uncrumple the tissue, but don't smooth it completely flat again. Lay the center of the tissue centered on the piece of DSP. Start smoothing gently from the center towards the outer edges. You want some wrinkles left, just not big ones. With your index finger make sure the tissue is sealed on the outer edges of the DSP. Let it dry for a while.
7.  When everything feels dry to the touch, take your paper snips and flip the DSP over, and carefully cutting the excess tissue away from the DSP without cutting into the DSP accidentally.

WHILE THE TECHNIQUE IS DRYING - TIME TO CUT AND STAMP:
1. With your paper trimmer, cut the Crushed Curry cardstock at 5-1/2" x 8-1/2", score at 4-1/4". Fold your card in half and use your bone folder or a clear block edge to crease the fold well.
2. Cut the Shaded Spruce cardstock layer at 4" x 5-1/4".
3. Cut Basic White cardstock for the inside layer at 4" x 5-1/4".
4. Cut another piece of Basic White cardstock at 4-1/4" x 5-1/2" for the stamping of the sunflower, sunflower center, two leaves, and greeting.
5. With Crushed Curry Ink - stamp the sunflower image, and die cut it out.
6. With Shaded Spruce Ink - stamp two leaves and die cut them out.
7. Near an edge that remains of the Basic White piece, stamp your greeting in Early Espresso ink. Using your paper snips, fussy cut it out, and save for the assembly steps.
8.  Flip your sunflower stamp over and ink just the center area with Early Espresso Ink pad. Press what's left of the Basic White cardstock piece onto the inked center. Rub with fingers with out moving the paper. Lift up and turn over to dry. Fussy cut the center out.
9. Before gluing the Early Espresso center down on the sunflower, take a Blender pen and going from the center of the sunflower out, blend the ink to create a shaded effect about 1/4" into the petals. Don't rub the Blender pen too hard. I recommend using it on its side to get the desired effect.
10. Glue the Early Espresso Sunflower Center to the sunflower matching its location, so it fits perfectly.

FINAL ASSEMBLY STEPS:
1. With the Stampin' Seal adhere your tissue/DSP layer to the Shaded Spruce Layer.
2. Wrap the Linen Thread around the double layer 3 times, scotch tapE the cut ends on the back of the Shaded Spruce layer.
3. With Stampin' Seal adhere the double layer and thread to the Crushed Curry card front.
4. Adhere the Basic White Layer to the inside of the card for your personal message.
5. Scotch tape the two leaves to the back of the Sunflower as shown in my photos.
6. Raise the entire sunflower/leaves with dimensionals and affix to the card front. 
7. Cut one or two dimensionals in half and apply to the back of fussy cut greeting and apply to cardfront above the linen thread.
8. Apply the Iridescent Rhinestones to the card front as shown. (The rhinestones I used are retired, but my substitution on the shopping list will be just as pretty.)
9. If you haven't already, apply the DSP to the envelope flap, trim excess, and ALL DONE!

Don't forget to sign or stamp the back of your card/artwork and date it!

Wasn't that easy and fun? I hope you agree!

At the link below I have compiled an extensive shopping list for this card and the needed tools, too. You have several options when you use this shopping list. You can add all to the cart if you want everything. But if you already have some of the items in your stamping collection, just uncheck each box by the items you have, and the rest of the items you need will go to your shopping cart when you click the "add to cart" button. Once in the online store you can set up a free account or check out as a guest. Either way this link goes to my store and I appreciate your business so much!


Plus two more items from home
1. White Tissue Paper used in wrapping gifts
2. White School Glue Stick

*************
Learn how to get more done in less time by signing up for my exclusive "Insider" weekly newsletter. Each week the news will share card class information, Stampin' Up! promotions, hot tips from me, and two free tutorials! Subscribe to my Weekly Newsletter today. Plus you’ll receive a FREE 14 Card One Sheet Wonder Tutorial to download when you receive my thank you email for signing up.


Please contact me or email me at stampinwitheva@gmail.com if you have any questions about products, techniques, or card designs. Comments below are welcomed too!

Friday, September 9, 2022

Love Seasonal Displays? This Interchangeable Magnetic "O" Home Decor Piece Made with Stampin' Up! Products Does the Job and is So Cute Too!

Back in 2018 a group of my customers had a lot of fun making this 5" x 7" framed Monthly Seasonal Display using magnetic ovals for the "O" in home.


Here's the magnets that were included in that class. They could choose which 12 they wanted to make.

**************************

Now speed forward 4 years to 2022, and several of my current customers asked if they could make one for their home, since my frame sits on a bench near my front door. The stampers always see it when they enter for class. I said sure!

I decided it was time for an monthly magnet update so I switched from an oval to a circle (luckily I had enough room on the same frame to do that, phew!) I only reused the Cross Oval, because I didn't have anything better to replace that idea with.

I also gave some choices. The group could choose between the Easter Basket or Cross, the Tulip or Daisy, and the Ornament and Santa.

I used a lot of current and retired stamp sets and a few Paper Pumpkin stamp sets too. I have to say I'm very happy with the "new and improved" collection!

Today's post is to inspire you to do something similar with the supplies you have in your stamp room. 

You can use any embossing folder or use your score board to make the Basic White cardstock background cut 5" x 7". The H M E letters were made of  die cut Basic Black cardstock and Black fun foam (found in the bix box craft stores) glued together. They were glued directly to the white backing. The circles were 2-1/4" in diameter punched or die cut out of Thick Basic White cardstock, then layered with a piece of punched or die cut Designer Series Paper adhered with Tombow Multipurpose Liquid Glue. 

I used thin 8-1/2" x 11" adhesive backed magnetic sheets I purchased on Amazon, and then cut in a portion of one sheet in approximately 5/8" squares. One magnet went in the space of the O on the frame, then each magnet received one magnet in the center of the circle back. Since the magnets are lightweight, the magnets support each O.

So use these magnet ideas as inspiration to create your own, with whatever images speak to you for each month of the year! Have Fun!

************

Would YOU like to receive a couple exclusive "Insider" card tutorials each week in your email inbox? Subscribe to my Weekly Newsletter!. Plus you'll receive a Free14 card One Sheet Wonder Tutorial as a Subscriber bonus! 

Please contact me or email me at stampinwitheva@gmail.com if you have any questions about products, techniques, or card designs.

Wednesday, September 7, 2022

Big Square Layered Masculine Birthday Card using Stampin' Up! Products Galore! A Labor of Love!

 I discovered I hadn't shared some family birthday cards I made this past spring. I thought you might enjoy seeing them. This one my son-in-law received. 

This layout was a math calculation but I've got the numbers for you to make it easy!

Start with a Thick Basic White cardbase cut at 5-1/4" x 10-1/2". Score at 5-1/4"

There will be an imaginary grid that you will work within at 1-3/4" intervals.
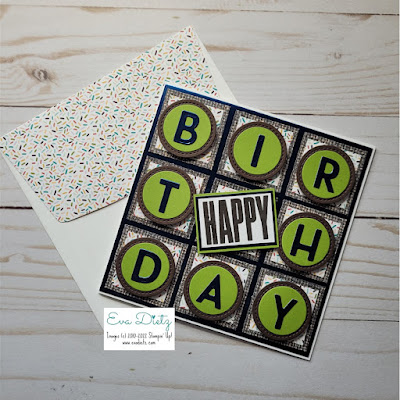

Dimensions:
The Night of Navy foil is 5-1/8" square.
9 pieces of In Good Taste Designer Series Paper 1-9/16" square.
9 pieces of Ice Cream Corner Designer Series Paper (DSP) 1-5/16" sqaure
 8 pieces of Early Espresso cardstock die cut with Stitch Shape Dies smallest circle 
8 pieces of Granny Apple Green cardstock die cut with 1-1/8" Layering Circles Dies
1 piece of Night of Navy Foil for the Playful Alphabet Letters dies 1-1/4" x 7"

Center Tag consists of Granny Apple Green cut 1-15/16" x 1-3/8"
Night of Navy Foil 1-3/4" x 1-1/4"
Basic White 1-9/16" x 1-1/8"
Stamped with Early Espresso Ink and the Biggest Wishes Stamp set "Happy"

The Letter Circles and center tag are raised up on Dimensionals.


I happened to have a 5-1/2" square white envelope so it all worked out perfectly. 
Decorated the exterior envelope flap with more Ice Cream Corner DSP 5-3/4" x 3".


A cute idea for the inner card using more of the Ice Cream Corner Designer Series Paper with fussy cut out popsicles layered on top of each other. !" x 5-1/4" strip.
More of the Night of Navy foil cut 1-1/4" x 3" for birthday number.

My son-in-law loved his card!


Close up view for the layers and stitching detail.

The majority of the products used are retired except for the Biggest Wishes stamp set, the Granny Apple Green, Early Espresso, and Thick Basic White cardstock. Check around on Etsy or Ebay and you probably can nab these products at a good price.

Would YOU like to receive a couple exclusive "Insider" card tutorials each week in your email inbox? Subscribe to my Weekly Newsletter!. Plus you'll receive a Free14 card One Sheet Wonder Tutorial as a Subscriber bonus! 

Please contact me or email me at stampinwitheva@gmail.com if you have any questions about products, techniques, or card designs.

Tuesday, September 6, 2022

Look Here! A Very Special Guardians of the Galaxy Groot Friendship Card Created with Stampin' Up! Products

My adult daughter visited recently and we had fun creating this very special A2 sized card together for a dear friend of hers. This friend loves the Groot character from the Guardians of the Galaxy 
series of movies.

We brainstormed together on how to make this card. 
It was going to accompany a gift of a small Groot figurine.

My daughter reported back that her friend loved her custom card and cute gift so much, she used the app "Marco Polo" to film herself opening the gift so my daughter could see her reaction. 

I was so happy to be part of the creative process and hear the effort was appreciated. 


Cardstock Colors Used: Cinnamon Cider, Gray Granite, Poppy Parade, 
Basic Black and Garden Green

Other Products Used:
Adhesive foam sheets for behind the die cut letters
Drew by hand Groot's head, fussy cut it out, then ran the cardstock through 
the Woodgrain embossing folder 
Tasteful Textures embossing folder for the background
Playful Alphabet dies
1/2" Circle Punch
White Colored Pencil
Small torn pieces of Garden Green for the leaves in his "bark"

The envelope was also fully embossed with the Woodgrain embossing folder since it was going inside the package we were mailing.

Would YOU like to receive a couple exclusive "Insider" card tutorials each week in your email inbox? Subscribe to my Weekly Newsletter!. Plus you'll receive a Free14 card One Sheet Wonder Tutorial as a Subscriber bonus! 

Please contact me or email me at stampinwitheva@gmail.com if you have any questions about products, techniques, or card designs.

Let me know in the comments if you are a fan of Groot and did we do him justice in our card design?

Thursday, September 1, 2022

Use Stampin' Up!s Jingle Jingle Jingle Stamp Set along with Sweetest Christmas Designer Paper to Create the Most Darling Holiday Card for Your Most Favorite People!

 This Jolly Holiday card filled with a Santa Hippo and a giant Candy Candy will work its magic this Christmas Season! I was inspired by a simiilar design from Hammond & Penny.

A child or grandchild would love to receive this darling card in their Christmas stocking, I'm sure!

Design Tips:

After you prepare your Garden Green card base, the Pool Party layer is cut with the Deckled Rectangles and dry embossed with the Tasteful Textures Embossing Folder. Onto that goes the silver and white polka dot layer. Both those layers are adhered directly to the card front. 

The Hippo is colored with Stampin' Blends then die cut out with the Hippo Dies. The Santa hat on the Hippo was fussy cut out from the Jingle (x3) stamp set and stuck to his head with a glue dot. The hippo is raised up with dimensionals.

The Sweetest Christmas Designer Series Paper had one of its Candy Canes fussy cut out close to the striped design. Then a Garden Green die cut candy cane was cut. The two were adhered together to help it "pop" off the card front. Tie a bow around the candy cane with a piece of the silver Simply Elegant trim. Affix the candy cane so it appears the Hippo is holding it.

The little "you're so" tag used the "you're so HIP" stamp from the Hippest Hippos stamp set. All you need to do is color the "you're so" words with the Garden Green Stampin' Write Marker by hand and stamp on a scrap of Basic White. Fussy cut out the small tag. Do not attach it to the candy cane until you have the "JOLLY" placed as shown in the photo.

Stamping the JOLLY from the Jingle (x3) stamp set goes together from two separate stamps. I recommend you stamp the Black outline stamp first. Then before inking the Real Red ink onto the decorative JOLLY stamp, do a trial run of seeing how you need to position it to get the stamp inside the black border lines. Once you have a feel for it, go ahead and stamp. After a couple moments to dry, you may begin fussy cutting the individual letters out. Each letter has halves of mini dimensionals on the back so they can be placed on the card front as shown. Then add the "you're so" tag that you have already prepared.

Finish up with the Adhesive Backed Seasonal Sequin.  Add a coordinating piece of Designer Series Paper for the envelope flap. Adhere and trim off the excess.


Cutting Dimensions

Garden Green Cardstock  4-1/4" x 11", scored at 5-1/2"

Pool Party Cardstock  3-1/2" x 5"

Silver & Gold 6”x6” Designer Series Paper  3" x 4-1/4"

Garden Green Cardstock  for Candy Cane base  1-1/2" X 4"

Basic White Cardstock for inner layer 4" x 5-1/4"

Basic White Cardstock for hippo, hat, Jolly, and mini tag  3" x 4"

Envelope Flap - 2-3/8" x 6"


This list of Supplies are available to order at my online store. Click each photo to shop.


Retired items used - Silver & Gold 6” x 6” Designer Series Paper & Hippest Hippos Stamp Set and  Hippo Dies were in the second Sale-a-Bration offering for July-August, 2022. The Tasteful Textures Embossing Folder is a little older than that. You may find these items offered on Ebay or Etsy, or feel free substitute what looks pleasing to you.

Would YOU like to receive a couple exclusive "Insider" card tutorials each week in your email inbox? Subscribe to my Weekly Newsletter!. Plus you'll receive a Free14 card One Sheet Wonder Tutorial as a Subscriber bonus! 

Please contact me or email me at stampinwitheva@gmail.com if you have any questions about products, techniques, or card designs.