Pages

Showing posts with label pear pizzazz. Show all posts

Friday, March 17, 2023

Create a Good Luck Shades of Green Quilt Card for St. Patrick's Day with your Stampin' Up! Patterned Papers.

I love quilts both to sew, and make as a card. So I thought this card quilt might be fun to try for St. Patrick's Day today. It all starts with cutting or punching 1 1/4" squares. Prepare a variety in various shades of green paper that you have in your stash.


Then select one of the shades as your card base color. Mine is Old Olive. Then cut a Basic Black layer 4" x 5 1/4". Next will be the Basic White layer you'll make your paper quilt on 3 3/4" x 5".

I have a black mat on my craft desk that has a 45 degree diagonal line on it, so I lined up my Basic White piece and drew a light pencil line with a ruler from the lower left corner to wherever it stopped on the upper right side. Having the line there helped me line up my squares. 

At first I was going to put them edge to edge, but decided against that when I saw I would end up with tiny bits at the outer edges and I didn't like that. The squares are spaced a little less than 1/8" apart. When you get done laying out your colors the way they look good to you, then start adhering them to the Basic White. You will have squares that hang over the edge and need to be trimmed off with paper snips.


Once the quilt layer is done, adhere to the Basic Black layer. Tie the Black and White Gingham ribbon around the layers. Affix the bow with a glue dot to hold in place.

I stamped the 1/2" strip of Basic White with the "good luck" from the retired Special Moments stamp set. I had used a 1 1/4" square punch for my quilt squares so that is how I got the tag to fit precisely in the center square raised up on mini dimensionals. I added two retired Holiday Rhinestone Jewels in the green color at the point end of the tag.

Give this quilt design a try and it will soon be one of your favorites to make over and over again! Let me know if I can be of any help to you!

If you don't already have your own Stampin' Up! Independent Demonstrator, I'd love to be yours!

Learn how to get more done in less time by signing up for my exclusive "Insider" bi-monthly newsletter. Twice a month the news will share card class information, Stampin' Up! promotions, hot tips from me, and free tutorials! Subscribe to my Bi-Monthly Newsletter today. Plus you’ll receive a FREE 14 Card One Sheet Wonder Tutorial to download when you receive my thank you email for signing up.


Please contact me or email me at stampinwitheva@gmail.com if you have any questions about products, techniques, or card designs. Comments below are welcomed too!

Good Luck Gnome Flying a Clover Kite for St. Patrick's Day

 Happy St. Patrick's Day! I donned my lucky scarf to share with you this darling gnome who'se flying his shamrock kite to bring you good luck for St. Patrick's Day!


You can make this easy card if you happen to have either Stampin' Up!s recently retired Storybook Gnomes Designer Series Paper that you can fussy cut a cute preprinted gnome from or maybe you have the current Friendly Gnomes stamp set where you can stamp a cute gnome in matching colors to the shade of green Designer Series Paper that you choose. 

My piece comes from the retired Celebrate Everything Designer Series Paper. It is layered on Basic White and Pear Pizzazz cardstock layers on a Basic White card base. I finished up this cutie with four small gold foil punched hearts topped with a gold gem and used some yellow bakers twine with a gold metallic thread in it for the kite string. 

My gnome is mounted on a very retired piece of Pear Pizzazz foil, and the good luck is stamped from the retired Special Moments set. Simple but cute! Give something like this a try with what you have in your crafting stash. 


I hope you'll give this card layout a try and that it brings you good luck!

If you don't already have your own Stampin' Up! Independent Demonstrator, I'd love to be yours! Let me know if I can be of any help to you!

Learn how to get more done in less time by signing up for my exclusive "Insider" bi-monthly newsletter. Twice a month the news will share card class information, Stampin' Up! promotions, hot tips from me, and free tutorials! Subscribe to my Bi-Monthly Newsletter today. Plus you’ll receive a FREE 14 Card One Sheet Wonder Tutorial to download when you receive my thank you email for signing up.


Please contact me or email me at stampinwitheva@gmail.com if you have any questions about products, techniques, or card designs. Comments below are welcomed too!

Tuesday, May 24, 2022

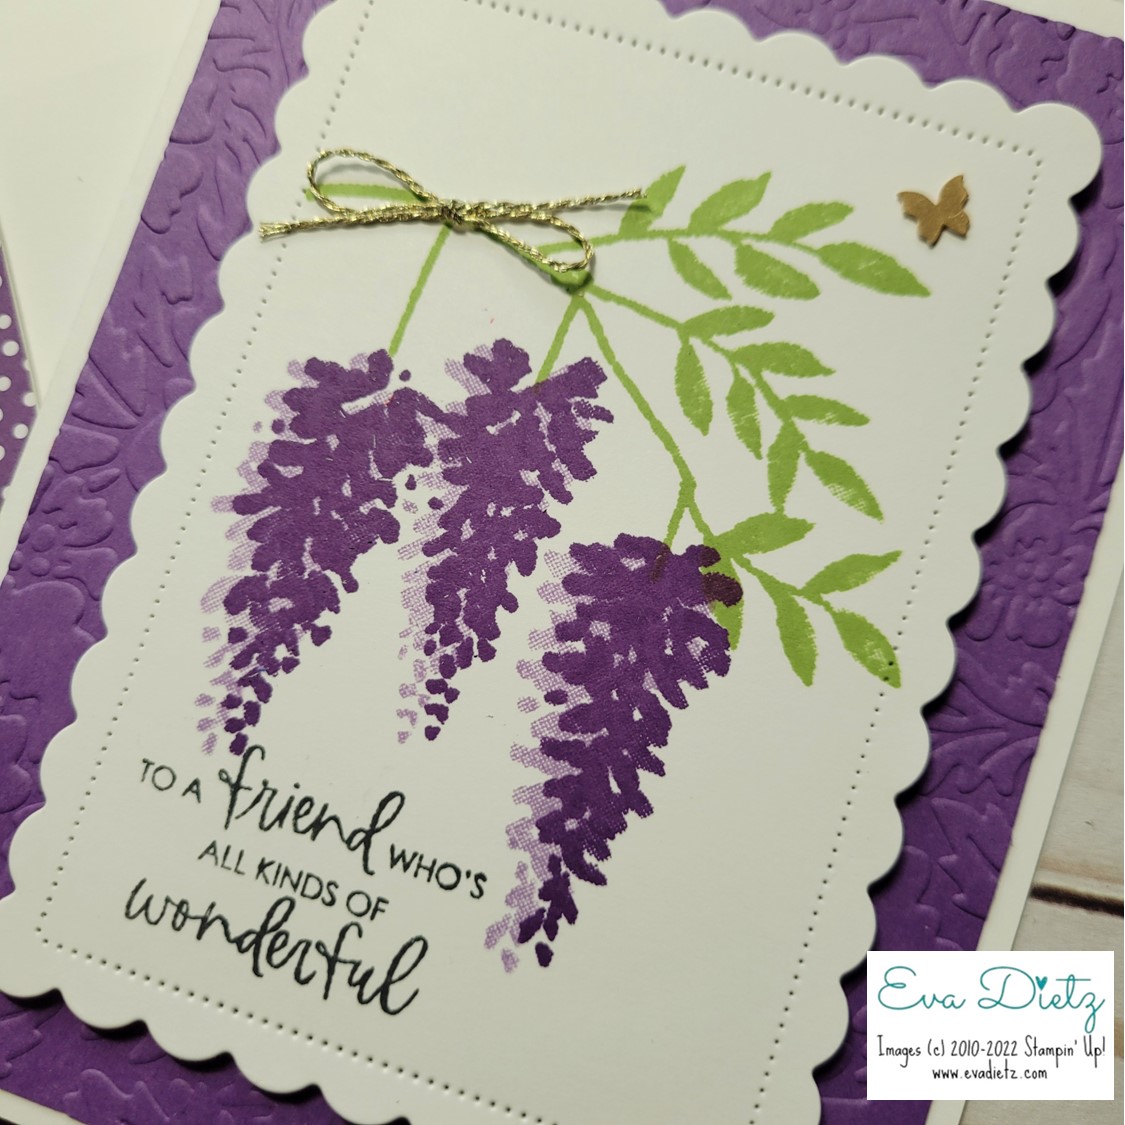
Introducing the Wisteria Wishes Stamp Set

 Have you ever grown Wisteria? I haven't, but I have always admired those that can. So when Stampin' Up! placed the Wisteria Wishes stamp set in the new Annual Catalog, I had to get it. That way I can "grow' some beautiful Wisteria cards instead! You can "grow" some too!


Cutting and Assembly Directions:
1. Basic White cardbase 5.5" x 8.5" scored at 4.25"
2. 4" x 5.25" Gorgeous Grape cardstock embossed with the Pretty Flowers folder. Adhere to cardbase.
3. Die Cut Basic White cardstock 3.5" x 4.25" with Scalloped Contour Die as shown. 
4. With Pear Pizzazz ink stamp branch.
4. With Highland Heather ink stamp triple flower stamp.
5. With Gorgeous Grape ink stamp triple flower stamp over just a smidge.
6. With Memento ink stamp greeting.
7. With Dimensionals raise Scalloped stamped layer on Gorgeous Grape layer.
8. Add gold bow and butterfly
9. Decorate envelope flap with 2-3/8" x 6" piece of matching Designer Series Paper.

One thing I learned is you have to pay attention to stamp the leaf branch so the wisteria stems hang vertically. Stamp  the triple floral image first in Highland Heather, then again moved just a bit to the right in Gorgeous Grape ink.


Products Used to Create this Card:

159434 Wisteria Wishes $18.00 

159276 Basic White Cardstock $10.25

146987 Gorgeous Grape Cardstock $9.25

155428 Pretty Flowers Embossing Folder $7.50

155560 Scalloped Contour Dies $35.00

132708 Memento Tuxedo Black Ink $6

147099 Gorgeous Grape Classic Stampin’ Pad $8.00

147103 Highland Heather Classic Stampin’ Pad $8.00

147104 Pear Pizzazz Classic Stampin’ Pad $8.00

158136 Brushed Brass Butterflies $10

Retired – Fine Gold Cording

159236 Basic White Medium Envelopes $7.50

Envelope Flap paper is retired

Adhesives

104430 Stampin’ Dimensionals $4.25

144108 Mini Dimensionals $4.25

152803 Stampin’ Seal Adhesive $8.00

152814 Stampin’ Seal Refill $5.50

103683 Glue Dots $5.25

Tools

152392 Paper Trimmer $25.00

152391 Cutting Blades Multipack $12.00

103579 Paper Snips $11.00

149653 Cut & Emboss Machine $125.00

150673 Mini Cut & Emboss Machine $63.00

144107 Take Your Pick Tool $10.00

147042 Simply Shammy $8.50

Clear Stamp Blocks various sizes on page 149 of Annual Catalog


Please contact me anytime if you have any questions 
or 
stampinwitheva@gmail.com

With love and gratitude,

Thank you for taking the time to comment on my post, you've made my day!

Monday, March 28, 2022

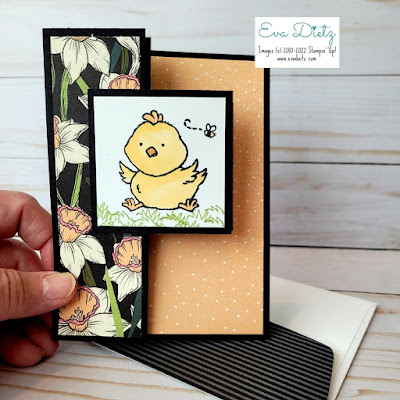
Easter Card Idea with a Cute Chick

Do you have memories of watching your children or of yourself going on Easter Egg hunts as a child? I sure do of my children. They loved hunting for eggs out in our yard, but they weren't the best at sharing. We resorted to writing their names on the plastic eggs, so they could find only the ones with their name on them. That's how we could keep it fair. We often added some money in a few of the eggs and they really loved that!

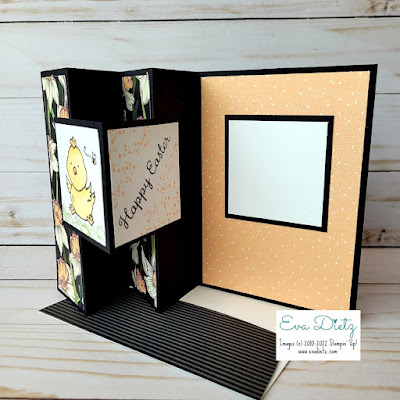
 With those memories in mind, I designed this card after being inspired by Terri Gaines fun fold. It is hard to believe Easter will be here in just a few short weeks. It is April 17 this year. So at my Stamp and Chat Classes this past weekend, this is one of the Double Z with Pop Out Fun Fold cards we made.


Fun fold cased from Create with Terri Gaines - her Jan. 22, 2022 post. 

The Card base is 5.5" x 11". Score at 1.75", 3.5", 5.25" and 7".

The Designer Series Paper pieces are: 2 pieces at 1.5" x 5.25" and 1 piece 4" x 5.25"

The Pop Out is made from one piece of Basic Black cut 2.5" x 5", scored at 2.5". Two pieces of Basic White are cut 2.25" square.

I changed up her measurement just a bit. The back section of the card, I increased the Basic Black to be 2.5" square with the Basic White piece at 2.25" square, so all the squares are the same size.


Products Used in this Card Design:

Retired – Welcome Easter stamp set

Retired Sale-a-Bration item – Daffodil Afternoon Designer Series Paper

Use whatever springy paper and Easter stamp sets you have.

The Following items are current and in my Online Store. 
You can order by clicking on the yellow box link below.

157786 Daffodil Daydreams $23 for splatter stamp

121045 Basic Black Cardstock $9.75

159276 Basic White Cardstock $9.75

132708 Memento Tuxedo Black Ink $6

155670 Pale Papaya Classic Stampin’ Ink Pad $7.50

100082 Stampin' Write Basic Black Marker $3 for bee body

154905 So Saffron Stampin’ Blends $9 - chick body

155519 Pale Papaya Stampin’ Blends $9 - chick legs and cockscomb

153105 Cinnamon Cider Stampin Blends $9 (will be retiring May 2, 2022) - Chick beak

147104 Pear Pizzazz Classic Stampin’ Ink Pad $7.50 - grass

159236 Basic White Medium Envelopes $7.50 with piece of coordinating Designer Series Paper cut 2-3/8" x 6" adhered to exterior envelope flap and trimmed with paper snips.

Adhesives

154031 Tear & Tape $7

152803 Stampin’ Seal Adhesive $8

152814 Stampin’ Seal Refill $5.50


Tools

152392 Paper Trimmer $25

152391 Cutting Blades Multipack $12

103579 Paper Snips $10

147042 Simply Shammy $8

Clear Stamp Blocks various sizes on page 145 of Annual Catalog


As you walk through your Easter memories, consider making a card similar to this one for your grandchild and/or your children.

Have a lovely day!
Subscribe and receive a free card tutorial

Tuesday, January 11, 2022

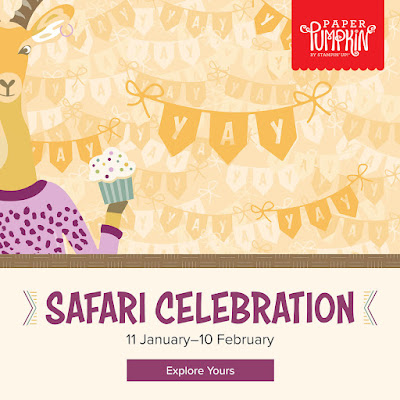
Let's Go on Safari with Paper Pumpkin

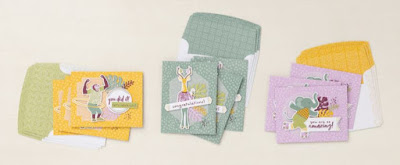
 Do you have friends that could use some encouragement? Children or Grandkids you would like a project to make with them? Do you want to expand your crafting fun?  Well, a monthly subscription to Paper Pumpkin is the perfect answer! Check this out!


Did you see that? It’s a mischievous monkey swinging from tree to tree! What about that elephant marching through the mud? Can you catch an antelope galloping in the grass? Grab your binoculars, buckle up, and hop into our off-road truck—there’s so much to see on this safari!

Answer the call of the wild—and your creativity—with the Safari Celebration Paper Pumpkin Kit. This playful, party-themed kit includes all the goodies and gear you need to create nine cards and coordinating envelopes in safari-inspired shapes and patterns you’ll go wild for! Make every occasion a celebration with this month’s amusing animals, beautiful botanicals, and celebratory sentiments.

Don’t monkey around and miss this amazing adventure! Unleash your creativity with February’s wildly fun kit.


Details:

  • This month’s kit contains enough elements to create 9 cards—3 each of 3 designs—and 9 coordinating envelopes. This all-inclusive kit includes printed card bases, die-cut paper pieces, embellishments, adhesive, and more!
  • The Safari Celebration Paper Pumpkin Kit includes a Rich Razzleberry Classic Stampin’ Spot!
  • This kit’s stamp set is an uplifting one! Make every occasion a celebration with sentiments that say “yay!”, “fantastic!”, and other fun phrases.
  • Explore each of our current In Color collections with this colorful kit! Discover designs and paper pieces in Bumblebee (a 2020–2022 In Color), Fresh Freesia (a 2021–2023 In Color), and Soft Succulent (a 2021–2023 In Color).
  • Card size: 4-1/4" x 5-1/2" (10.8 x 14 cm)
  • Envelope size: 4-1/2" x 5-3/4" (11.4 x 14.6 cm)
  • Coordinating colors: Bumblebee, Fresh Freesia, Pear Pizzazz, Rich Razzleberry, Soft Succulent, Soft Suede


Now is the best time to subscribe because you can receive extra Sale-a-Bration rewards with a prepaid subscription.  Order here
Once you've purchased, Stampin' Up! will email you a coupon code to enter here 
Set up your online account and add the coupon code and you'll be receiving your first kit before the end of February!

Then share the fun of making your kit with your friends. Start a kindness movement!


#stampinwitheva #sudemo #paperpumpkin


Thursday, December 2, 2021

Two Piece Cascade Fancy Fold Card

Now it is my downline Anne's turn to show off the card she shared with me while we were together at OnStage at Home. She chose a two-piece Cascade Fancy Fold design.
I love how pretty it turned out! Thanks for the great idea Anne!


The message can be written on the reverse when the card is folded flat.


Supplies Used to Make this Card:

Pale Papaya Cardstock and Ink
 Expressions in Ink Designer Series Paper
Artistically Inked Stamp Set 
Pear Pizzazz Ink
Basic White cardstock
Gingerbread Dies for trim
Memento Tuxedo Black Ink
Champagne Rhinestones

******

Here is a great website full of a gazillion fun folds.

https://beccysplace.blogspot.com/2012/04/technique-class-cascade-card.html

Why reinvent the wheel when great resources like this one are already available? Check it out, it will be worth your time.

Happy Fun Folding!


#stampinwitheva #sudemo
#funfolds