Pages

Showing posts with label Hues of Happiness Designer Series Paper. Show all posts

Wednesday, November 16, 2022

The OnStage Experience in Vancouver BC - Part 2

PART 2

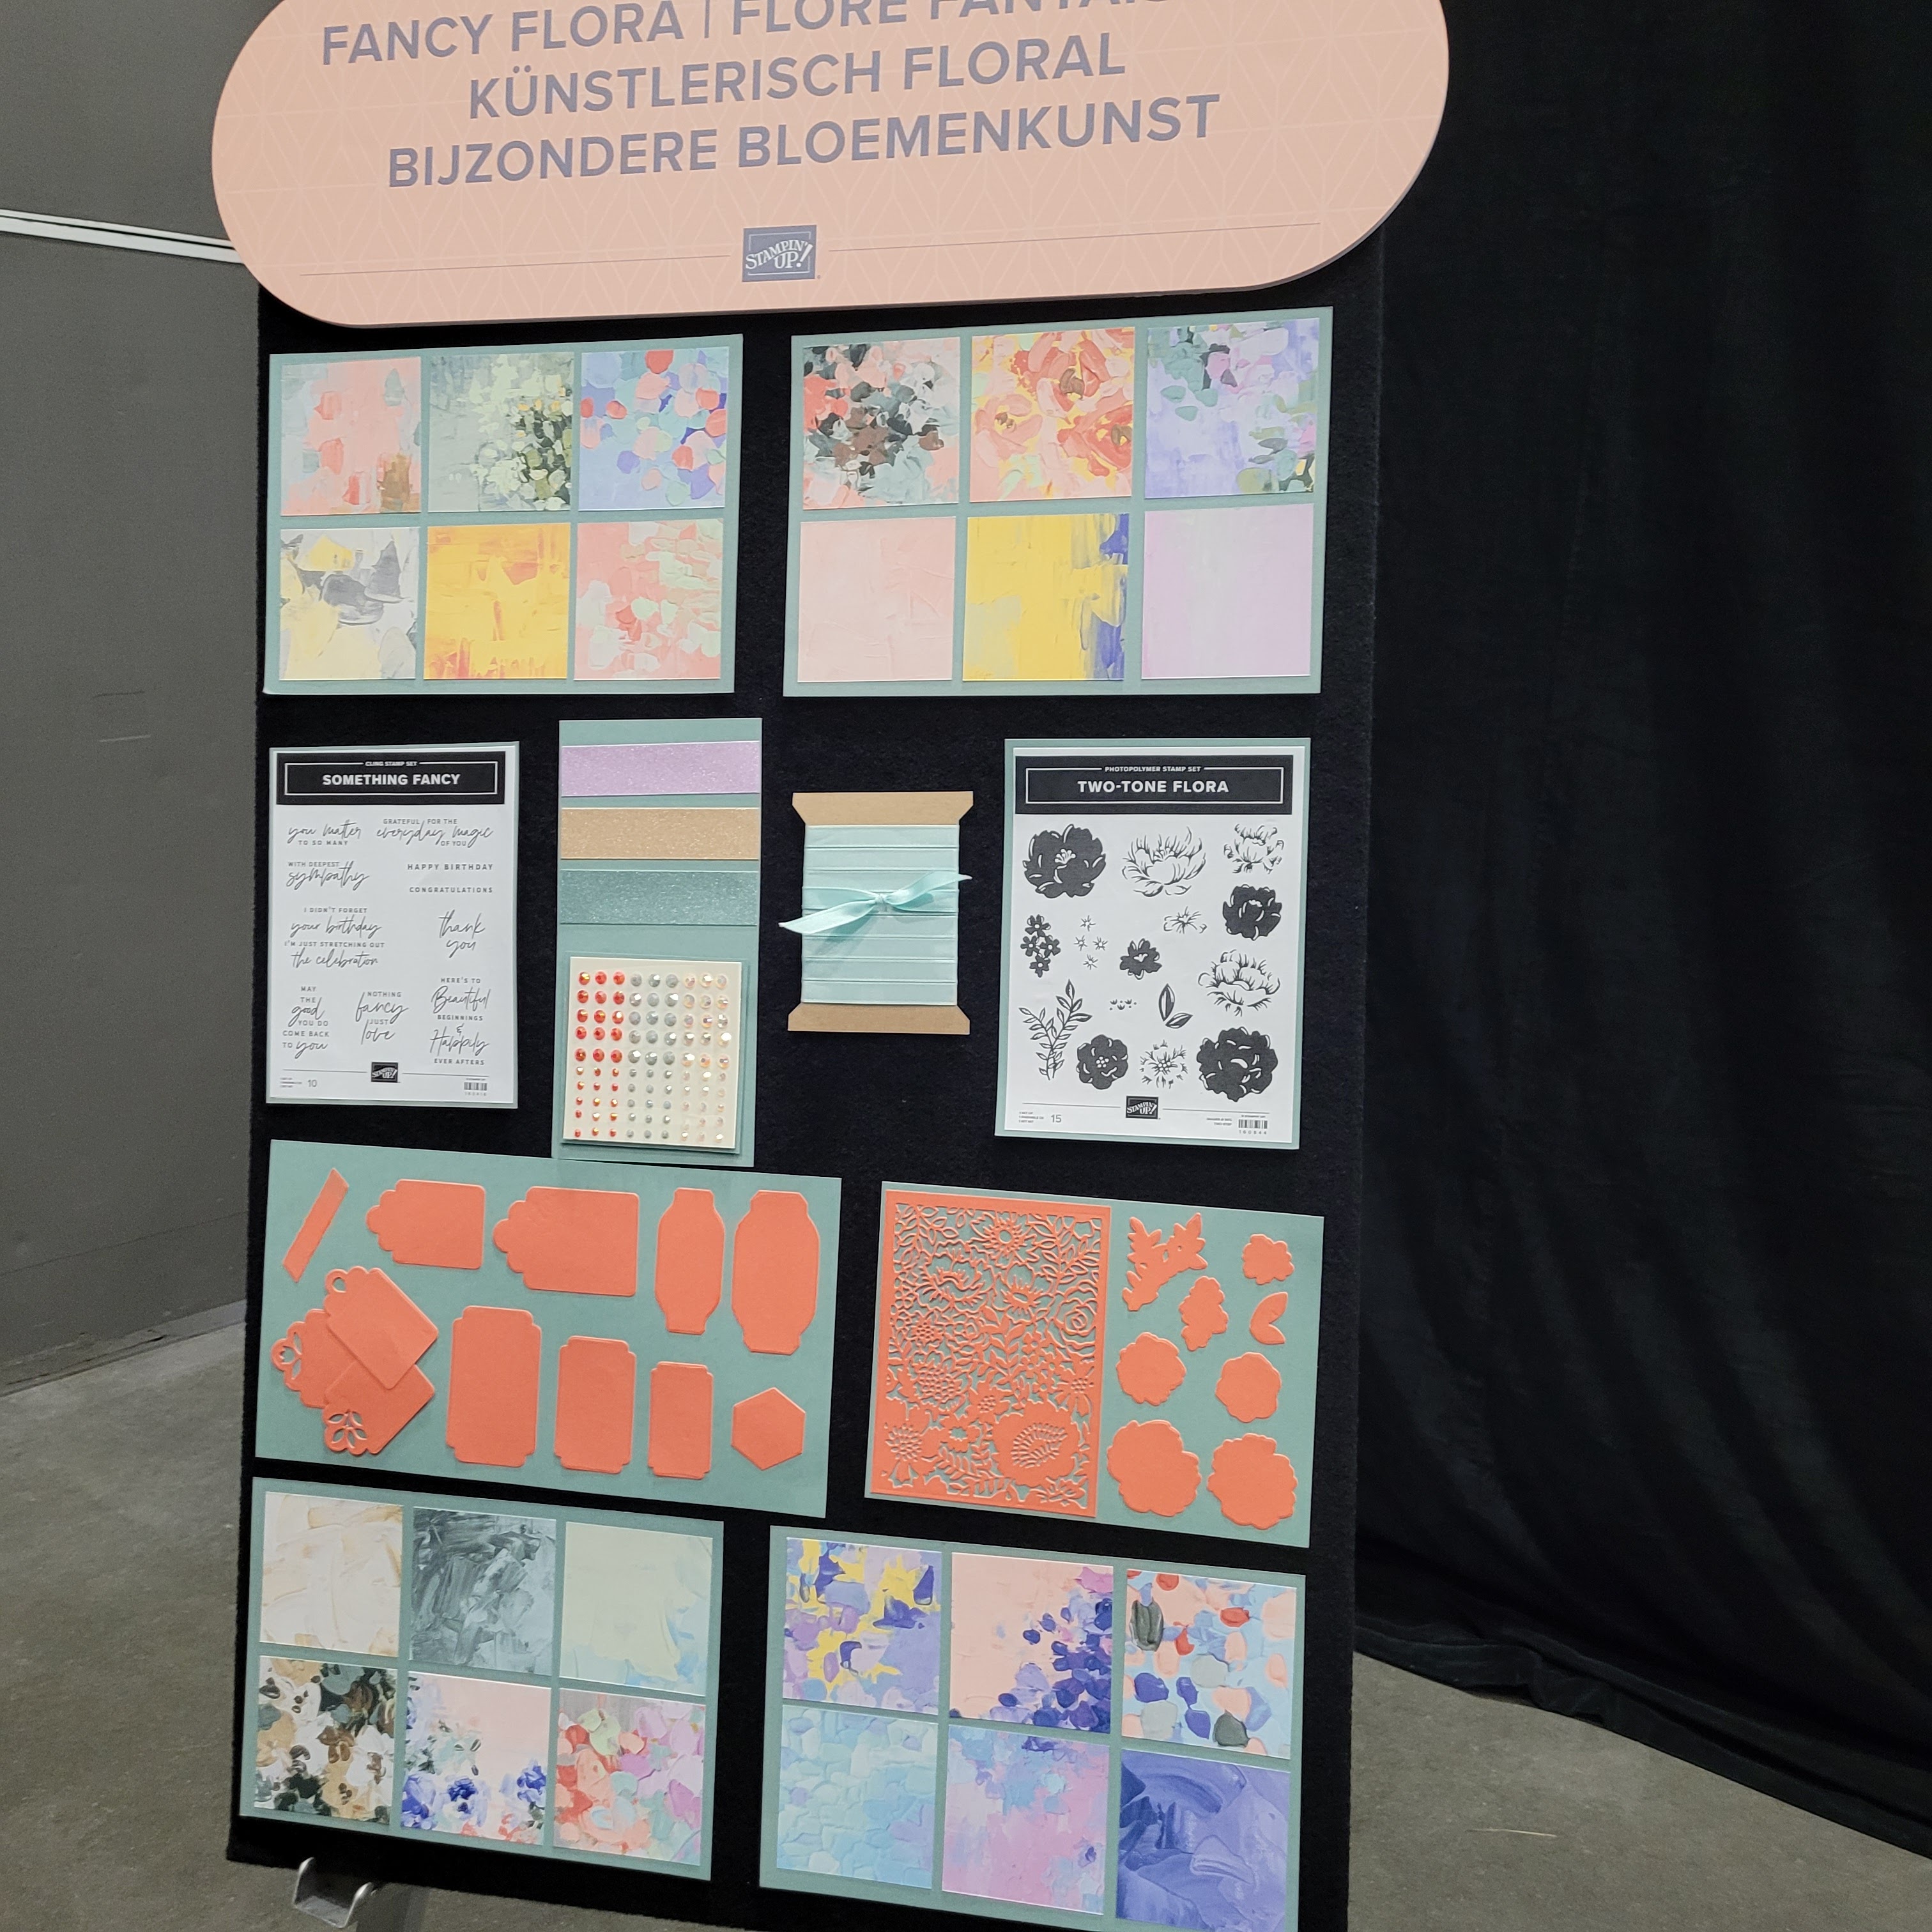
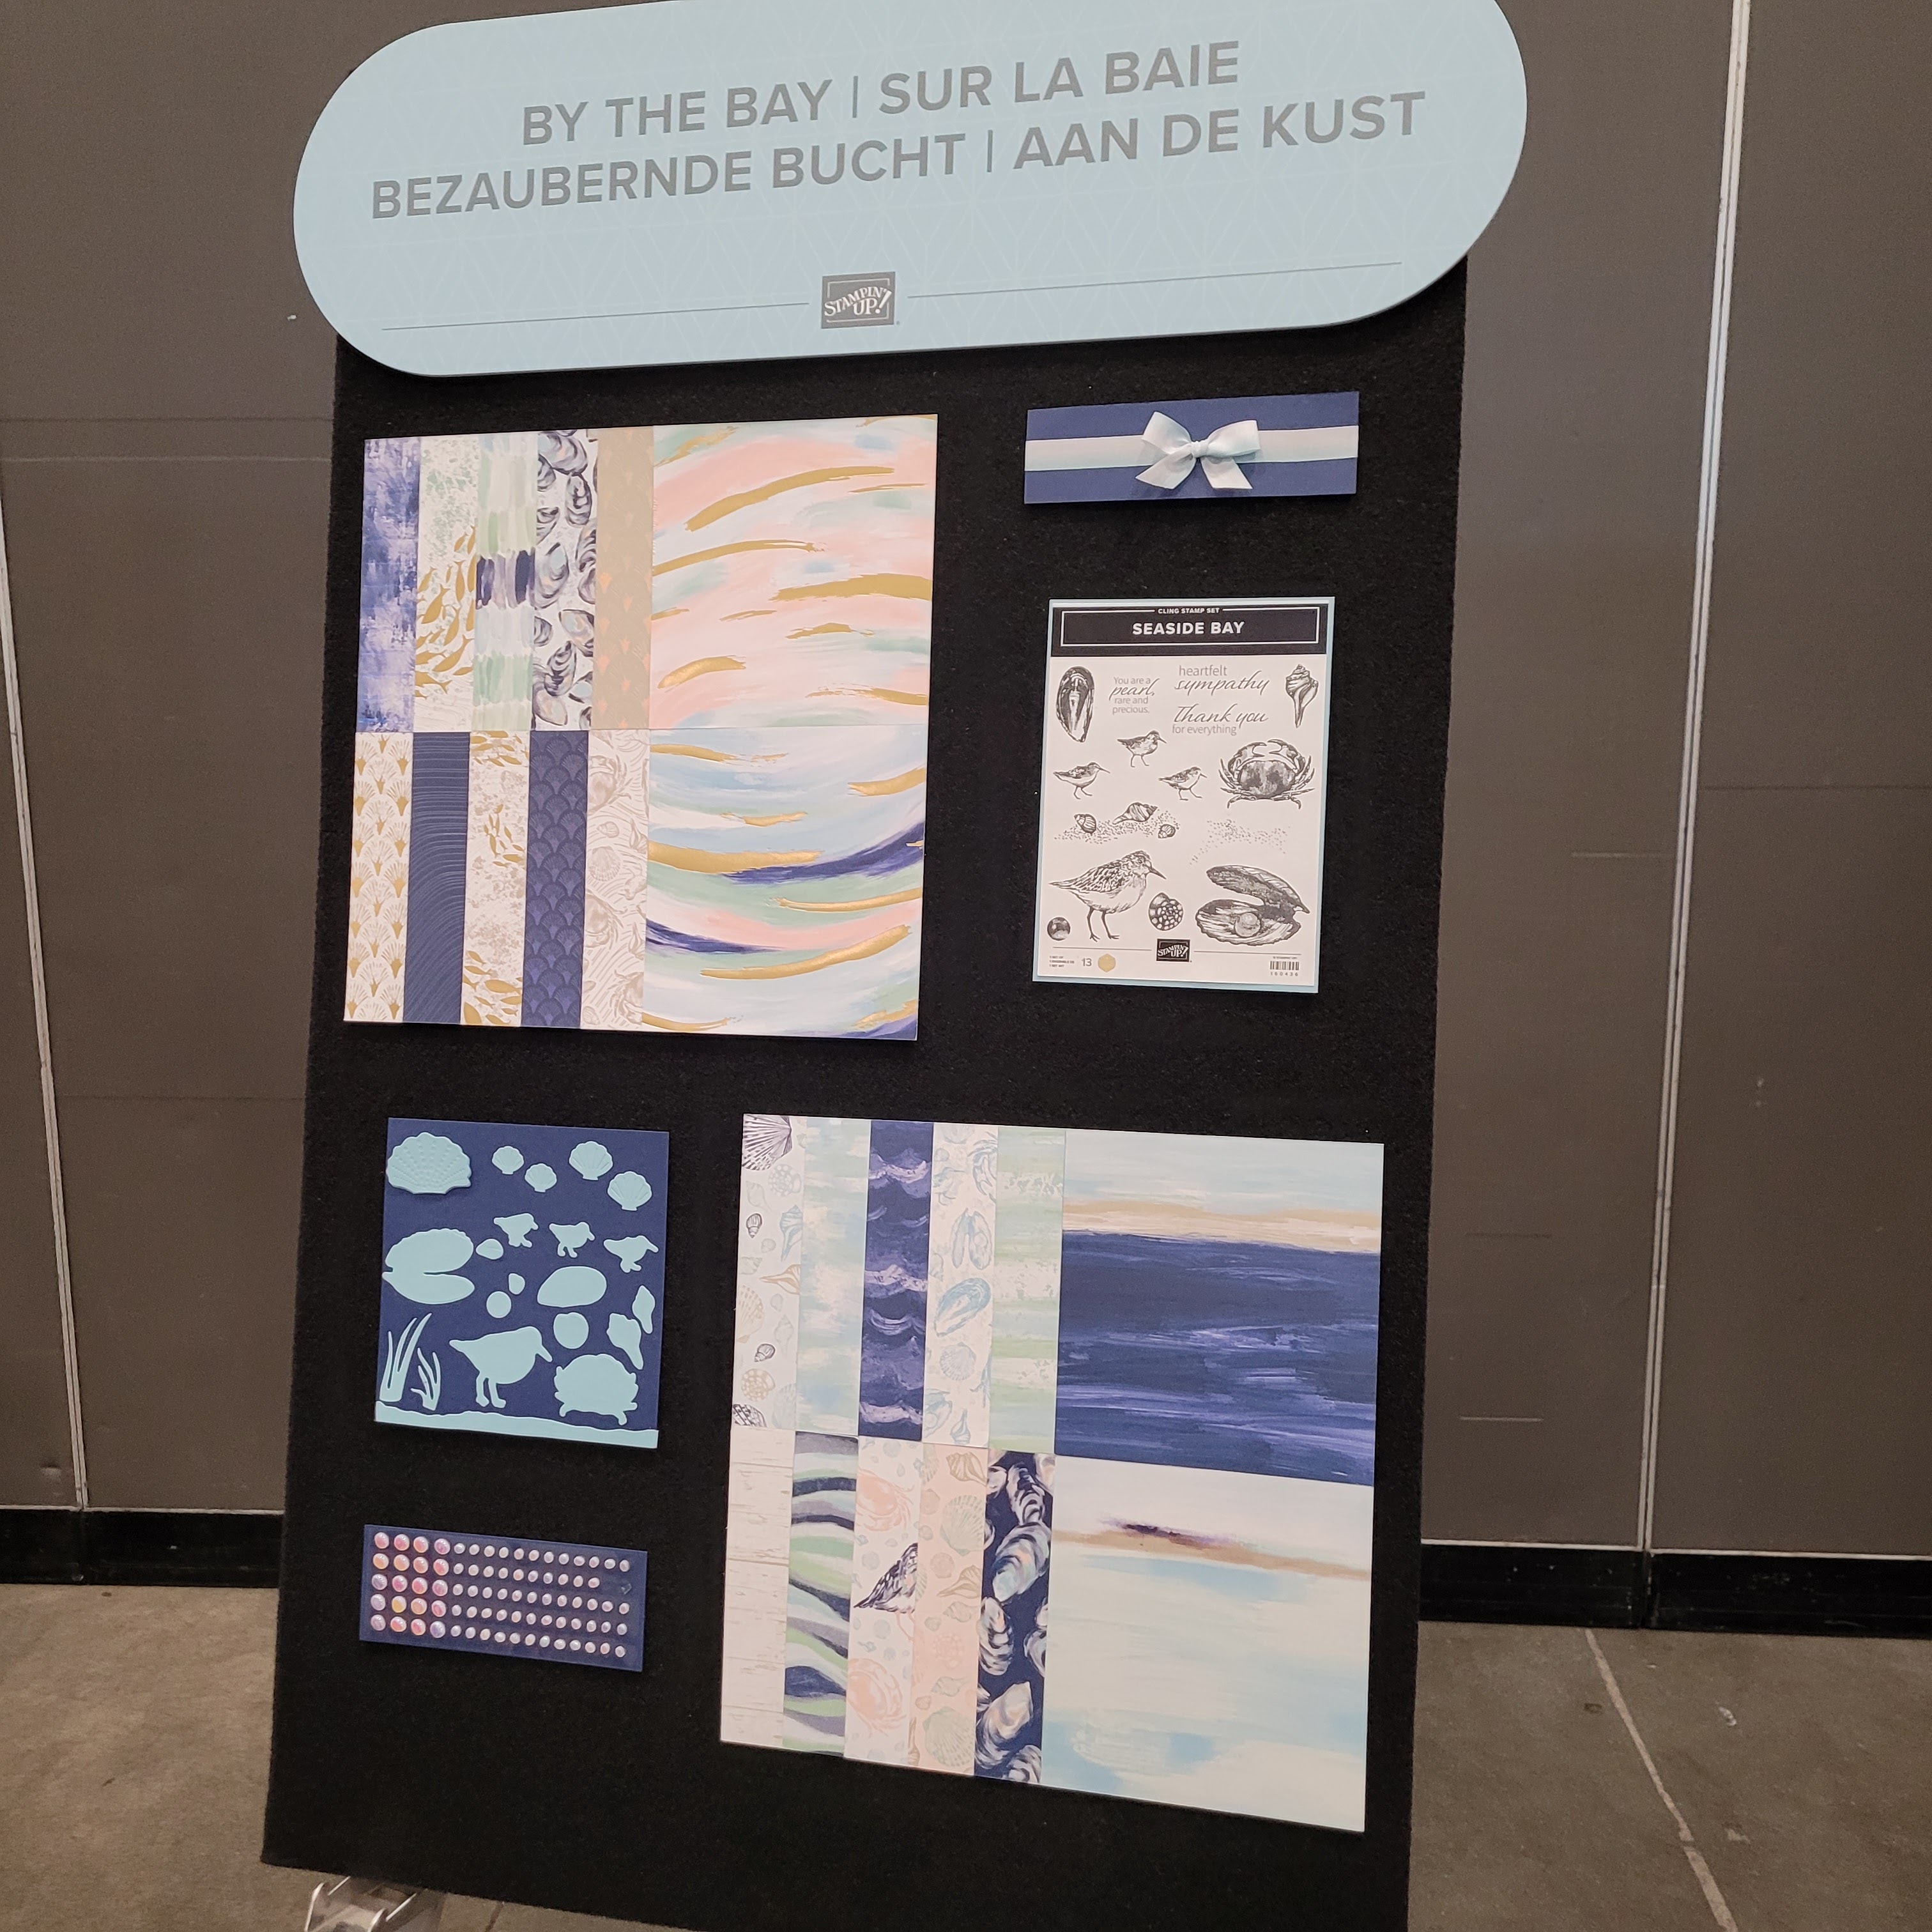
Assorted Display Boards with upcoming products shown.


More Sale-a-Bration choices displayed.


Country Lane Floral Suite above and below


Some of the Demos who attended placed one of their swap cards on the display board.

*********************
My General Swaps - Assorted Designs

Used the Picture This Dies, with the Framed and Festive Stamp Set, Boughs of Holly Designer Series Paper, and the Decorative Circle Punch.

A simple SIP card - Stamps, Ink and Paper!
Thick Basic White Card Base, Boughs of Holly Designer Series Paper, and Season to Remember Stamp Set with Shaded Spruce Cardstock and Real Red Ink. Added Linen Thread.

Flip Flap Fun Fold Gift Card Holder - Soft Suede Card base, Storybook Gnomes Designer Series Paper with fussy cut out Gnomes,  and the Framed and Festive Stamp Set.

Inside peek - gift card goes where I put my business card.

******************
Organized Swap Cards
(held during our lunch break)

A Locking Angled Flip Flap Card - Happy Birthday Card using Sweetest Cherries Bundle, Real Red Cardstock, and Perfectly Penciled Designer Series Paper.

Z Fold Sympathy Card - 2 Color Combinations
Melon Mambo and Daffodil Delight Cardstock. Flowers fussy cut from Hues of Happiness Designer Series Paper, Scalloped Contour Dies, Good Feelings Stamp Set and Inspired Thoughts Stamp Set.


****************
Next blog post I'll be sharing the cards I received while swapping.

Learn how to get more done in less time by signing up for my exclusive "Insider" bi-monthly newsletter. Twice a month the news will share card class information, Stampin' Up! promotions, hot tips from me, and free tutorials! Subscribe to my Weekly Newsletter today. Plus you’ll receive a FREE 14 Card One Sheet Wonder Tutorial to download when you receive my thank you email for signing up.


Please contact me or email me at stampinwitheva@gmail.com if you have any questions about products, techniques, or card designs. Comments below are welcomed too!

Thursday, October 27, 2022

It May Not Be Spring But Stampin' Up!s Hues of Happiness Suite Can Be Used Year Round With This Locking Tent Easel Fun Fold Card

This Happy Birthday card may seem too springy and out of season at this time of the year, but let's focus on learning how to make the Locking Tent Easel Fun Fold portion of this card. You can incorporate any occasion stamp set, cardstock colors and matching Designer Series Papers you have in your craft collection. 


Front View

Side View Showing How the Locking Portion Workds on Tent Easel Fun Fold

CUTTING DIRECTIONS:

 First Base Piece - Daffodil Delight cardstock 4-1/4” x 11, scored at 2-3/4” and 5-1/2”

Second Base Piece – Daffodil Delight cardstock 3-1/2” x 9”, score at 4-1/2”

For Inside of Back - Hues of Happiness Designer Series Paper 4” x 5-1/4”

Basic White Inner Layer for Greeting 3-1/4”x 4-1/4”

Hues of Happiness Designer Series Paper for front under front flap 2-1/2” x 4"

Basic White cardstock 3-1/4” x 4-1/4”, then slice 1’’ from right side to left bottom corner to create diagonal

Scrap of DD for Tags die holes

Basic White Envelope Flap with Hues of Happiness Designer Series Paper  cut 2-3/8” x 6”

Fussy Cut out Flowers and leaves as show and adhere as shown


Online Shopping is easy with these links below for the products used in this project.


Tools Needed:

1/16 th hole punch – available commercially

Paper Trimmer 152392 $25

Bone Folder 102300 $7

Paper Snips Scissors 103579 $11

Take Your Pick Tool 144107 $10

Stampin’ Seal Adhesive 152813 $8

Glue Dots 103683 $5.25

Foam Adhesive Sheets 152815 $8

I hope you'll give this Fun Fold a try. It is a unique one, but worth the effort!

Here's another fun idea using Hues of Happiness, visit here!

Learn how to get more done in less time by signing up for my exclusive "Insider" weekly newsletter. Each week the news will share card class information, Stampin' Up! promotions, hot tips from me, and two free tutorials! Subscribe to my Weekly Newsletter today. Plus you’ll receive a FREE 14 Card One Sheet Wonder Tutorial to download when you receive my thank you email for signing up.

Shop or Join Stampin' Up!

Please contact me or email me at stampinwitheva@gmail.com if you have any questions about products, techniques, or card designs. 

Thursday, August 18, 2022

The Stampin' Up! Happiness Abounds Bundle is Fantastic! Look at the Beautiful Floral Birthday Card You Can Create and Give to Friends or Family!

Do you love floral images? If you do, then the Happiness Abounds Bundle from Stampin' Up! will quickly become your favorite Bundle to work with from the 2022-23 Annual Catalog.

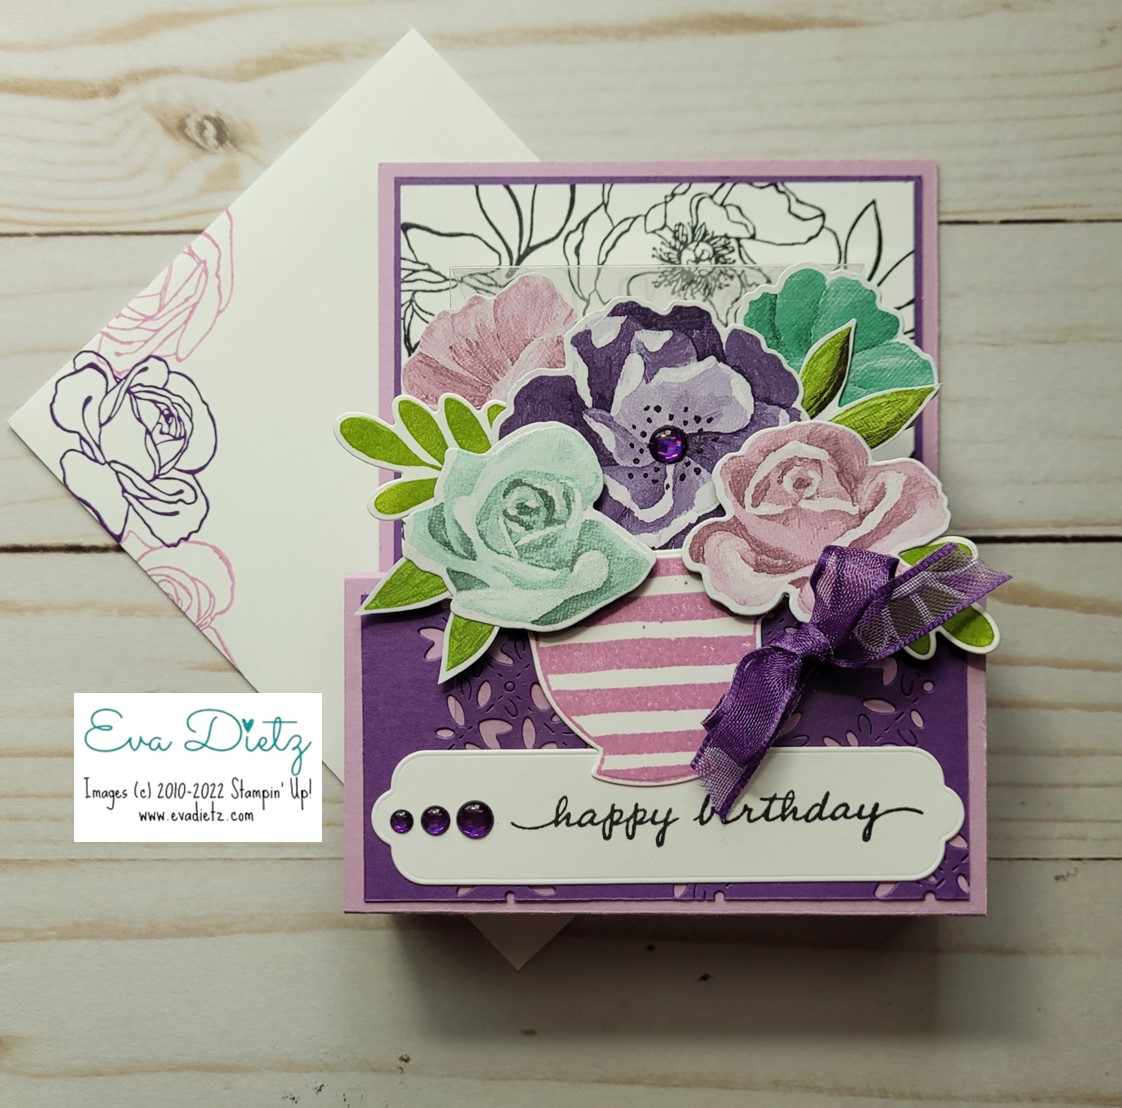
I have created something different for you to try with this Pop-up Front-Step Fun Fold. A piece of Window Sheet is used to create a see-though look. The Window Sheet allows more of the back panel to show where I stamped a variety of black floral images. By doing this, the front floral tea cup layered image POPS off the front of the step fold. 


Focus on the envelope design between these two photos, above and below.
 
The front of the envelope had some floral images stamped in two colors. 
The back of the envelope flap has an all over floral design stamped in Memento Black Ink.

This envelope has beauty on both sides!


When the Front Step Card is turned over below, there is a panel on the back for your message. Fussy cut some of the edge florals from the Hues of Happiness Designer Series Paper to incorporate into this lovely floral edge look.


Let's get Creating!

Cutting Measurements

Fresh Freesia cardstock - cut 4 1/4 x 11"
 
Gorgeous Grape cardstock - cut two pieces. Front Upper Panel 4 x 3" 
and Lower Front Die Cut Panel 4 x 2" 

Basic White cardstock - Front Upper Panel - cut 3 7/8 x 2 7/8"
Back of Card Sentiment Panel - 4 x 5 1/4"
For Teacup - cut 3 x 2"
For Happy Birthday tag - cut 4 1/4 x 1 1/4" 
For 2 Leaves - 2 1/2" square piece
 
Window Sheet - 2 3/4 x 5 1/2"


Scoring and Assembly Instructions:


Fresh Freesia card base - score at 5-1/2", 6-3/4", 9", 10-1/4". 
Fold on each score line, use bone folder. 
Add Tear and Tape as shown in diagram. 

Helpful Hint! Practice Fold the card base at the 5-1/2" line, then fold again at the 9" line to the inside. See how that allows the cardbase to lay flat? 
Referring to the side view photo below, peel off the protective layer on the Tear and Tape and 
adhere to create foldable/pop up base, replicating what you just did on your practice fold. 

Gorgeous Grape cardstock piece - adhere to upper front panel section. 

Basic White cardstock upper front panel piece- stamp with variety of floral and leaf images from the Happiness Abounds stamp set in Memento ink. Adhere to Gorgeous Grape Layer. 

Gorgeous Grape cardstock lower front panel piece - use Blossoming Happiness die to create peekaboo look. Adhere to Fresh Freesia lower panel of card base. 


Window Sheet - score at 3/4" and 2". Fold plastic on each score line until there is a good crease but plastic isn't cracking. Position the larger area of the window sheet on top of the die cut Gorgeous Grape panel, centering it from side to side. 

Apply one pass of Stampin' Seal adhesive at the plastic bottom edge only, so it will be covered up by the tag later. Press in place. 

Fold up the card like it will fit in an envelope as shown in the image below. That will give you the placement of where to run the one pass of Stampin' Seal to attach the top section of the window sheet on the basic white stamped floral layer.


Tea Cup image - stamp Basic White with Fresh Freesia ink and die cut out. 

Happy Birthday tag - stamp sentiment as shown in photos using Memento ink. Die cut out. With Stampin' Seal, adhere tag so it covers the bottom edge of the window sheet covering the adhesive line. Add the three Gorgeous Grape Glossy Dots to the tag. 

Prepare floral and leaf images - Die cut out florals and pointy leaves like shown in the photo from the Designer Series Paper. Stamp the two rounded leaf images in Granny Apple Green ink and die cut out. 

Assemble the images using the photo above for reference, as a unit on and behind the tea cup. Use Stampin' Seal and Mini Dimensionals as needed but do not attach to card base yet. Lightly apply some Wink of Stella to flowers. Apply one Gorgeous Grape Glossy Dot in the center of the middle flower. 

Tie 8" ribbon piece around tea cup handle in a bow. Trim excess ribbon as needed. 

Now close the card like it will go into your envelope. Place the prepared floral tea cup on the window sheet and lower section to see how it fits. You want to make sure the flowers do not go above the fold in the window sheet so it will still fit in the envelope. Once you have decided where to place, use the Stampin' Seal and securely attach to window sheet panel. 

Using the photos for reference prepare the back of the card with the fussy cut flower and leaf images glued down on the Basic White cardstock. Stamp the sentiment in Memento Ink. 

On your envelope - stamp front floral images in Gorgeous Grape and Fresh Freesia. 
On back flap stamp multiple floral images in Memento Black ink.

Well Done! You have made a very special birthday card for a loved one or friend.

List of Supplies available to order at my online store. Click each photo to shop.
 

Explore these other Hues of Happiness Suite cards via the links below.


Please contact me anytime if you have an questions 
or email at 
stampinwitheva@gmail.com
Thank you for taking the time to comment on my post, you've made my day!

Sunday, June 12, 2022

Using Hues of Happiness Flowers to Create a Original Card Front

 Phew, what a week it has been! I've had trouble sticking to my Monday-Friday posting schedule this week. Life and travel got in the way a bit. So here comes Friday's card on Sunday! You get to see two similar cards today, so I hope it was worth the wait.

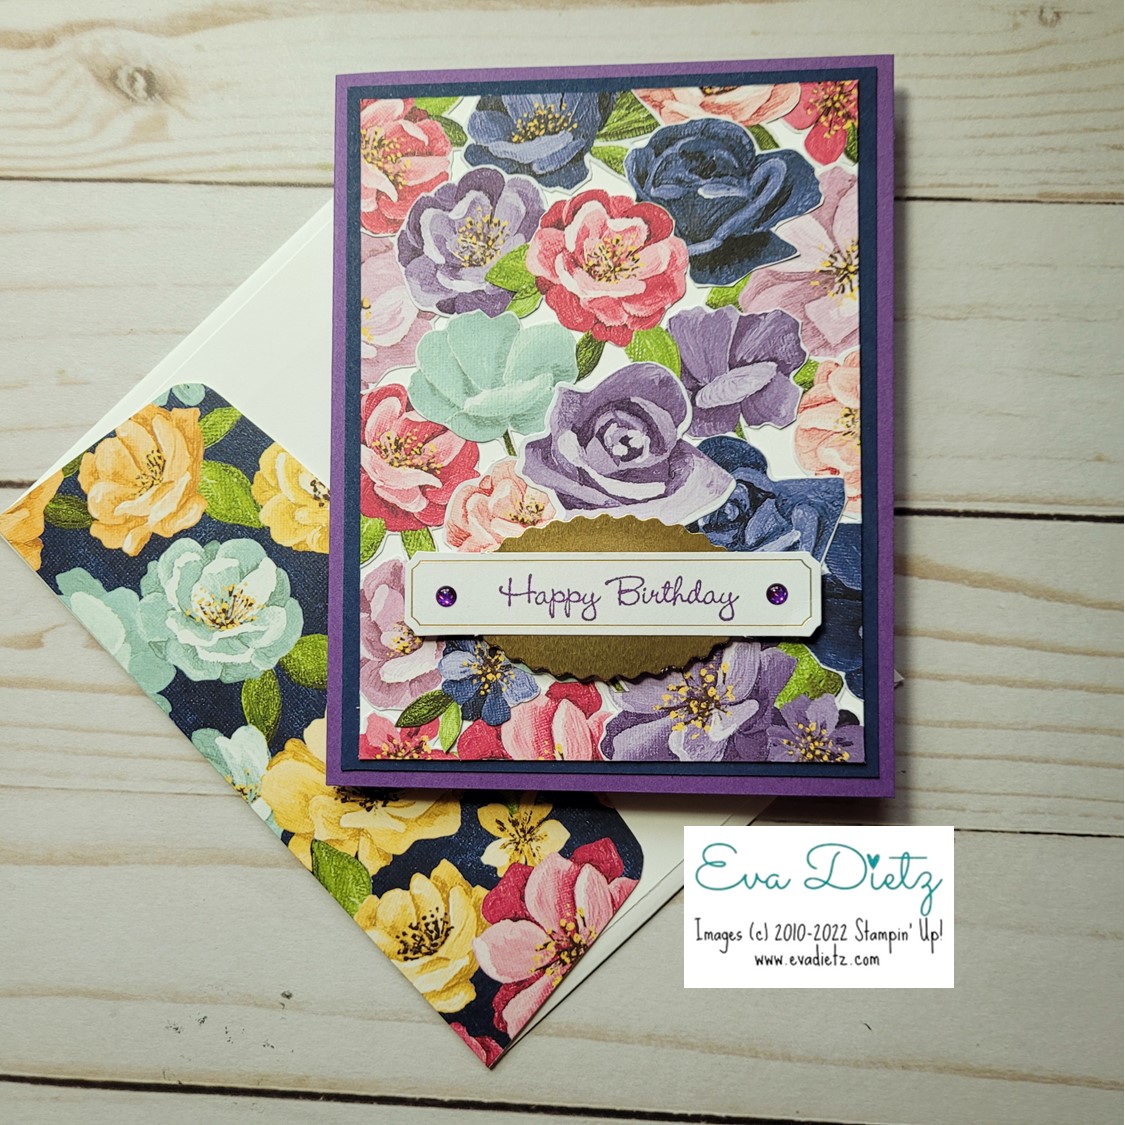
In the flowers I fussy cut out from the one sheet of the Hues of Happiness Designer Series Paper (DSP), I STILL had some left over, so this time I covered the 3-3/4" x 5" Basic White cardstock layer almost completely with flowers. I did move them around before adhering so I had a design pleasing to my eye.

The two cards I'm showing today are similar in layout, but you will see how a change in one color can make the cards look different.

Today's cards are using the smallest sized greetings in the Go To Greetings stamp set. 


Above, you see the color combination of Gorgeous Grape card base with a Night of Navy layer. Looks a little more subdued, I think. The tag the Happy Birthday is stamped on in Gorgeous Grape ink is a leftover tag I had from one of my monthly Paper Pumpkin kits. Gold Foil was punched with the Double Oval Punch. The tag and the oval were adhered together, then raised up on mini-dimensionals. Two Gorgeous Grape dots came from the Glossy Dots Assortment to complete the card design.


The card above only has two things changed on it but to me the card seems brighter and more fun. The Night of Navy layer changed to a Melon Mambo layer. Two Melon Mambo dots were added to another Paper Pumpkin tag I had on hand. 

The inside of both cards have a layer of Basic White and a couple small flowers glued in the lower right corner.

Each envelope flap had coordinating DSP added, because you never want a naked envelope!

Overall List of Products Used in these two Cards and are available to purchase at the link below:

Gorgeous Grape cardstock
Melon Mambo or Night of Navy cardstock
Basic White cardstock
Hues of Happiness Designer Series Paper
Go To Greetings Stamp Set
Tags are from assorted Paper Pumpkin kits
Gorgeous Grape Ink
Gold Foil
Double Oval Punch
Glossy Dots Assortment
Mini Dimensionals
Paper Snips
Basic White Envelope with decorated flap

Tell me in the comments which card is your favorite - Night of Navy layer or Melon Mambo layer.

Shop or Join Stampin' Up!

Please contact me or email me at stampinwitheva@gmail.com if you have any questions about products, techniques, or card designs.

Friday, June 10, 2022

Putting Hues of Happiness Flowers to Good Use

Hello! When I fussy cut one of the sheets of the beautiful Hues of Happiness Designer Series Paper (DSP) a few weeks ago, I would never have believed I would still end up with a bunch of flowers (pun intended) I needed to use in a card design. Today's card share presents an idea of what to do with all the big edge flowers you haven't used yet. 

I started with a 3-7/8" x 5-1/8" piece of Basic White cardstock and laid the edge flowers around the edge of the cardstock until I had a color combination that was pleasing to my eye. Once I was happy, then I adhered and overlapped the flowers until all were glued down. With paper snips trim off any edge problems.

I went back to the Go To Greetings stamp set and pulled the large Happy Birthday out that I used on Monday's card. The greeting was stamped in Night of Navy ink. However I needed to get out my Night of Navy Stampin' Write Marker to fill in the few gaps that showed when I stamped on the flowers and the white. With the fine tip end it was an easy fix to close the gap.

Next came the layer of Melon Mambo cardstock. Tie the bow around both those layers and then used dimensionals to raise those layers off the Coastal Cabana cardbase. Finished up with a few Brushed Brass Butterflies. 

Do you like this idea? Would you or Have you tried something like it yet? It really is a great way to use up any edge floral you may have.


Products used in this Card Design:

Coastal Cabana cardstock
Melon Mambo cardstock
Basic White cardstock
Hues of Happiness Designer Series Paper
Go To Greetings Stamp Set
Night of Navy Ink
Night of Navy Stampin' Write Marker
Retired - 3/8" Coastal Cabana and Granny Apple Green Reversible Ribbon
Brushed Brass Butterflies
Glue Dots
Foam Adhesive Sheets
Paper Snips
Basic White Envelope with decorated flap

Visit my online store (link below) to shop almost all of the products above. I find it is very fast to use the search function then add the item to your shopping cart.

Shop or Join Stampin' Up!

Please contact me or email me at stampinwitheva@gmail.com if you have any questions about products, techniques, or card designs.

Tuesday, June 7, 2022

Stepped Up Go To Greetings Birthday Card

Welcome back to "Go To Greetings" Stamp Set Week. Today's card is almost like yesterday's but stepped up a bit more with fussy cut flowers and Happy Birthday greeting. I also left a little more Basic White showing when I adhered my Hues of Happiness Designer Series Paper to the front. I like the striped effect it gives. What do you think?


In the card close up below, it shows how the two outer flowers are glued down, but the middle rose have the leaves attached to it and it is raised up with mini dimensionals. The Solid Faceted Dots were spread out around the floral focal image.

I am really liking the trend of fussy cutting around stamped greetings, Today's "Happy Birthday" is the middle size option in this stamp set. It works perfectly to add a little movement and interest to the card front.


Products Used in Creating this Card and Available to Order at the Link below.

Night of Navy cardstock
Melon Mambo cardstock
Basic White cardstock
Hues of Happiness Designer Series Paper
Go To Greetings Stamp Set
Night of Navy Ink
Retired - Playing with Patterns Ribbon Combo Pack - Night of Navy
Solid Faceted Gems
Glue Dots
Mini Dimensionals
Paper Snips
Basic White Envelope with decorated flap

Shop or Join Stampin' Up!

Please contact me or email me at stampinwitheva@gmail.com if you have any questions about products, techniques, or card designs.

Monday, June 6, 2022

Go To Greetings Stamp Set with Hues of Happiness Suite

This week here on my blog I'll will be focusing on a new stamp set in the new Annual Catalog called Go To Greetings. It is such a versatile set, which fills a need to have multiple sizes of common greetings at your fingertips! You are going to want to add this set to your stamping inventory. The set is made up of three different fonts with different sizes of the most popular greetings that we all need. I'll be sharing with you some cards that illustrate how to use each size well.


Today I present to you -
A Scrappy Leftover Pieces Card
Advanced Beginner ability level

Since I have been using the Hues of Happiness Designer Series Paper (DSP) so much recently, I ended up having some sizeable pieces that I saved, knowing before too long, I would create a card with them.

Building on a layer of Basic White, I spaced out my three pieces to see how they would look. Decided to flip the middle piece over and it is the perfect spot to stamp the Happy Birthday greeting in Night of Navy ink. Adhere the three pieces to the Basic White, then add a layer of Melon Mambo behind, on a Night of Navy card base.  Embellishments were the navy bow and three faceted dots.

Inside the card is a Basic White layer with a flower fussy cut from the DSP and glued in the lower right corner.

Finished with decorating the envelope flap.


Can you see yourself doing a card like this? You should give it a try with whatever scraps you have on hand. Experiment. Play. Design your Masterpiece. 

Products Used in Creating this Card:

Night of Navy cardstock
Melon Mambo cardstock
Basic White cardstock
Hues of Happiness Designer Series Paper
Go To Greetings Stamp Set 158763 $24
Night of Navy Ink
Retired - Playing with Patterns Ribbon Combo Pack - Night of Navy
Solid Faceted Gems
Glue Dots
Mini Dimensionals
Paper Snips
Basic White Envelope with decorated flap

Most of these products are available at my online store (link below). My suggestion is to put the item name into the search window and boom you'll have it faster than typing in an item number. Have fun shopping! 

Shop or Join Stampin' Up!

Please contact me or email me at stampinwitheva@gmail.com if you have any questions about products, techniques, or card designs.

Thursday, June 2, 2022

May Paper Pumpkin Kit Celebrating In Colors Alternates

The May Celebrating In Colors Paper Pumpkin Kit was lots of fun to make alternates with. I made 21 cards in all. The photos below just show the individual designs of which I made some duplicates. I was inspired by many creative souls on the Paper Pumpkin Fan Club Facebook Page.

I also used up the remaining cards and envelopes I had of the Tea Boutique Cards and Envelopes set.


Upper Right card used fussy cut florals from the Hues of Happiness Designer Series Paper.


Right card - I tried my hand at writing "You" with the dark Basic Black Stampin' Blends pen. The paper behind the "you" came from the 2022-24 InColors 6" x 6" Designer Series Paper.


The upper left and lower right cards uses the envelope as a layer and I added the InColor Glimmer Paper 3/4" strip for a little pizzazz.

The upper right card has an added Ladybug punched from Orchid Oasis and Tahitian Tide cardstock. The 2022-24 InColor Matte Decorative Dots puts the spots on the ladybug wings.

The lower left card is intended to be a Graduation card. I used the envelope flap at the top and stamped "congrats" from a retired set I have. Added a Gold Fold Circle punched out and gold trim as a bow.


I thought the ladybug was such a fun addition to the cards above and below I couldn't stop adding them! Some were stamped and then punched, others just punched from cardstock.

The upper left card had the front edges of the kit cardbase sponge daubered with Sweet Sorbet ink.

The upper right and lower left cards had the Biggest Wish stamp set used with Sweet Sorbet ink.


Above the Biggest Wish stamp set was used in Sweet Sorbet ink and Starry Sky ink. More Sweet Sorbet cardstock and Gold Foil were added for accent and to tie the gold dots together.

Every month it is such a fun challenge to see what is possible in the way of alternate cards once I receive my kit. Be brave give it a try too!

Shop Paper Pumpkin Pre Paid subscriptions or Join at https://evadietz.stampinup.net/

Or Sign up directly for Paper Pumpkin here 

Shop or Join Stampin' Up!

Please contact me or email me at stampinwitheva@gmail.com if you have any questions about products, techniques, or card designs.

Wednesday, June 1, 2022

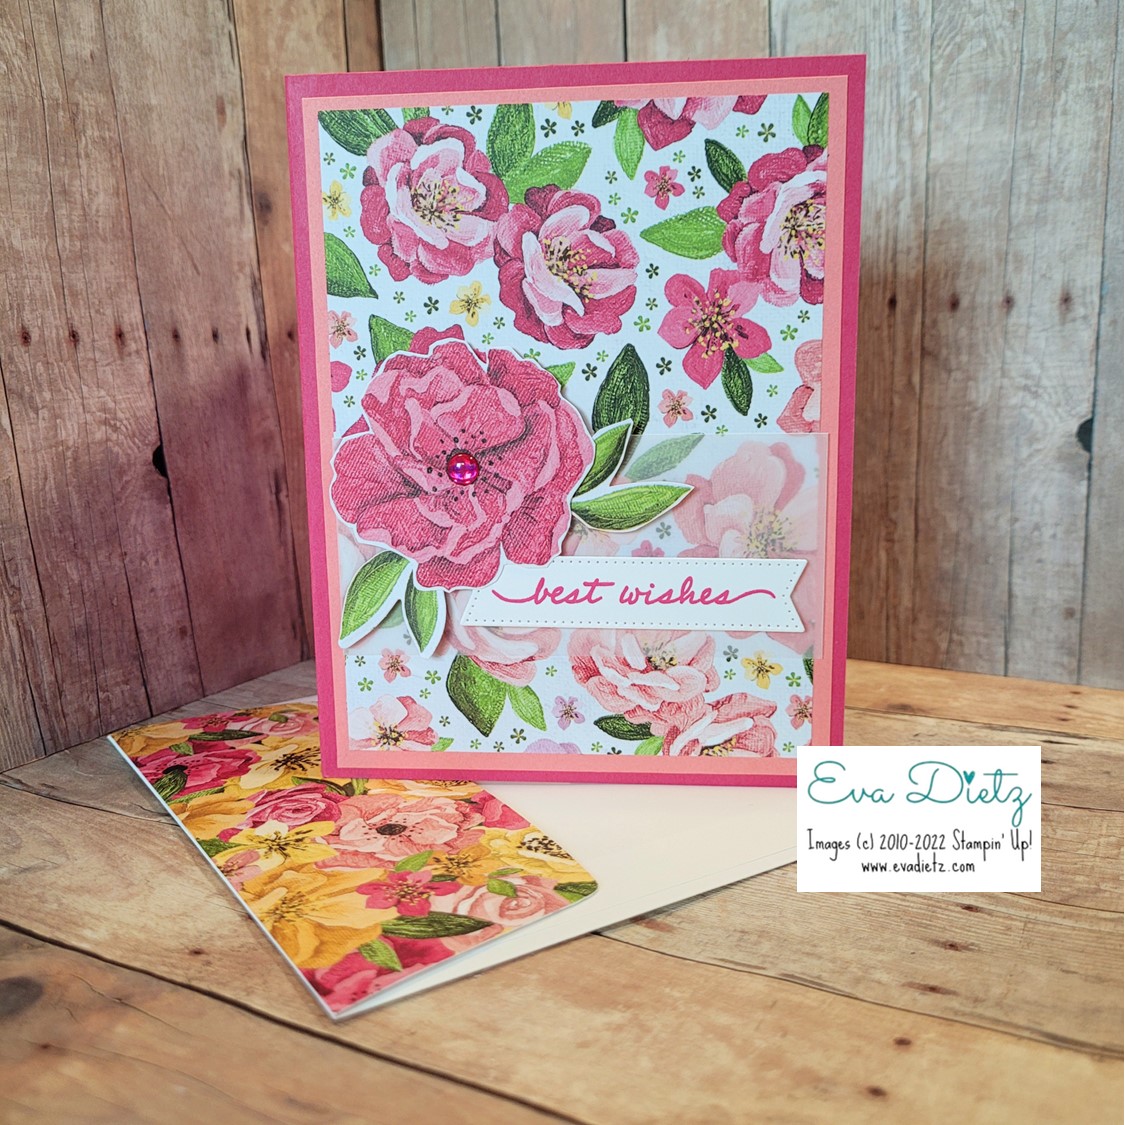
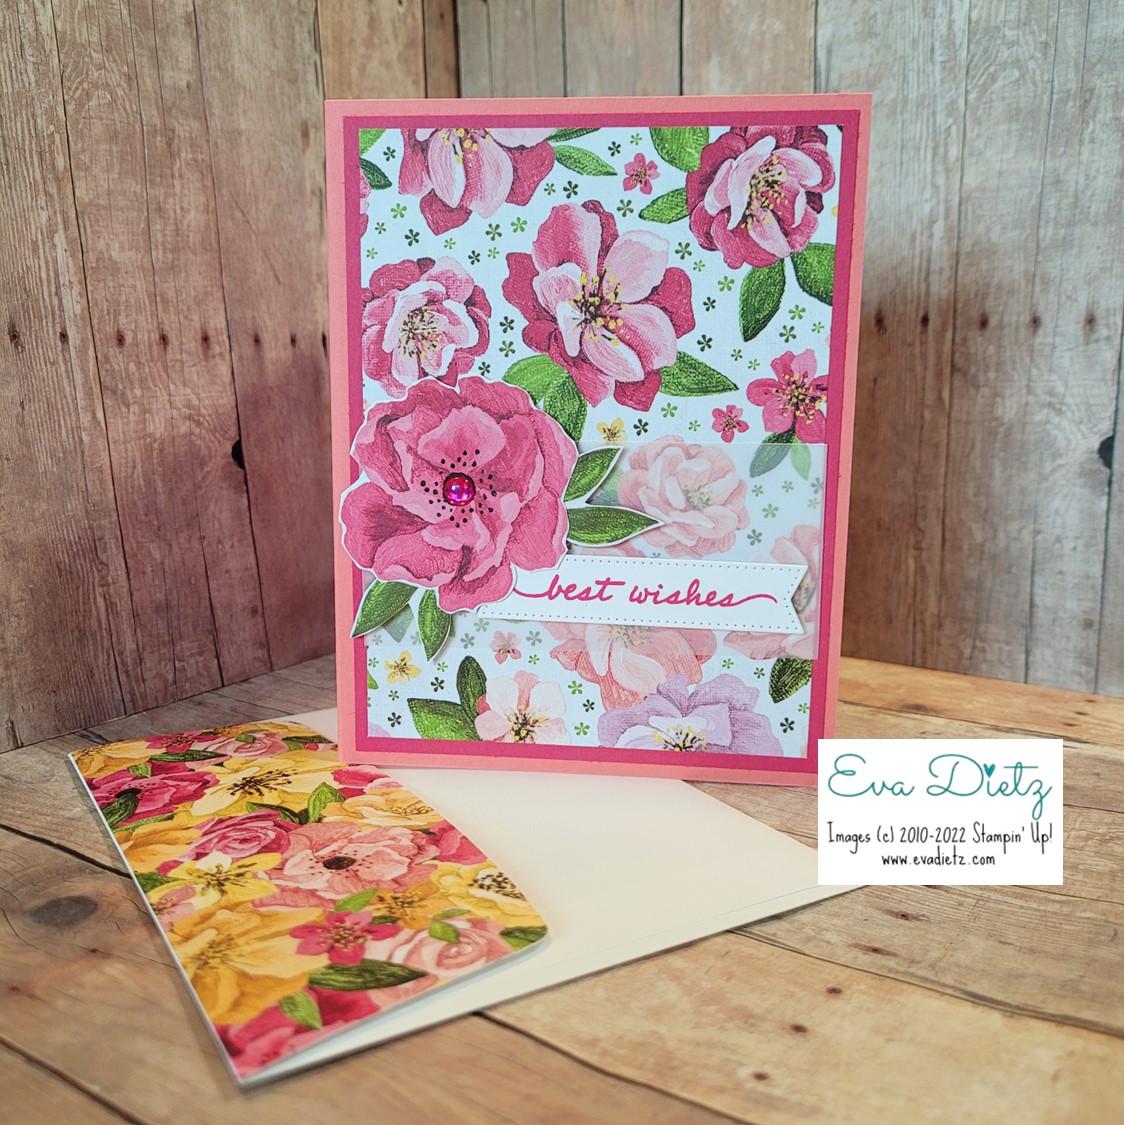
Hues of Happiness Tunnel Fun Fold Best Wishes Card

Recently I held an online Mystery Hostess Party on my business Facebook page. It was quite the positive experience. During the course of the three day event, I did two Facebook Lives. Oh my!  
I have a lot to learn about video making, but I took my live, uploaded it on Canva and went to work editing it down to cut out the "dead" time and streamline the cardmaking process. 
I'd love it if you'd give it a look.


After watching the video, you can see the Tunnel fun fold cards shown within below here in the blog post.

This card design was inspired by Jenny Hayward, but I changed it up some, to make it my own.

First card is the Melon Mambo base with Flirty Flamingo layer.


Second card is the Flirty Flamingo base with the Melon Mambo layer.


Products Used in Creating these Cards:

Happiness Abounds Stamp set 159238 $23
Hues of Happiness Designer Series Paper 158822 $12 (Cut 3-3/4" x 5")
Basic White Cardstock 159276 $10.25 (Cut 5.25" x 8.5", scored at 2-1/8" and 4-1/4", then rotate 180 degrees and score at 2-1/8" from other side) and scrap for best wishes tag
Melon Mambo Cardstock 115320 $9.25  (Card base 5.5" x 8.5", scored at 4.25")
Melon Mambo Classic Stampin' Pad 147051 $8
Flirty Flamingo Cardstock 141416 $9.25  (Front layer cut 4" x 5.25")
Stylish Shapes Dies 159183 $30
Vellum Cardstock 158827 $8  (1-3/4" x 3-3/4")
Glossy Dots Assortment 158827 $8
Mini Dimensionals 144108 $4.25
Stampin' Seal Adhesive 152813 $8
Basic White Envelopes 159236 $7.50
 

Shop or Join Stampin' Up!

Please contact me or email me at stampinwitheva@gmail.com if you have any questions about products, techniques, or card designs.