Pages

Tuesday, August 30, 2022

Two Days Left Before Stampin' Up!s Sale-a-Bration Ends Tomorrow Night! Get Your Extra Rewards Now! Lots Left to Choose From!

Decisions, Decisions! 

Everytime Stampin' Up! offers their Sale-a-Bration Promotion there is always great products you can get for Free with either a $50 order or a $100 order before tax and shipping. 

If you are a Papercrafter I bet there are some things on your shopping list that would be perfect to order today! Cardstock? Envelopes? Ink Pads and or Ink Refills? That stamp set you've been drooling over but haven't purchased yet?

Tomorrow, August 31st is when this promotion ends and you'll have to wait until January 2023 for the next one to come around.

(3 things are sold out - Hippo Dies, Tree Lot Dies, and Pool Party/Soft Seafoam Cards & Envelopes)

Plus there is more to chose from below!


Here's another Option!

If  you haven't tried Papercrafting yet, then a 3 month Prepaid Paper Pumpkin subscription is the perfect place to start. Paper Pumpkin is an All-Inclusive Project kit that includes everything except scissors and liquid glue. You get a stamp set and clear block inyour first kit, ink spot, color coordinated paper pieces to make cards or treat packaging. The image below is the "sneak peak" of the September, October, and November Kit boxes.


You'll earn one free $50 Level Reward with your subscription.

Either way you may be approaching papercrafting, I'd love to help you learn more about this fabulous hobby. If you don't already have a demonstrator, I'd love to be yours if you are in the USA.

Would YOU like to receive a couple exclusive "Insider" card tutorials each week in your email inbox? Subscribe to my Weekly Newsletter!. Plus you'll receive a Free 14 card One Sheet Wonder Tutorial as a Subscriber bonus! 

Please contact me or email me at stampinwitheva@gmail.com if you have any questions about products, techniques, or card designs,

Monday, August 29, 2022

Don't Miss Out on this Fabulous Stampin' Up! Opportunity to be Your Own Boss, Get Your Hands on Discounted Products Early, and Make New Friends All over the World!

Time is running out to get the best deal during Stampin' Up! Sale-a-Bration Rewards time! On August 31 at 10:59 p.m. this offer expires and you shouldn't miss the best papercrafting deal around.

If you  want to learn more about papercrafting or have been looking to try something new and expand your horizons, then Stampin' Up! is the best Papercrafting Company out there with the BEST Customer Service. You should give them a try!

This is the perfect opportunity for anyone to get papercrafting supplies at a discount, be the first to see new products and have the chance to order them early.  Anyone 18 and over with a credit or debit card, a bank account to receive your earnings, and an email address can partake of this fabulous deal!  Moms, Dads, Retired folks, Extra Busy people and anyone inbetween!

Let's add up the Value of this Opportunity:
Your cost - $99 Customizable Kit plus sales tax - value of items you choose $125
PLUS
Making Plans Collection $45 (photos below)
Free Past Paper Pumpkin Kit $23
Free Kit shipping $20 value
Total Value nearing $210


THIS OPPORTUNITY IS REALLY PRICELESS!

I'd love to talk with you about it. My email address is below.

 Or if you want to jump right in Sign Up Here.


The planner is larger than 6" x 8" but not 8.5" x 11" The cover is beautifully designed vinyl and padded with a magnetic latch.


There are multiple pockets to put your notes, credit cards, business cards and more. The monthly tabs are numbered to use how you would like.


Here's an example of what the inner pages look like.


The Making Plans stamp set and 3 additional notebooks come with the planner.


You get more pages to cover the 18 months, but they will not all fit in the planner at once. There are two pages of stickers to help with your planning notes.


Once the 18 months of planner supplies are used up, a quick Google search revealed that there are commercial supplies available to continue using this gorgeous binder indefinitely.

I'd love to have you join my Sunflower Friends Team. We are a group of kind ladies who love to make cards, share our ideas, and help others.
Please email me with your questions or phone number. I would be happy to chat with you.
stampinwitheva@gmail.com 

Thursday, August 25, 2022

Three Rusty Robots Come Together to Make the Cutest Stampin' Up! Children's Happy Birthday Card for Your Favorite Little Ones

I had a request from one of my customers to create a Birthday Card for her three year old grandson. This is what I came up with. What little boy wouldn't love to get these three rusty robots wishing him a wonderful birthday? 

To get the rust on Stampin' Up!s Nuts and Bolts stamp set was easy. Use a Cajun Craze watercolor pencil to shade in the spots you want on the stamped robot images. Then use a Blender pen to smooth out your patches of rust. So easy!

The center robot's red heart was a scrap of Real Red cardstock with the middle of the center robot stamped again in Memento Tuxedo Black ink, then fussy cut out and glued on. That little robot was raised up on dimensionals so he would "stand-out"!


This short list of Supplies are available to order at my online store. Click each photo to shop.

Retired items used – Nuts & Bolts Stamp set from the Jan.-June 2022 Mini Catalog, and the Celebrate Today Stamp set. You may find these items offered on Ebay or Etsy, or feel free substitute what you think looks pleasing to you.

Cutting Dimensions

Basic Black Cardstock card base  5-1/2" x 8-1/2", score at 4-1/4"

Real Red Cardstock layer  4" x 5-1/4"

Basic White Cardstock- two pieces- front layer 3-7/8" x 5-1/8" and inner card layer 4" x 5-1/4"

Smoky Slate Cardstock  2-1/2" x 5-1/2" to stamp the robots on

Coordinating piece of Designer Series Paper for Envelope Flap 2-38" x 6"

*********

Would YOU like to receive a couple exclusive "Insider" card tutorials each week in your email inbox? Subscribe to my Weekly Newsletter!. Plus you'll receive a Free14 card One Sheet Wonder Tutorial as a Subscriber bonus! 

Shop or Join Stampin' Up!

Please contact me or email me at stampinwitheva@gmail.com if you have any questions about products, techniques, or card designs, I'd love to help you!

Wednesday, August 24, 2022

Pick This Birthday Card For Your Friend Made with Stampin' Up!s Sweetest Cherries Stamp Set and a Simple Four Color Theme

Since we are still in the season of summer for a little while longer, and cherries grow in the summertime, do you have a friend who would love to receive this birthday card from you? 

I love to work in Black and White and one (or two) other colors. But if you are going to nit-pik, technically there is a fifth color, but it is used so little, I'm not counting it.

Now matter how many colors you include, this card design is an easy one to put together by following the photo below.


Do you like Black and White card designs? Let me know in the comments.


Those cherries look almost good enough to eat!

This list of Supplies are available to order at my online store. Click each photo to shop.


Retired Products used – Pattern Party Designer Series Paper & Scalloped Seasonal Layers Dies. You may find these items offered on Ebay or Etsy, or feel free substitute what you think looks pleasing to you.

Project Directions:

Cut Sweet Sorbet cardstock card base 5-1/2" x 8-1/2", score at 4-1/4".
 
Cut Basic White cardstock layer - need two pieces - one for front layer 
and one for inner layer 4" x 5-1/4".

Cut Pattern Party Designer Series Paper (DSP) black diamond pattern - 3/4" x 4".

Cut Pattern Party Gingham pattern 2-1/2" x 4" and 3/4" x 4" strip for inner card layer.

Take one piece of the Basic White layer and lay (do not glue) the two pieces of black and white on the front in the position shown in the photo.

Stamp the images shown. If you are successful on the first try. Then go ahead and adhere the black and white pieces to the Basic White piece.

Cut Granny Apple Green cardstock for the scallop die 3/4" x 4". After die cutting adhere to card front as shown.

Use some Basic White scraps for cherry parts. I recommend three various size pieces. One pieces large enough to stamp two cherries at each end say 2" x 5". Another piece a half inch wide by 5 inches long for the stems being stamped also one at each end. Lastly a 1" wide by 4" piece for the two leaves, again stamped at each end. By doing it this way, you will have a "handle" to hold on to when using the Cherry Builder Punch.

After stamping and punching the cherry parts start assembly using glue dots to stick the stems on, put the leaves together and later add the bow. The cherries and leaves portions are raised up with mini dimensionals on the card front.

Finish by adding your Rhinestone Jewels. Add the second piece of Basic White to the inner card and add the small strip of DSP for an accent.

Add a coordinating piece of DSP for the envelope flap cut at 2-3/8" x 6". Adhere and trim excess.

Well Done You!
*************************


In case you missed this fun Sour Cherry Treat Box from a while back, take a look!


Would YOU like to receive a couple exclusive "Insider" card tutorials each week in your email inbox? Subscribe to my Weekly Newsletter!. Plus you'll receive a Free14 card One Sheet Wonder Tutorial as a Subscriber bonus! 

Please contact me or email me at stampinwitheva@gmail.com if you have any questions about products, techniques, or card designs.

Tuesday, August 23, 2022

Check Out Stampin' Up!s Sale-a-Bration Reward Choice of the Wonderful World Stamp Set and Designer Series Paper Thank You Card You Can CASE

 Have you heard of CASE? It means "Copy and Share Everything", but some others have been creative and also called it "Copy and Selectively Edit." No matter what you call it, many card makers CASE others ideas for inspiration and to improve their skills. 

This card was inspired by Su Mohr, but I did "Copy and Selectively Edit" this one with the addition of the retired embossing folder. 


I used a very retired Embossing Folder called Pretty Print, but I think having the 3D look with the writing is very cool because when you give this card away, you too will be writing on the inside!


The Wonderful World Designer Series Paper has a lot of beautiful 
flower images that are fun to fussy cut out. I love to fussy cut out things while watching/listening to television.


As a fun addition to the inside of the card I added 
1-1/2" x 4" strip of Orchid Oasis Designer Series Paper (DSP) to the right side of the inner layer.
On top went a 1-1/2" circle punch of a flower image from Wonderful World DSP.

This list of Supplies are available to order at my online store. Click each photo to shop.


Cutting Dimensions

Daffodil Delight Cardstock card base  5-1/2" x 8-1/2", scored at 4-1/4"

Basic White Cardstock two pieces 4" x 5-1/4", one for front, one for inner card

Wonderful World - fussy cut flower of your choice and punch a 1-1/2" circle of another smaller flower

6" x 6" DSP Assortments - Brights 4" x 5-1/4" 

InColor Designer Series Paper   1" x 3"

Envelope Flap from a paper of your choice 2-3/8" x 6"

Orchid Oasis Metallic Woven Ribbon - 7" piece for across the front with end taped to back of embossed layer and Basic White layer. Then another 7" piece to tie a bow that will be attached with a glue dot.

Retired – Pretty Print Embossing Folder and 1-1/2” circle punch which you may find these items offered on Ebay or Etsy, or feel free substitute what you think looks pleasing to you.

Would YOU like to receive a couple exclusive "Insider" card tutorials each week in your email inbox? Subscribe to my Weekly Newsletter!. Plus you'll receive a Free 14 card One Sheet Wonder Tutorial as a Subscriber bonus! 

Shop or Join Stampin' Up!

Please contact me or email me at stampinwitheva@gmail.com if you have any questions about products, techniques, or card designs.

Monday, August 22, 2022

Send Hugs to Those You Care About With Stampin' Up!s Splendid Thoughts Bundle Handmade Card Created in a Monochromatic Pool Party Color Scheme

 The soft colors and plant images of the Splendid Day Suite in Stampin' Up!s July to December Mini Catalog is sure to warm your heart. This card is a quick and easy one to make multiples of to send to your friends or family that could use some encouragement. And that is what Happy Mail is for, right?, to cheer people up, and this card will do just that!


Splendid Thoughts Bundle - Stamp set and Splendid Stems Dies


Splendid Day 12" x 12" Designer Series Paper 
This is a paper you must see in person, it is SO gorgeous!


Close up of the images in the Splendid Thoughts Stamp Set.


Project Directions:

Prepare Pool Party Cardstock card base 5-1/2" x 8-1/2", score at 4-1/4"

With the eucalyptus leaf stamp and Pool Party ink, stamp two columns of images on the card base right front side.

Adhere the Splendid Day Designer Series Paper 2-3/4" x 5-1/4"to left side of card front (you may cover some portions of the stamped images.)

Cut the next Pool Party Cardstock layer 3-1/4" x 4-1/4"

Also cut two pieces of Basic White Cardstock - front layer 3" x 4" and inner layer 4" x 5-1/4"

Again with the Pool Party ink, stamp the greeting and plant images shown on the card front. On the inner card layer stamp two bee images in the lower right corner, then adhere that layer inside of card.

Adhere the two smaller front layers together, then raise up with Dimensionals at a slant on the card front.

Thread an 8" piece of 1/8" wide ribbon through the top  circle of the Open Leaf Trinket charm. Tie a bow, trim tails as needed. Use two glue dots to affix to card front as shown.

Add three sparkly embellishments of your choice.

Cut a coordinating piece of Designer Series Paper 2-3/8" x 6" and adhere to the exterior of the envelope flap. Trim off excess with your paper snips.


This short list of Supplies are available to order at my online store. Click each photo to shop.


Retired Products used – Genial Gems & 1/8” Gold Ribbon.You may find these items offered on Ebay or Etsy, or feel free substitute what you think looks pleasing to you.

Here's some more great projects with this Suite!

Splendid Thoughts Card Idea #1

Splendid Thoughts Bundle Card #2

Splendid Thoughts Card Idea #3

Splendid Thoughts Bundle Card #4

A Gift Bag to Hold the 4 Cards

Would YOU like to receive a couple exclusive "Insider" card tutorials each week in your email inbox? Subscribe to my Weekly Newsletter!. Plus you'll receive a Free14 card One Sheet Wonder Tutorial as a Subscriber bonus! 

Shop or Join Stampin' Up!

Please contact me or email me at stampinwitheva@gmail.com if you have any questions about these products, techniques, or card designs.

Friday, August 19, 2022

Loving This Sweet Sunflowers August 2022 Paper Pumpkin Kit from Stampin' Up! As They Have Blown the Roof Off With Its Incredible Watercolor Beauty!

 The August Paper Pumpkin Kit is the most gorgeous kit ever with all the beautiful watercolor artwork! Take a look at this short video to see all the pieces and parts up close.


Through the remainder of August, you still have time to sign up for a prepaid Paper Pumpkin Subscription and earn some FREE Sale-a-Bration rewards. 

In my opinion now is the time to get more for your money while you explore all that Paper Pumpkin has to offer in their all-inclusive monthly kits.


If you subscribe now, here is the September Paper Pumpkin Spooky Treats kit that you will receive.


  • The September kit contains enough elements to create 18 treat boxes—6 each of 3 designs. This all-inclusive kit includes printed box bases and tops, die-cut paper pieces, adhesives, and more!
  • The Spooky Treats Paper Pumpkin Kit includes an Orchid Oasis Classic Stampin’ Spot!
  • This kit’s stamp set puts the TREAT in trick-or-treat with fun, Halloween-themed sentiments and designs. Embrace the spooky season with ghost, bat, spider, and star images.
  • This kit also includes a special peek-through box top on one of the box designs.

Finished box size: 2-1/2" x 3" x 1" (6.4 x 7.6 x 2.5 cm)

Coordinating Stampin’ Up! colors: Basic Black, Gray Granite, Orchid Oasis, Fresh Freesia, Crushed Curry, Pumpkin Pie

I hope you'll consider this wonderful monthly subscription box. It is a great way to make a small investment to see if you'd like to take up cardmaking as a new hobby. You don't have to worry about not being creative enough, any way you make the kit is just fine!

Plus there is a fabulous Facebook Group called Paper Pumpkin Fan Club and the most amazing ideas are shared there each month to get your creative juices flowing! 

I'd love to have you as a subscriber!

Sign Up Here for Paper Pumpkin

Thursday, August 18, 2022

The Stampin' Up! Happiness Abounds Bundle is Fantastic! Look at the Beautiful Floral Birthday Card You Can Create and Give to Friends or Family!

Do you love floral images? If you do, then the Happiness Abounds Bundle from Stampin' Up! will quickly become your favorite Bundle to work with from the 2022-23 Annual Catalog.

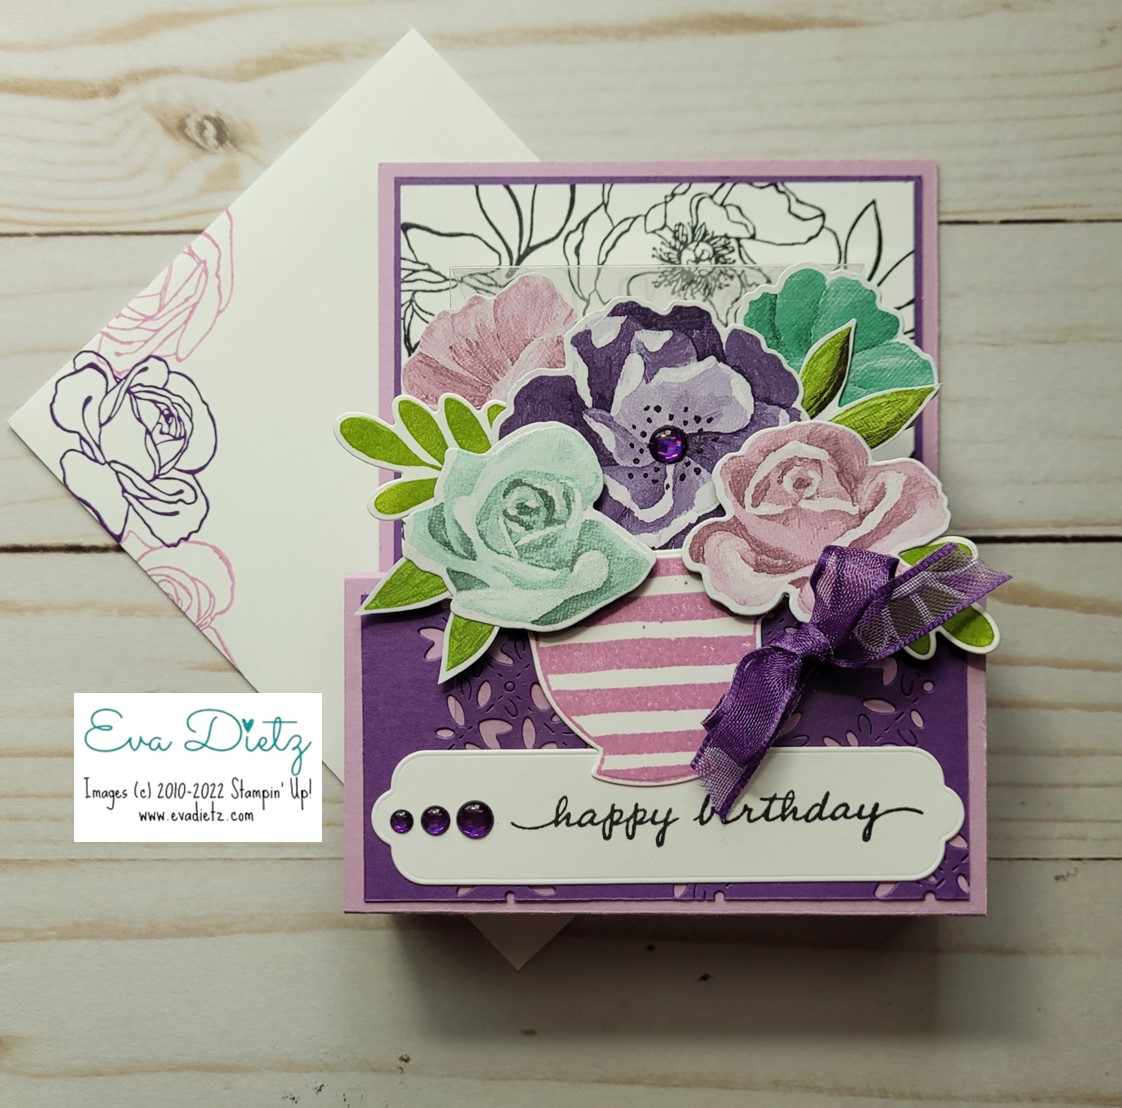
I have created something different for you to try with this Pop-up Front-Step Fun Fold. A piece of Window Sheet is used to create a see-though look. The Window Sheet allows more of the back panel to show where I stamped a variety of black floral images. By doing this, the front floral tea cup layered image POPS off the front of the step fold. 


Focus on the envelope design between these two photos, above and below.
 
The front of the envelope had some floral images stamped in two colors. 
The back of the envelope flap has an all over floral design stamped in Memento Black Ink.

This envelope has beauty on both sides!


When the Front Step Card is turned over below, there is a panel on the back for your message. Fussy cut some of the edge florals from the Hues of Happiness Designer Series Paper to incorporate into this lovely floral edge look.


Let's get Creating!

Cutting Measurements

Fresh Freesia cardstock - cut 4 1/4 x 11"
 
Gorgeous Grape cardstock - cut two pieces. Front Upper Panel 4 x 3" 
and Lower Front Die Cut Panel 4 x 2" 

Basic White cardstock - Front Upper Panel - cut 3 7/8 x 2 7/8"
Back of Card Sentiment Panel - 4 x 5 1/4"
For Teacup - cut 3 x 2"
For Happy Birthday tag - cut 4 1/4 x 1 1/4" 
For 2 Leaves - 2 1/2" square piece
 
Window Sheet - 2 3/4 x 5 1/2"


Scoring and Assembly Instructions:


Fresh Freesia card base - score at 5-1/2", 6-3/4", 9", 10-1/4". 
Fold on each score line, use bone folder. 
Add Tear and Tape as shown in diagram. 

Helpful Hint! Practice Fold the card base at the 5-1/2" line, then fold again at the 9" line to the inside. See how that allows the cardbase to lay flat? 
Referring to the side view photo below, peel off the protective layer on the Tear and Tape and 
adhere to create foldable/pop up base, replicating what you just did on your practice fold. 

Gorgeous Grape cardstock piece - adhere to upper front panel section. 

Basic White cardstock upper front panel piece- stamp with variety of floral and leaf images from the Happiness Abounds stamp set in Memento ink. Adhere to Gorgeous Grape Layer. 

Gorgeous Grape cardstock lower front panel piece - use Blossoming Happiness die to create peekaboo look. Adhere to Fresh Freesia lower panel of card base. 


Window Sheet - score at 3/4" and 2". Fold plastic on each score line until there is a good crease but plastic isn't cracking. Position the larger area of the window sheet on top of the die cut Gorgeous Grape panel, centering it from side to side. 

Apply one pass of Stampin' Seal adhesive at the plastic bottom edge only, so it will be covered up by the tag later. Press in place. 

Fold up the card like it will fit in an envelope as shown in the image below. That will give you the placement of where to run the one pass of Stampin' Seal to attach the top section of the window sheet on the basic white stamped floral layer.


Tea Cup image - stamp Basic White with Fresh Freesia ink and die cut out. 

Happy Birthday tag - stamp sentiment as shown in photos using Memento ink. Die cut out. With Stampin' Seal, adhere tag so it covers the bottom edge of the window sheet covering the adhesive line. Add the three Gorgeous Grape Glossy Dots to the tag. 

Prepare floral and leaf images - Die cut out florals and pointy leaves like shown in the photo from the Designer Series Paper. Stamp the two rounded leaf images in Granny Apple Green ink and die cut out. 

Assemble the images using the photo above for reference, as a unit on and behind the tea cup. Use Stampin' Seal and Mini Dimensionals as needed but do not attach to card base yet. Lightly apply some Wink of Stella to flowers. Apply one Gorgeous Grape Glossy Dot in the center of the middle flower. 

Tie 8" ribbon piece around tea cup handle in a bow. Trim excess ribbon as needed. 

Now close the card like it will go into your envelope. Place the prepared floral tea cup on the window sheet and lower section to see how it fits. You want to make sure the flowers do not go above the fold in the window sheet so it will still fit in the envelope. Once you have decided where to place, use the Stampin' Seal and securely attach to window sheet panel. 

Using the photos for reference prepare the back of the card with the fussy cut flower and leaf images glued down on the Basic White cardstock. Stamp the sentiment in Memento Ink. 

On your envelope - stamp front floral images in Gorgeous Grape and Fresh Freesia. 
On back flap stamp multiple floral images in Memento Black ink.

Well Done! You have made a very special birthday card for a loved one or friend.

List of Supplies available to order at my online store. Click each photo to shop.
 

Explore these other Hues of Happiness Suite cards via the links below.


Please contact me anytime if you have an questions 
or email at 
stampinwitheva@gmail.com
Thank you for taking the time to comment on my post, you've made my day!

Friday, August 12, 2022

We Gathered, Crafted, and Celebrated Christmas in July! See What Gifts I Gave to my Dear Stamping Friends in Their Holiday Shopping Bags!

Over the course of the last couple weeks, my 10 Christmas in July card designs were shared with you. I hope you have enjoyed being inspired by them.

Today's post shares the treats that were in each stamper's Holiday Shopping bag that was part of my Christmas in July event.


An origami two tea bag holder held Peppermint Tea and Orange Spice Tea. They were simple to make from a 6" x 6" piece of the Sweetest Christmas Designer Series Paper. 


Here's a suggestion of how to fold the square. You will need to place one of your tea bags in the middle and fold around it so you will have a good fit. The pleat at the bottom is approximately 3/8" on each side of the center fold.

Retired - Tag Buffet Kit stamp set made the labels with Shaded Spruce ink and raised with a couple of Dimensionals. Non-Stampin' Up! 1/8" red ribbon tied the tips together through a small punched hole.


I had two full retired Tag Buffet Kits with the matching stamp set from a couple of years ago. Each kit made 30 tags, so the 60 tags in all were shared equally among the participants. The Baggies used I've had in my stash for a long time and I don't remember where I got them.


Spangler Candy Canes were ordered from Amazon. 
The darling slide on tag was make with the Sweet Candy Canes Bundle from the July - December 2022 Mini Catalog.


The Peek-a-Boo Treat Bags were stamped with images from the Christmas to Remember stamp set in both Shaded Spruce and Real Red inks. 

Old Fashioned Hard Candy (also from Amazon) filled the bags. 


All my Guests loved all their "Sweet Treats." We had a wonderful holiday time together making 10 Christmas cards, enjoying refreshments, and listening to Christmas music on Spotify.


Just click on the links above if you'd like to purchase any of the products to get a head start on your holiday treat packaging.

If you want to see the Christmas cards we made, just scroll back through the posts.

Thanks for stopping by today. I'd love to know which treat was your favorite. Tell me in the comments.

Shop or Join at https://evadietz.stampinup.net/

Please contact me anytime if you have any questions 
or  email me at
stampinwitheva@gmail.com

Thursday, August 11, 2022

Get Your Crafty On with the Spooky Treats September Paper Pumpkin Kit from Stampin' Up!

Does Halloween give you the tingles all over? If you look forward to your favorite holiday of Halloween every year, then this Paper Pumpkin Kit is for you!

Which Kind of Halloween Lover Are You?

Are you the neighborhood Halloween Party House Hostess with the Most-tess? These cute treat boxes you will make with this kit would be a perfect little gift to put on your refreshment table or to send home in a scary goodie bag.

Are you the person who dresses in costume to greet your treat or treaters at the door? Then be the hit of the neighborhood with candy filled decorated treat boxes that you give out on the 31st of October.

Are you a teacher or parent helper who throws a Halloween party in the school classroom? Then get several of these kits to make lots of filled treat boxes for the students. They will love you for it!

Are you the party planner at your office? Then take in a tray of filled Spooky Treat boxes to pass out to your co-workers!

No matter which kind of Halloween Lover you are, this crafty kit will be perfect for your needs! Get several! Keep reading about how to sign up!


But, don't forget, if you sign up for a one of the three prepaid kit options, you can still earn Sale-a-Bration rewards until August 31, 2022.


Read More about how Prepaid Subscriptions work at this Link.

Paper Pumpkin Kits give you so much value for your hard-earned dollar, you shouldn't miss out! I've been a subscriber for a long time and seriously each month the kit gets better and better. 

If you do subscribe, then be sure to join the Paper Pumpkin Fan Club on Facebook where lots of crafty people share more fabulous ideas of how to use the monthly kit.
*******

Please contact me anytime if you have any questions 
or  email me at
stampinwitheva@gmail.com