Pages

Showing posts with label double oval punch. Show all posts

Monday, July 24, 2023

Celebrating Stampin' Up!s Zoo Crew Designer Series Paper in a Z Fold Easel Style Birthday Card That's Fun to Make

Over the last week, I've shared some fun card ideas using the Zoo Crew Designer Series Paper (DSP) by Stampin' Up! If you love to fussy cut like I do, you can get so many fun creatures out of one of the two sheets of each design. The remaining sheets become the background layers of your cards. That's a lot of cards for a $12.50 USD pack of 12" x 12" paper. I've made 8 cards in the last week and I have A LOT of creatures left to make more fun cards with.

This card today also features extra coloring on the animals done with Stampin' Blends and watercolor pencils. I think that really brings them to life. Using the Double Oval Punch helps provide the "spotlight" for the animals to stand on to wish the recipient a very cheerful Happy Birthday. 

In addition to the animals having extra color added with Stampin' Blends and watercolor pencils, I did the same with the polka dot background. Using Stampin' Up!s wonderful Blending Brushes, it was easy to apply Pool Party ink to get just the right shading I wanted. Being able to add additional color is a wonderful technique to use from time to time.


The card above shows the Z Fold closed, as it would go in an envelope.


The card is now open in it's easel fold. I used three layers of the white polka dot ovals glued together to make the easel stopper that is raised on dimensionals. No fear of the easel sliding closed. It is securely behind the oval stopper when on display.


I always add a coordinating matching envelope to complete the card set.


Here's the side view of this card. I wanted to leave room on the inside layer for a personal message to be added. On the card base you would score at 2 1/8" and 4 1/4" to create the Z fold easel.


Using the Celebrate with Tags stamp set was fun to use, because it comes with those darling balloons that I stamped in Granny Apple Green and Pool Party Inks. Happy Birthday was stamped in Memento Tuxedo Black Ink.


As a bonus for you if you live in the USA - I have prepared a product shopping list, just click the blue bar below. You can uncheck any item on the list you already have, or say add all to the cart if you are a newer card maker. 


 If you enjoyed this post, please be sure to . . . 

  • Leave Kind comments below.
  • Subscribe to my twice monthly newsletter here, and in my thank you email, you can download a FREE 14 Card One Sheet Wonder PDF tutorial. 
  • Click for my Monthly Host Code and how you can earn up to a $40 shopping spree with my Loyal Shopper Rewards.
  • Check out my Online Store clearance rack and save up to 70%.
  • Save 10% on coordinating product bundles!
  • The $99 Starter Kit is the best deal of ALL! Discounts & benefits here. I'd love to have you join my growing team.
  • Explore all the blog posts here for over 1,000 paper crafting and greeting card ideas to enjoy.
  • Follow me on PinterestFacebook, & Instagram
  • Subscribe to my YouTube paper crafting video tutorials.
  • If you don't already have your own Stampin' Up! Independent Demonstrator, I'd be honored to be yours! Let me help you be creative and proud of your cards that you make and send.
  • Please contact me if you have any questions about products, techniques, or card designs.


Wednesday, March 15, 2023

DIY Easy St. Patrick's Day Craft for You to Make

With St. Patricks Day arriving later this week, it is always fun to whip up a little craft to add to your home holiday decor. I suggest you give this idea a try. Cute but inexpensive to make.


This decor piece can hang on the wall in your home, or sit in a tier tray display. The approximately 3" x 5" little box is from Dollar Tree, but any small Dollar Tree frame will do.

Dive into your stash of patterned paper and find some greens that go well together. Select one pattern to fill the back of the frame and glue in place. Add another piece for a narrow strip to help anchor your greeting.

Then to make your clover you will need a heart punch or heart die. I used 5 hearts per "leaf" of the clover. Fold all 5 hearts in half carefully and glue 4 halves together, so you end up with a flat back that will be glued to your background paper. Once you have 3 "leaves" made, cut a little freehand stem and arrange to you liking in your frame and glue the clover parts down including the stem. Fashion a tag to your liking and add to the design along with some "bling" to help everything look good together. All done! So cute!

Let me know in the comments if you are going to make something similar to celebrate St. Patrick's Day. It's a very easy craft to make.

*********

If you don't already have your own Stampin' Up! Independent Demonstrator, I'd love to be yours!

Learn how to get more done in less time by signing up for my exclusive "Insider" bi-monthly newsletter. Twice a month the news will share card class information, Stampin' Up! promotions, hot tips from me, and free tutorials! Subscribe to my Bi-Monthly Newsletter today. Plus you’ll receive a FREE 14 Card One Sheet Wonder Tutorial to download when you receive my thank you email for signing up.


Please contact me or email me at stampinwitheva@gmail.com if you have any questions about products, techniques, or card designs. Comments below are welcomed too!

Wednesday, October 5, 2022

Try Your Hand at Making This Super Fun Double Gate Fold Card Design with Stampin' Up!s Sweetest Christmas Suite for an Easy Holiday Card to Send


 WHO WE ARE:

Welcome to the first blog hop of many (we hope) by the Sweethearts Global Collective. We are a group of women who are members of an exclusive Direct Sales Coaching Group, called The Elite Suite led by Brenda Ster. We are all working to improve our direct sales business' online through providing value that you can use. We hope you'll find what we share valuable. This month's theme is "Anything Goes!"

For this first time, eleven fabulous Stampin' Up! Independent Demonstrators from around the globe have collaborated to bring you some wonderful ideas to enrich your papercrafting experience. We hope as you "hop" through each blog you will leave some comments about the project they are sharing with you. We'd all appreciate that very much.

LET'S GET STARTED:

Do you like to challenge yourself with difficult looking cards to only find out they are very easy to make? That is how you'll feel when you are done trying this Double Gate Fun Fold. It goes together quickly for an outstanding result!

I was inspired by a Lavonne Schwendeman design. But as most cardmakers do, I changed the front panel to show off more of the background Designer Series Paper. Then I balanced the space around the candy canes on the front panel. The card still stands up easily. I realized I tend to like projects that are symmetrical. This one is!


Matching fun fold card and envelope always makes a special gift to receive.


Here's a sneak peek to the inside message panel. At first I thought it was going to be awkward to write your message inside because nothing was laying flat. 

But look what I discovered! You can open it wide to write on the inside! It only took me a while to realize it. That was an aha moment!


Just fold the side flaps all the way to the back side and you'll be able to easily write your message inside.


Close up of the main front panel.


Top View to see the Double Gate Fun Fold.

LET'S GET GOING!

Project Directions:

There are 3 sections to this card: Back Panel base, Double Gate Folded middle panel, and Front Panel holding the candy canes.

Cutting Directions:

Back Panel base
Cut Real Red Cardstock 4-1/4" x 5-1/2"

Double Gate Folded Middle Panel
Cut Real Red Cardstock 5-1/2" x 7-1/4" 
Score this piece on the long side at 1-3/8", 2-1/2", 4-3/4" and 5-7/8"
Then starting on the left side do a Mountain fold, Valley fold, Valley fold, and Mountain fold.

Cut 4 pieces of the Sweetest Christmas Designer Series Paper (small red and green candy cane design) 1-1/8"" x 5 1/4".  Two pieces will go on the Back Panel, and two pieces on the middle double gate fold outer panels.

Basic White cardstock for inner layer 2" x 5-1/4"

Front Panel holding the candy canes
Cut Real Red Cardstock 3-1/4" x 4-1/4"
Cut Sweetest Christmas Designer Series Paper (green diamond pattern) 3" x 4"
Die Cut with the Candy Cane Dies two red and white candy canes (one pointing each direction)
Real Red Glimmer Paper 1-1/2" x 3"
Basic White Cardstock for tag 1-1/2" x 2-1/2"

If desired - Decorate your envelope flap with a piece of 2-3/8" x 6" coordinating paper from the Sweetest Christmas Designer Series Paper.

Assembly Directions:

1. Adhere two pieces of the candy cane paper to the left and right sides of the Back Panel leaving a 1/8" border on the outside and top/bottom edges.

2. Using your Grid Paper center the Back Panel on the paper. Adhere the Middle Panel so there 1" sections on each side of the back panel.

3. Adhere the last two pieces of the candy cane paper to the left and right panels of the Middle Panel sections.

4. With Garden Green ink and the little leaf stamp from the set, stamp two leaves as shown in the photo on the Basic White inner layer before adhering it to the middle section of the Middle Panel.

5. With the Front Panel piece of Real Red cardstock, adhere the piece of the green diamond patterned paper. 

6. Before adhering the two die cut candy canes to the front panel, set them in place to see how they look. Once you are happy with the look, put a small amount of adhesive where they cross, so you will now handle them as one unit. Place Mini Dimensionals generously on the back, then affix to the green patterned paper.

7. Using the Double Oval Punch, punch out the scalloped oval in the Real Red Glimmer paper. 
On the piece of Basic White cardstock, stamp the "Christmas Cheer" in Garden Green ink, then punch out the plain oval. Affix them together.

8. Affix the Oval Greeting flat to the Candy Canes in the middle with Stampin' Seal and one mini dimensional on each outer portion. 

9. Embellish each corner of the front panel with a Red Rhinestone.

10. Attach your coordinating envelope flap paper and trim off excess with your paper snips.

**********************


This list of Supplies are available to order at my online store. Click each photo to shop.


*************
If you found this post valuable, I'd love for you to join my exclusive "Insider" weekly newsletter, each week the news will share a variety of topics, such as card class information, Stampin' Up! promotions, hot tips from me, and two free tutorials! Subscribe to my Weekly Newsletter today. Plus you’ll receive a FREE 14 Card One Sheet Wonder Tutorial to download, when you receive my thank you email for signing up.


Please contact me or email me at stampinwitheva@gmail.com if you have any questions about products, techniques, or card designs. 

Comments below are welcomed too!

Thursday, July 28, 2022

Are You a Cardmaker Who Wants to Make Their Own Christmas Cards but Can't Find the Time?

We all say we never have enough time to do things, but we are only fooling ourselves. We make the time for the things we really want to do. 

If you think of your cardmaking as a process to organize, and break the steps down like a project manager or mathematician would, you would be amazed at what you can accomplish in a short amount of time. 

Here's how to think about breaking down the task of making Christmas cards into manageable chunks.


Using the card above as my example...

The first thing to think about is how many pieces can be cut out of one sheet of 12" x 12" Painted Christmas Designer Series Paper (DSP). That helps to be efficient with your use of paper.

The strip of the pretty pinecones design is 2" x 5-1/2".


So you can make 12 Christmas cards from one sheet of this Designer Series Paper.

********

Next you'll need 6 sheets of Soft Succulent Cardstock, cut crosswise at 5-1/2" x 8-1/2", then score all 12 pieces at 4-1/4". You have 12 card bases. Use a bone folder or your fingernail to crease the fold line when matching the cardbase corners.

********
The next piece to prepare is the Evening Evergreen cardstock 2-1/2" x 5-1/2" layer pieces. You will need 2 sheets of cardstock.


********
Next step is to cut your Soft Succulent ribbon pieces. You will need 4" pieces. Cut 12.

********
Since the Double Oval Punch was used in this card design, 2-3 strips of 1-1/4" x 11" of  Basic White cardstock will be perfect for the stamped greeting done in Evening Evergreen ink. The greeting used was from a retired stamp set called Arrange a Wreath, but you could use a stamp set similar that would fit into the plain edge oval. Stamp 5-6 images per strip horizontally. Remember to turn the punch over in your hand so you can see the alignment of each stamped image in the oval as you slide the stamped strip through the punch and you will have a portion of the cardstock strip to hold on to as you punch.

Next prepare 3 strips of 1-1/2" x 11" of Evening Evergreen cardstock, and punch out 12 scalloped ovals from the three strips.
********
3 sheets of Basic White cardstock are needed to make 12  4" x 5-1/4" pieces for the inner card layer for your personal greeting.  


***************
Using the Tasteful Textile Embossing Folder and your Die Cutting Machine, run just the front of the card in the embossing folder through your machine, while the back of the cardbase is exposed on the back of the embossing folder.
********
The No Naked Envelope Suggestion - Two Optional Choices you can do:
1)  Cut Designer Series Paper Envelope Flap pieces 2-3/8" x 6". 10 pieces can be cut from one 12" x 12" piece of matching Designer Series Paper. Adhere with adhesive to envelope flap and trim excess with paper snips.
 
OR 2) Stamp in matching ink on your envelope flap or on the lower left corner on envelope front with coordinating images or greetings.
********
NOW you are ready for your Card Assembly Production Line. You'll be just like Santa's elves!

1. Adhere the two narrow strips together - Pinecones and Evening Evergreen, making 12 sets.

2. With scotch tape secure 1 ribbon piece ends to back of double layer done in step 1. Repeat 11 more times.

3. Adhere this unit directly to embossed card front with 1/2" left margin spacing. Total 12 cards.

4. Adhere both oval tag (1 stamped plain oval and 1 scalloped oval) pieces together making 12 sets. 
Use 2 Dimensionals to raise each tag up on each card front similiar to photo.

5. Add 3 Rustic Metallic Adhesive Backed Dots to each card as shown in photo.

6. Adhere Basic White inner card layer to the inside of each card.

7. If you have your own personalized stamp, stamp the back of each card. If you don't, handwrite your name and year on the card back.

8. Decide what (if anything) you will be do with your Basic White envelopes from the previous suggestions. Pair one envelope with one card.
TA-DA You now have 12 cards made. Well Done!


The following products are retired:
You may be able to purchase them from Ebay or Etsy

152587 Arrange a Wreath Stamp Set for greeting
152718 Tasteful Textile Embossing Folder for subtle texture on the Soft Succulent card base

I'd love to read a comment from you. Was the detailed process and pictures helpful for you? Making one card at a time takes a LONG time, but using the assembly line method will result in time well spent. I use this assembly line method every time I prepare card kits for my classes.

Shop or Join at https://evadietz.stampinup.net/

Please contact me anytime if you have any questions 
or  write me at
stampinwitheva@gmail.com

Sunday, June 12, 2022

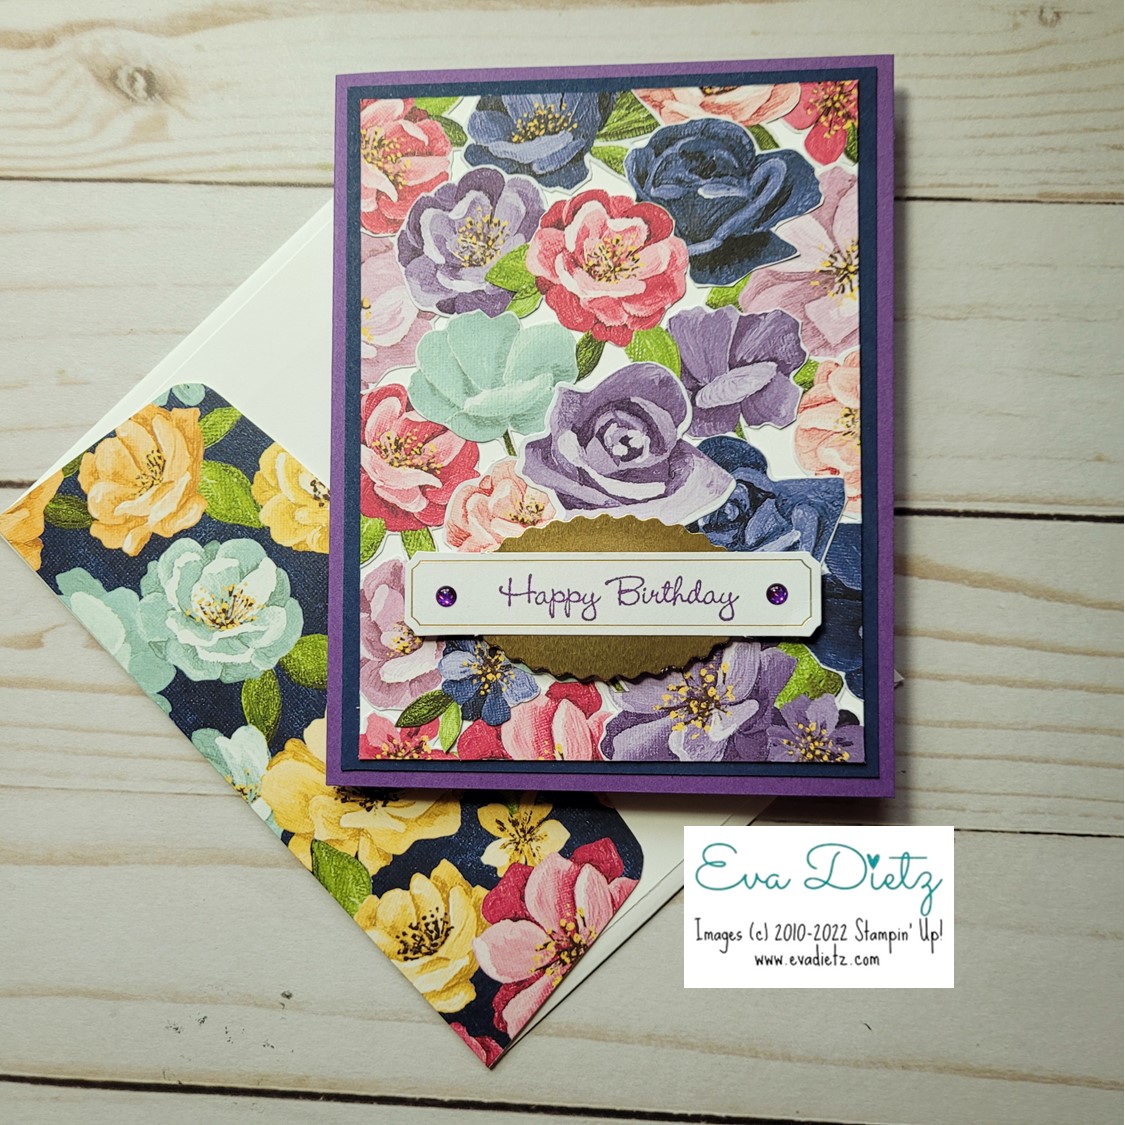
Using Hues of Happiness Flowers to Create a Original Card Front

 Phew, what a week it has been! I've had trouble sticking to my Monday-Friday posting schedule this week. Life and travel got in the way a bit. So here comes Friday's card on Sunday! You get to see two similar cards today, so I hope it was worth the wait.

In the flowers I fussy cut out from the one sheet of the Hues of Happiness Designer Series Paper (DSP), I STILL had some left over, so this time I covered the 3-3/4" x 5" Basic White cardstock layer almost completely with flowers. I did move them around before adhering so I had a design pleasing to my eye.

The two cards I'm showing today are similar in layout, but you will see how a change in one color can make the cards look different.

Today's cards are using the smallest sized greetings in the Go To Greetings stamp set. 


Above, you see the color combination of Gorgeous Grape card base with a Night of Navy layer. Looks a little more subdued, I think. The tag the Happy Birthday is stamped on in Gorgeous Grape ink is a leftover tag I had from one of my monthly Paper Pumpkin kits. Gold Foil was punched with the Double Oval Punch. The tag and the oval were adhered together, then raised up on mini-dimensionals. Two Gorgeous Grape dots came from the Glossy Dots Assortment to complete the card design.


The card above only has two things changed on it but to me the card seems brighter and more fun. The Night of Navy layer changed to a Melon Mambo layer. Two Melon Mambo dots were added to another Paper Pumpkin tag I had on hand. 

The inside of both cards have a layer of Basic White and a couple small flowers glued in the lower right corner.

Each envelope flap had coordinating DSP added, because you never want a naked envelope!

Overall List of Products Used in these two Cards and are available to purchase at the link below:

Gorgeous Grape cardstock
Melon Mambo or Night of Navy cardstock
Basic White cardstock
Hues of Happiness Designer Series Paper
Go To Greetings Stamp Set
Tags are from assorted Paper Pumpkin kits
Gorgeous Grape Ink
Gold Foil
Double Oval Punch
Glossy Dots Assortment
Mini Dimensionals
Paper Snips
Basic White Envelope with decorated flap

Tell me in the comments which card is your favorite - Night of Navy layer or Melon Mambo layer.

Shop or Join Stampin' Up!

Please contact me or email me at stampinwitheva@gmail.com if you have any questions about products, techniques, or card designs.

Tuesday, April 12, 2022

In Color Week with Starry Sky

The second I learned about the new In Color Starry Sky, I immediately thought of my favorite piece of artwork by Vincent Van Gogh - The Starry Night. Comparing this painting to the In Color below it, I think you'll agree Stampin' Up! has named this new In Color appropriately.

www.vangoghgallery.com
 

Today's card share using the Tea Boutique Suite is a fun one with dancing teacups. Those dancing teacups would cheer me up for sure!

 I stamped the stripes on a piece of the Designer Series Paper with Starry Sky ink then die cut out. The middle cup was die cut out with another design from the Designer Series Paper. The lower cup used Crushed Curry cardstock with the more detailed die cut image, layered on another die cut teacup with another design from the Designer Series Paper.

I had a happy discovery that the plain oval punch from the Double Oval Punch makes a small saucer for the teacup. Yesterday's Sweet Sorbet ink and cardstock were also incorporated into the card. It is finished off with the Starry Sky 1/8" Metallic Woven Ribbon.


Reverse side of Tea Boutique Cards and Envelopes that are part of the Suite above.

Front side of the Envelope below.


Close Up below. 


Products used in my Card above:

Tea Boutique Cards and Envelopes, Cup of Tea stamp set, Teacup Dies, Tea Boutique 6" x 6" Designer Series Paper = Tea Boutique Suite

Sweet Sorbet cardstock and ink pad, Starry Sky ink pad, Basic White cardstock for tea bag and scalloped oval tag, Starry Sky Stampin' Write Marker on the Double Oval Punch "saucer", and retired white Baker's Twine.

Adhesives used were Mini Dimensionals, Multipurpose Liquid Glue, Glue Dots, and scotch tape.

Tools used were the regular Cut and Emboss Machine, Paper Trimmer, Take Your Pick Tool, and Paper Snips.

********
Thanks for stopping by. Be sure to check back in tomorrow for another cute card design.
Leave some love in the comments about this card, too! Have a lovely day!

Monday, March 21, 2022

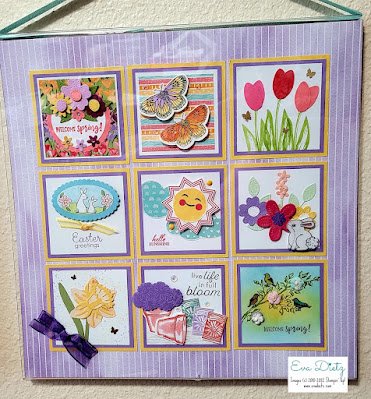
Spring Sampler Home Decor Idea

Here's a fun home decor piece that you can make with your crafty friends. 

This Spring Sampler project was a swap organized by Debbie Henderson from Maine on Facebook. I was in Group F and eight other people besides myself signed up to make 9 identical squares with a spring theme using the colors Highland Heather, Daffodil Delight, and Basic White. By the set deadline, we agreed to mail the 8 squares to each person on the list along with keeping one for ourselves.


The Daffodil Delight was 3-1/4" square, the Highland Heather 3" square, and Basic White  2-3/4" square are your building squares. The margin around the edges was 1" so that is why the squares fit tightly on the background paper.

When all the squares were received then you could organize them however you thought best and mount them on a 12" x 12" piece of Designer Series Paper. The photo above is my finished result. I put my sunny square in the middle, with the swapped 8 arranged around mine. I love how it turned out.

So if you wanted to get a group of 8 friends plus yourself together, you could get a Spring Sampler of your own design made in a couple of hours. Each person brings their supplies and makes one square design then swaps them around the table. Pretty fun!

Use my sampler as inspiration for your own! 

Happy first Monday of Spring!


#shareyourmoment

Tuesday, March 8, 2022

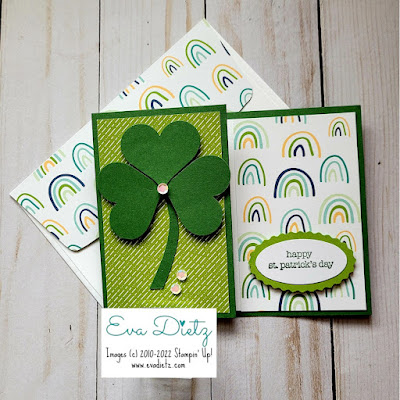
Easy St. Patrick's Day Card

Do you want to bring the luck of the Irish to your loved ones? If so, there are ten days until the holiday, so you have time to make this card (even multiples of it!) and get them out in the mail really quickly.

I used the recently retired Sunshine and Rainbows Designer Series Paper from Stampin' Up!s January-February Sale-a-bration promotion, but you can use anything you have and like!

I was inspired by Laura's Craft Cottage idea for her St. Patrick's Day card.


How to create this card:

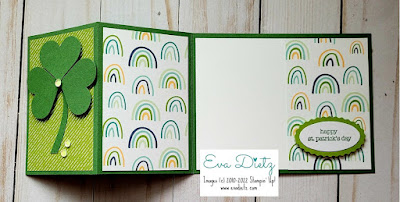
Garden Green cardstock cut at 4-1/4" x 11", score at 2-3/4" and 5-1/2" to create the "Z" fold

Retired Sunshine and Rainbows Designer Series Paper - cut three pieces 2-1/2" x 4"

Basic White cardstock - cut one piece 3" x 4" 
Adhere the Basic White to the inner back first, then add the rainbow paper to make sure the edges all have a 1/8" border

With the retired Full Heart Punch, punch three hearts from Garden Green cardstock. Make your own stem by fussy cutting a slightly curved piece like in the photo above.  Assemble the clover in place on the card front using dimensionals to raise up the leaves. Add some adhesive iridescent sequins for a little bling!

For the Oval tag, start with a small piece of Basic White cardstock and stamp in Garden Green ink the greeting from the very retired Teeny Tiny Wishes stamp set. Then punch out the plain oval with the Double Oval Punch. With a small piece of Granny Apple Green punch out the scalloped oval with the same punch, and attach the two together. Raise the finished tag up on dimensionals as shown in the photo.

Finish your envelope flap with a piece of 2-3/8" x 6" matching designer series paper, adhere, and with paper snips trim off the excess.  All done!

I hope this card brings you lots of luck on St. Patrick's Day! 


Monday, February 21, 2022

Fresh Freesia Double Flip Back Fun Fold

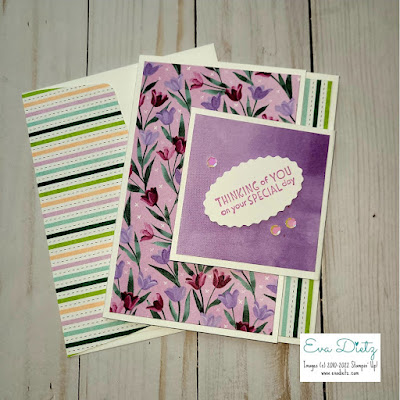
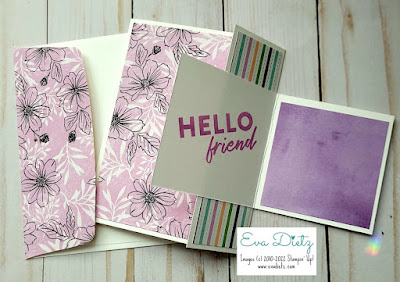
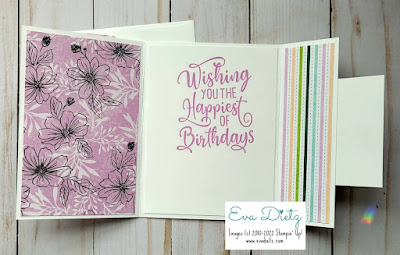
This fun fold holds two surprises inside instead of one.  It is called the Double Flip-Back Fun Fold. I was introduced to it by my demo friend, Lori. I made a total of 4 cards. Today, you'll see two and tomorrow's post will show the other two. I had fun using the Fresh Freesia In Color ink on these two cards.


Front closed view above. This card combines two different Designer Series Papers (DSP). The tulip pattern comes from the Flowering Fields 12" x 12" Designer Series Paper in the January - June 2022 Mini Catalog. The other products I used are the current Sale-a-Bration Friendly Hello stamp set and matching DSP. Also used the Inspired Thoughts stamp set for the greeting on the oval tag. Used Double Oval Punch (scalloped oval), and some Iridescent Sequins I had leftover from my January Paper Pumpkin kit, but you can use whatever you like.


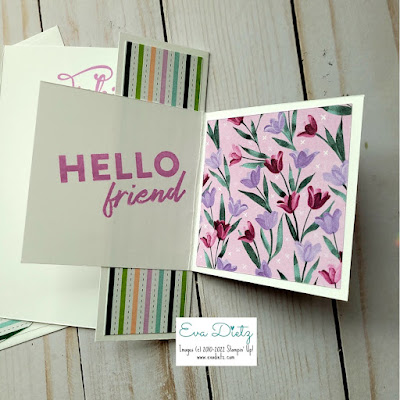
First Surprise - the small card opens first. Greeting is from Friendly Hello stamp set.
Use strong adhesive like Stampin' Seal to attach the small card to the larger base.


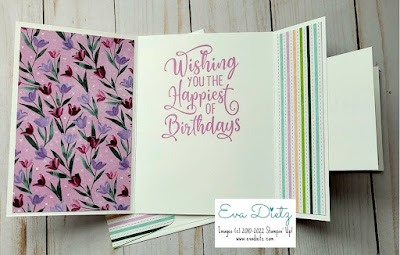
Second Surprise - the full inside look using the Happiest of Birthdays stamp set.


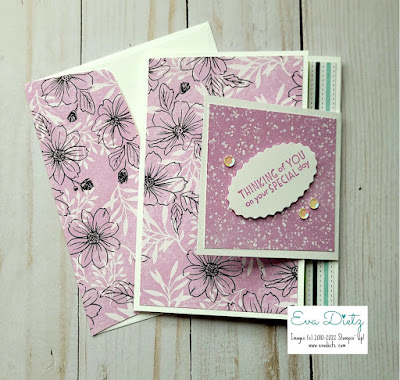
Second Card - The front of this card uses only the Friendly Hello DSP. 


On the small flap on the right side the Flowering Fields DSP again. 
I thought those purples worked well together.


I love how the Fresh Freesia ink works so nicely with this entire card.


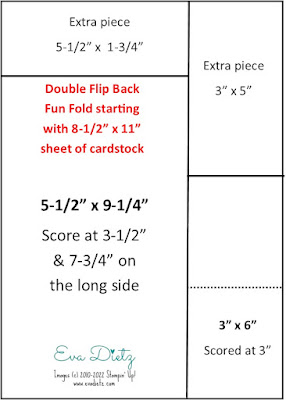
Cutting Dimensions:
Basic White Cardstock Base cut 5-1/2" x 9-1/4"
Score on the long side at 3-1/2" and 7-3/4"

Two pieces of coordinating Designer Series Paper, cut 3-1/4" x 5-1/4"
Two pieces of coordinating Designer Series Paper, cut 1-1/4" x 5-1/4"

Basic White Small Card on Front 3" x 6", score at 3"
Two pieces of coordinating Designer Series Paper cut 2-3/4" square

Basic White Envelope Flap - Coordinating Designer Series Paper, cut 2-3/8" x 6", 
glue to the exterior of flap and trim off excess when dry.

See how creative you can be using what you have on hand to try this fun fold. Once you make a couple, you won't want to stop!

Tuesday, December 21, 2021

Gingerbread and Peppermint Easy Gift Tags

As a demonstrator, we often buy multiple packages of Designer Series Paper because there are one or two sheets we fall in love with. Usually, each 12'" x 12" package only has 2 sheets per package. The 6" x 6" stacks often have between 4 and 6 of the same pattern. If we are planning for a class, multiple sheets are always needed. So what do you do with the rest of the paper in the package? Make tags!

I made over 40 package tags with Kraft Paper and assorted Gingerbread and Peppermint Designer Series Papers. The twine I used is not a Stampin' Up! item, but I had a big spool, so wanted to use some up.


The kraft paper tags are 2" x 4". The Gingerbread and Peppermint Designer Series paper was cut to 1-3/4" x 3-3/4". Using the Gingerbread and Peppermint Dies made quick work of die-cutting the bell, ornament, and snowflake images. Stamp your favorite holiday greeting on Cinnamon Cider cardstock in Real Red ink, then punch out with the Double Oval Punch. Raise both the image and oval up on dimensionals. Use a regular hole punch for the twine to go through at the top.


I was able to group the tags into sets and give them away as thank you gifts to my customers earlier this month. They loved them! You know you don't have to always use them on packages, they can also be tied around the neck of a wine bottle or hand soap dispenser for easy gift giving. So many possibilities! Your friends and family will love the creativity and care that went into these tags. Make a bunch!


#stampinwitheva #sudemo #holidaytags

Tuesday, September 21, 2021

Lets Have Tea Time Together

"Love is a warm cup of tea," says the sentiment in the retired Tea Together stamp set. When I saw this layout by Danielle Peck, I knew I had to case it. Especially since it was a Z Fold fun fold card and it used the You're a Peach Designer Series Paper that is currently in the Annual Catalog.

I love having a cup of mint or orange spice tea when I need a little pick me up. Since we are on the last day of summer, it seems like a great way to say so long to the season until next year. 

I don't know about you, but my retired stamp sets, go months without being used, but when I saw this idea, I knew I had to find my tea stuff and make this card. 
It's so CUTE!

Of course, I was also reminded of Mrs. Potts and Chip from the Beauty and the Beast Disney animated movie. Did you think of that too?


The color theme of Calypso Coral, Pale Papaya, and Basic White plus the Designer Series Paper, just work so nicely together.
Did you know you could stamp directly on the Designer Series Paper? Isn't that a cool technique? I think it works perfectly for this card design.


On the panel behind the teapot, there is a layer of Pale Papaya and Basic White to write your personal message.  The envelope also has a decorated flap with a piece of the striped Designer Series Paper to make a finished looking set.

Products Used to Create this Z Fold Card can be purchased at my online store (link below):

Retired Tea Together Stamp Set  (could purchase on Ebay or Etsy maybe)
Retired Tea Time Dies (same note above)
Calypso Coral, Pale Papaya, and Basic White cardstock
You're a Peach Designer Series Paper
Double Oval Punch
Calypso Coral Ink
Champagne Rhinestones

Maybe you have a sweet friend you could share a cup of tea with today? 


#stampinwitheva #sudemo
#funfolds #stampinup