Pages

Showing posts with label mini heart punch. Show all posts

Friday, March 17, 2023

Good Luck Gnome Flying a Clover Kite for St. Patrick's Day

 Happy St. Patrick's Day! I donned my lucky scarf to share with you this darling gnome who'se flying his shamrock kite to bring you good luck for St. Patrick's Day!


You can make this easy card if you happen to have either Stampin' Up!s recently retired Storybook Gnomes Designer Series Paper that you can fussy cut a cute preprinted gnome from or maybe you have the current Friendly Gnomes stamp set where you can stamp a cute gnome in matching colors to the shade of green Designer Series Paper that you choose. 

My piece comes from the retired Celebrate Everything Designer Series Paper. It is layered on Basic White and Pear Pizzazz cardstock layers on a Basic White card base. I finished up this cutie with four small gold foil punched hearts topped with a gold gem and used some yellow bakers twine with a gold metallic thread in it for the kite string. 

My gnome is mounted on a very retired piece of Pear Pizzazz foil, and the good luck is stamped from the retired Special Moments set. Simple but cute! Give something like this a try with what you have in your crafting stash. 


I hope you'll give this card layout a try and that it brings you good luck!

If you don't already have your own Stampin' Up! Independent Demonstrator, I'd love to be yours! Let me know if I can be of any help to you!

Learn how to get more done in less time by signing up for my exclusive "Insider" bi-monthly newsletter. Twice a month the news will share card class information, Stampin' Up! promotions, hot tips from me, and free tutorials! Subscribe to my Bi-Monthly Newsletter today. Plus you’ll receive a FREE 14 Card One Sheet Wonder Tutorial to download when you receive my thank you email for signing up.


Please contact me or email me at stampinwitheva@gmail.com if you have any questions about products, techniques, or card designs. Comments below are welcomed too!

Monday, March 13, 2023

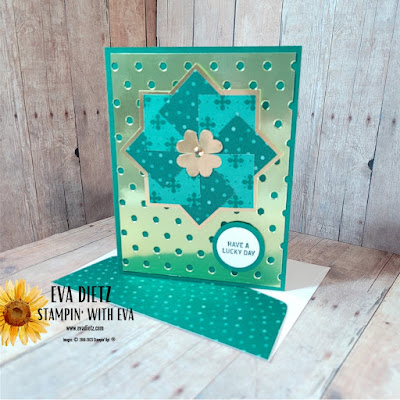
Pinwheel Technique Used for St. Patrick's Day Card Idea

St. Patrick's Day is coming later this week, so I felt like having a little fun here. This card is so shiny like a Pot of Gold! It definitely has an abundance of dots and spots all over it too! The little Leprechauns helped me design this wacky card layout.

The main focal point is the Pinwheel technique which is really easy to do using eight 1 1/4" squares. I used two different sheets from the Regals 6" x 6" Designer Series Paper assortment.


For the base - Cut two squares 2 5/8" of Gold Foil and using your grid paper placemat, position them so all 8 points are precisely aligned. Once you have that, then go ahead and adhere them together. 

Lay your 1 1/4" squares out as shown in the diagram above. You will carefully only adhere half of the each square to the base, with the last square being slid under the 7th square and ending up over on the 1st square. I suggest you practice before doing any adhering so you understand the pinwheel well.

I did my pinwheel a little different, by gluing just the squares together using my grid paper, then I mounted on a Gold Foil layer, with careful fussy cutting the edges until it looked good. 

With another scrap of gold foil I punched out four mini hearts, adhered with glue dots to the center of the pinwheel and finished off with a Gilded Gem.

The card base is Stampin' Up!s Shaded Spruce color (my fav!) with a layer of (retired) Pear Pizzazz foil die cut with the (retired) Spots and Dots die. I suggest to use a sticky lint Tape Roller to get all those dots out before they fall on the floor or stick to your clothes!

Once that is adhered to the card front, mount your pinwheel on dimensionals and affix as shown in the photo.

The lucky day stamp came from (retired) Itty Bitty Greetings stamp set stamped in Shaded Spruce ink on Basic White, then punched out with a 1" circle punch and mounted on a 1 1/4" circle punch also raised up with Dimensionals.

Finish up your card by applying a 4" x 5 1/4" Basic White layer inside the card for your personal message. Adhere and trim some matching Shaded Spruce Designer Series Paper 2 3/8" x 6" to the exterior flap of the envelope.

************
I hope you have fun giving the pinwheel technique a try. Let me know if I can be of any help to you!

If you don't already have your own Stampin' Up! Independent Demonstrator, I'd love to be yours!

Learn how to get more done in less time by signing up for my exclusive "Insider" bi-monthly newsletter. Twice a month the news will share card class information, Stampin' Up! promotions, hot tips from me, and free tutorials! Subscribe to my Bi-Monthly Newsletter today. Plus you’ll receive a FREE 14 Card One Sheet Wonder Tutorial to download when you receive my thank you email for signing up.


Please contact me or email me at stampinwitheva@gmail.com if you have any questions about products, techniques, or card designs. Comments below are welcomed too!

Monday, July 19, 2021

Christmas in July Use Whatcha Got!

When you want to do Christmas in July but the new Fall Mini Catalog hasn't be released yet, you must use what you have, so thanks to Rachel Traudt's lovely idea, I cased most of her layout for my July class cards. 


Products and Dimensions:

Just Jade cardstock card base - 5-1/2" x 8-1/2", scored at 4-1/4"
2020-2022 InColor 6" x 6" Designer Series Paper - 4" x 5-1/4"
Just Jade cardstock layer - 3" x 4-1/4"
Basic White cardstock layer - 2-3/4" x 4"
Stamp with Christmas greeting of your choice in Real Red ink
Gold Foil punched with 2-1/4" Circle Punch - both retired
Just Jade Cardstock punched with Tree Punch
Red Glimmer Paper punched with Mini Heart Punch - both retired
3/8" Real Red Organza Ribbon - one piece 4" long and another piece for 
separate bow attached with glue dots

Hope this card gets you in the Christmas spirit! It's a beautiful but easy card to make!
Come back and visit as Christmas lasts all week!


#stampinwitheva #stampinupproducts