Pages

Showing posts with label curvy christmas. Show all posts

Wednesday, December 22, 2021

Last Minute Easy Scrappy Holiday Cards

Do you ever purchase something, in my case the Wonderful Snowflakes, then have trouble knowing what to do with them? I was having that problem but luckily my leftover Sale-a-Bration Peaceful Prints Designer Series Paper (DSP) came to the rescue!

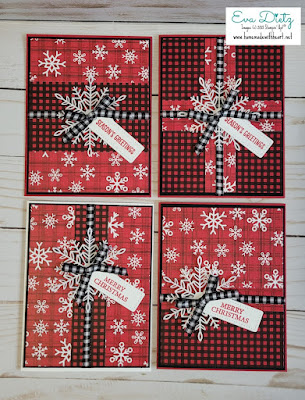
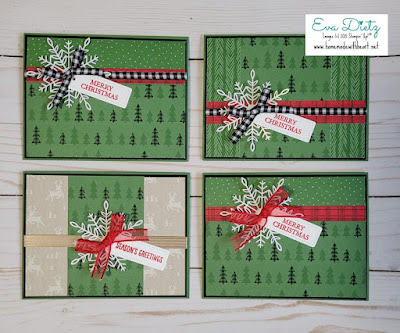
Below is the collection of 12 cards I made recently that used up some strips and assorted sizes of pieces of this DSP I had leftover and they combined so nicely with the Wonderful Snowflakes. It is hard to see in the photos, but these snowflakes have a glossy, iridescent sheen to them. So pretty!
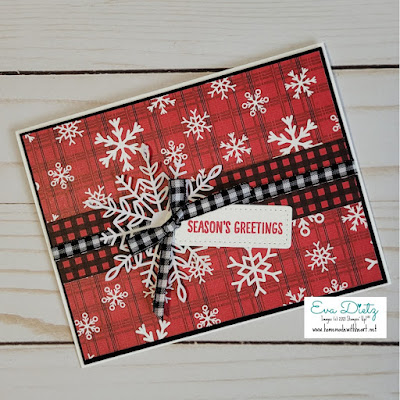

To adhere the snowflakes down, just a couple glue dots were used.

The little tags were all die-cut out with the Tailor Made Tags dies using Basic White cardstock. 

The two greetings came from retired stamp sets - Curvy Christmas and Happy Scenes. 
All were stamped in Real Red ink. The tags were sandwiched between the snowflake and the bow.

The ribbon I used was either the 1/4" Black and White Gingham ribbon 
or the 3/8" Real Red Organza ribbon. The bows were attached with Glue Dots.


You may be saying to yourself I only see eleven cards here. I made one pair identical, so I didn't photograph that duplicate.

I hope I've inspired you to be creative with trying to make a variety of cards using your paper scraps. It's so fun to see what results!

Happy Holidays!


#stampinwitheva #sudemo
#christmascards

Friday, July 23, 2021

Popular Curvy Blue Jingle Bell Card

The card I'm sharing today was the most popular original card of mine in 2020. Since I'm revisiting some great ideas for Christmas in July, I knew I had to share this again with you!


This card features the Curvy Christmas stamp set and Curvy Dies.  I just LOVE how this Christmas card turned out! It was very easy to make. The addition of the Sounds of the Seasons Dies, Silver and Navy Foil, and Feels Like Frost 6x6 Designer Series Paper (DSP) Stack all comes together in one stunning card you too can create!

All Images (c) 2020 Stampin' Up! 

HOT TIP #1: Use a 1-1/2" x 6" piece of silver foil, so after you use the Curvy Die you are able to line up the silver foil on the edge of the Feels Like Frost DSP, and trim off the excess once you have adhered the foil to the DSP.

HOT TIP#2: Be sure to use a sticky lint tape roller brush to pick up all the little cut out dots on your workspace and die cut machine.


A close up to admire the beautiful bell die with the Metallic Mesh Ribbon Bow. That ribbon is so soft and supple. I folded the ribbon in half to thread through the top loop of the bell die. Tying it is a dream!

HOT TIP #3: After you die cut the bell, carefully flip it over keeping the holly leaves intact and scotch tape over the back of the bell to hold them in place.


Here's a peek of the inside of the card using a smaller bell die and a 1/2" strip of the Feels Like Frost DSP.  This is a great way to finish off a card with a little extra pizzazz!

Maybe this inspiration will be enough to encourage you to make you own Christmas cards this year! They are fun to do and gives you such a sense of accomplishment!

Have a lovely day!

#stampinwitheva #stampinupproducts  

Friday, November 6, 2020

Curvy Blue Jingle Bell Card

Here's the last card I am sharing with you this week featuring the new Curvy Christmas stamp set and Curvy Dies that are available for preorder.  I just LOVE how this Christmas card turned out! It was very easy to make. The addition of the Sounds of the Seasons Dies, Silver and Navy Foil, and Feels Like Frost 6x6 Designer Series Paper (DSP) Stack results in one stunning card you too can create!


HOT TIP #1: Use a 1-1/2" x 6" piece of silver foil, so after you use the Curvy Die you are able to line up the silver foil on the edge of the Feels Like Frost DSP, and trim off the excess once you have adhered the foil to the DSP.

HOT TIP#2: Be sure to use a sticky lint tape roller brush to pick up all the little cut out dots on your workspace and die cut machine.


A close up to admire the beautiful bell die with the Metallic Mesh Ribbon Bow. That ribbon is so soft and supple. I folded the ribbon in half to thread through the top loop of the bell die. Tying it is a dream!

HOT TIP #3: After you die cut the bell, carefully flip it over keeping the holly leaves intact and scotch tape over the back of the bell to hold them in place.


Here's a peek of the inside of the card using a smaller bell die and a 1/2" strip of the Feels Like Frost DSP.  This is a great way to finish off a card with a little extra pizzazz!


Here's the Products used in Today's Project - these are available to order at my online store by clicking any of the pictures below: 

Noble Peacock Foil Sheets
[149495]
$10.00
Paper Snips
[103579]
$10.00

Need a card? Ask me and I can create one for you. 

Want the supplies to create your own, let me know and I can help you with that too!

Thank you for visiting today

As always, thank you for choosing me as your Stampin’ Up! Demonstrator!!


Thursday, November 5, 2020

Curvy Gnome Christmas

Is this darling gnome casting his spell on you?  I just love how his wand is helping this card be "bright" and merry. Using the color combination of Pretty Peacock, Merry Merlot, and Very Vanilla makes a striking holiday card for the gnome lovers in your life. Don't let him get away!


The new early release Curvy Christmas Stamp Set and Curvy Dies are available to order now at my online store. They will be in the Jan.-June 2021 Mini Catalog, but you can get these products now!

HOT TIP #1: Cut a 3" x 6" piece of the Designer Series paper (DSP) with the Curvy Dies. By having more paper than you really need it allows you to position the curves so they are a perfect match. After stamping your greeting, then you can adhere the DSP to the Very Vanilla and trim the edges with paper snips.

HOT TIP #2:  Before you adhere your Designer Series Paper (DSP) to the Very Vanilla, lay your word stamp down on your Very Vanilla and position it where it looks best. Then press Clear Block I down on your stamp and you will have it perfectly aligned with the curve of your DSP.


A close up of Mr. Gnome!  Also one of the Curvy Dies that I used is hard to see because of the Brightly Gleaming Designer Series Paper I used, but I have to say I needed to find a way to deal with all the little pieces that are left after you use the  curvy die.  

HOT TIP #3: I used the Basic Black Stampin' Write Marker to draw the line with a ruler to make the gnome hold his wand.  I also always use the brush end of this marker to go around the edge of my fussy cut shape just in case I accidentally leave a little bit of white paper showing. I really like how it gives the shape a finished, well-cut look.

HOT TIP #4: Get yourself one of the extra sticky lint rollers and use it to quickly and easily pick up all the little pieces left behind on your die cutting machine, work space, or floor.  You'll love it if you use glitter as well. So worth the money!


Here are the products used in today's project. Click on any link and you'll be directed to my online store for purchase.
 
Pretty Peacock Dark Stampin’ Blends Marker
[149559]
$4.50
Pretty Peacock Light Stampin’ Blends Marker
[149538]
$4.50
Paper Snips
[103579]
$10.00

Unfortunately the star punch is retired, but maybe you have something similar to use to make the gnome's wand.

Thank you for visiting today!  Leave a comment, I love to hear your thoughts!

As always, thank you for choosing me as your Stampin’ Up! Demonstrator!!