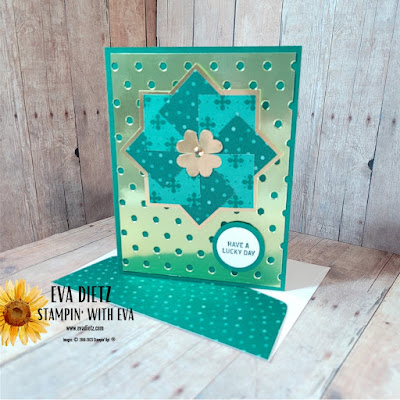
The main focal point is the Pinwheel technique which is really easy to do using eight 1 1/4" squares. I used two different sheets from the Regals 6" x 6" Designer Series Paper assortment.
I did my pinwheel a little different, by gluing just the squares together using my grid paper, then I mounted on a Gold Foil layer, with careful fussy cutting the edges until it looked good.
With another scrap of gold foil I punched out four mini hearts, adhered with glue dots to the center of the pinwheel and finished off with a Gilded Gem.
The card base is Stampin' Up!s Shaded Spruce color (my fav!) with a layer of (retired) Pear Pizzazz foil die cut with the (retired) Spots and Dots die. I suggest to use a sticky lint Tape Roller to get all those dots out before they fall on the floor or stick to your clothes!
Once that is adhered to the card front, mount your pinwheel on dimensionals and affix as shown in the photo.
The lucky day stamp came from (retired) Itty Bitty Greetings stamp set stamped in Shaded Spruce ink on Basic White, then punched out with a 1" circle punch and mounted on a 1 1/4" circle punch also raised up with Dimensionals.
Finish up your card by applying a 4" x 5 1/4" Basic White layer inside the card for your personal message. Adhere and trim some matching Shaded Spruce Designer Series Paper 2 3/8" x 6" to the exterior flap of the envelope.
************
I hope you have fun giving the pinwheel technique a try. Let me know if I can be of any help to you!
If you don't already have your own Stampin' Up! Independent Demonstrator, I'd love to be yours!
Learn how to get more done in less time by signing up for my exclusive "Insider" bi-monthly newsletter. Twice a month the news will share card class information, Stampin' Up! promotions, hot tips from me, and free tutorials! Subscribe to my Bi-Monthly Newsletter today. Plus you’ll receive a FREE 14 Card One Sheet Wonder Tutorial to download when you receive my thank you email for signing up.


No comments:
Post a Comment
Thanks for taking the time to leave me a comment! I appreciate hearing from my readers. If you have a question or anything I can help with please let me know. Have a wonderful day!