Pages

Showing posts with label red rhinestones. Show all posts

Monday, July 3, 2023

Stamp Your Own One Sheet Wonder Paper Using Stampin' Up!s Share a Milkshake Stamp Set with Patriotic Colors

 I was showing my husband the two cards I’d made with the Share a Milkshake Stamp Set recently – the Pretty Peacock Book Fun Fold Card and the Berry Burst/Bubble Bath Gate Fun Fold Card with Mega Belly Band, and he said, “Those look great, but what about a 4th of July card using this set?”

So, I took that as a personal challenge and wanted to see what I could fairly create quickly. Then the 4 piece One Sheet Wonder technique popped in my head. You can make four cards quickly from one sheet of 8 ½” x 11” Basic White Cardstock. Then I wondered what the cards would look like if I used the Share a Milkshake stamp set and some Patriotic ink colors. So, I decided to give it a try!

The other cool thing about this One Sheet Wonder technique is it only uses stamps, ink and paper (cardstock) which we, Stampin’ Up! Demonstrators call SIP cards. Yes, I did add some embellishments at the end, but you don’t have too. The nice thing about SIP cards is they lie flat and are easy to send through the mail. No postage due with these cards.

After I finished stamping the radiating design, I have to say I am very happy with how the finished cards look. I hope you’ll agree that it is worth trying this technique with any stamp set you own. Until trying it myself, I hadn’t seen this technique done in anything other than floral and greenery stamps. 


Shake a Milkshake Stamp Set is so much fun!!!


It is very easy to do this technique. Gather your 8 ½” x 11” Basic White Cardstock, a pencil, ruler, the ink colors you want to use, the stamp set and clear stamp blocks.

On the sheet of cardstock, you will make 2 tick marks on each long side at 5 ½” and repeat with 2 more tick marks on each short side at 4 ¼”. Connect the long side tick marks, then the short side tick marks with a lightly drawn pencil line creating four quadrants on the paper.

The ink colors I used were Real Red, Cherry Cobbler, and Sweet Sorbet for the reds. For the blues I used Boho Blue, Azure Afternoon, and Blueberry Bushel.

Using my photos as reference you will start at the intersection of lines in the middle of the Basic White cardstock, and stamp your images, some on each side of the lines and other images straddling the lines. Then each stamped image that follows will be stamped radiating out from the middle. I found I stamped better if I rotated the cardstock around the 4 quadrants so I could keep my hand and stamp in a comfortable position. This technique reminds me of a kaleidoscope that you might have looked through as a child.


Following the stamping of the OSW, then you can prepare the rest of the cardstock needed. I needed four 5 ½” x 8 ½” Basic White card bases, scored at 4 ¼”. For the single colored layer, I used 4” x 5 ¼” pieces of Real Red, Cherry Cobbler, Azure Afternoon, and Blueberry Bushel.

Next you must cut your stamped OSW apart. Cut on the 2 pencil lines to make four pieces. Then I decided to trim off the outer edges to make the stamped layer pieces end up at 3 ¾” x 5”. By doing that, I maximized my stamped images and the design.

The next big decision to make is deciding how you want the cards to look when finished. Will you have vertical cards or horizontal cards? Which way will the stamped greeting you want to use look best? I tried holding my greeting stamp as I rotated the quarter sheet around until I liked how it looked. Then I stamped the greeting stamp in the contrasting ink color of the colored cardstock layer that be paired with that stamped layer. Even though I had 4 different layer colors, I only went with two inks – Cherry Cobbler and Blueberry Bushel. I decided those would look best.

It's fun to lay out your four cards to see the whole design again!

Following the completion of the greeting stamping, it was time to assemble the layers. The stamped layer and colored cardstock layer are adhered together. Then they are raised up on Dimensionals before placing on the card base. Next, I decided to be brave and put a little Wink of Stella light glitter pen on my ice cream scoops. I found out quickly that the Wink of Stella did make the ice cream ink run just a little bit, but I liked how it could fill in the mini circles and if I had a gap of white showing at the top of the milkshake glass. I just love some bling on my cards, so I used retired Red Rhinestones to decorate the card fronts. On the inside of the cards, I stamped the little trio of hearts in Cherry Cobbler ink. They look so cute!

Below see the four resulting cards upclose.


Last but not least is decorating your exterior Basic White Medium Envelope flap. I used both the Brights and Regals 6” x 6” Designer Series Paper stacks to coordinate a matching paper to the colored cardstock layer on each card. I like to cut my flap paper 2 3/8” x 6” to give me some wiggle room in case something moves as I am applying to the exterior flap. I trim all the excess off the flap  with paper snips and TA-DA!

You too will be so proud of your One Sheet Wonder SIP cards and want to share them with your loved ones and dear friends.

As a bonus for you if you live in the USA - I have prepared a product shopping list, just click the blue bar below. You can uncheck any item on the list you already have, or say add all to the cart if you are a newer card maker. 


---------------------------

If you don't already have your own Stampin' Up! Independent Demonstrator, I'd be honored to be yours! Let me help you be creative and proud of your cards that you make and send.

Learn how to get more done in less time by signing up for my exclusive "Insider" bi-monthly newsletter. Twice a month the news will share card class information, Stampin' Up! promotions, hot tips from me, and free tutorials! Subscribe to my Bi-Monthly Newsletter today. Plus you’ll receive a FREE 14 Card One Sheet Wonder Tutorial to download when you receive my thank you email for signing up.

Join Stampin' Up! I'd love to have you be part of my growing team.

Please contact me if you have any questions about products, techniques, or card designs. 

Comments below are appreciated and welcome too!

Thursday, February 2, 2023

Seven Cute Stampin' Up! Snowmen Form a Winter Sampler Home Decor Piece to Share with You

Last year, a small group of my customers agreed that they wanted to make several 12" x 12" Wall Samplers that would fit in a Shadow Box Frame to use as a Home Decor item. I had lots of fun designing them from retired and current products in my stamp room.

As we got further along in the year, the group asked if they could make a couple more in 2023. I said sure! So here is our Winter Sampler we made recently. I love how it turned out and the ladies were very pleased as well. 


We started with a 12" x 12" piece of Basic White cardstock.

The measurements for the six squares were Pool Party Cardstock at 3-1/4" square, and retired Let it Snow Specialty Designer Series Paper (DSP) 3" square. The middle section was Pool Party at 3-1/4" x 10-1/4" and the Let It Snow DSP at 3" x 10". There is a 7/8" border all the way around and the squares/rectangle are spaced approximately 1/4" apart.

The Stamp Sets used were Spirited Snowmen (from 2018 Holiday catty), Snowman Season (2019 Holiday catty), and Snow Day (very old 2010 maybe?).

The bases for the stamped snowmen were made from Thick Basic White cardstock and Real Red cardstock. Retired Layering Circles Dies were used.

The assorted Snowmen were stamped in Memento Tuxedo Black Ink and colored with Stampin' Blends Alcohol Markers. The Blends colors used were Pool Party, Pumpkin Pie, Smoky Slate, Basic Black, Old Olive, and Soft Suede. The one snowman has a red felt hat and scarf that Stampin' Up! sold but I can't remember what the product name was.

The retired Large Letter Dies used more of the Let It Snow DSP to cut the word WINTER.

The Snow Day Snowman next to the WINTER word was stamped on a piece of Pool Party cardstock using White Craft Ink and a Heat Tool to speed drying. The rest of the snowman images were stamped in Real Red Ink, Pumpkin Pie ink, Memento Tuxedo Black Ink and Early Espresso ink. Then the entire snowman was fussy cut out and mounted on a White Glimmer Paper Oval cut from the Layering Ovals dies and adhered directly on the base using Stampin' Seal adhesive.

All the snowmen circle pieces and letters were raised up from the square bases using Adhesive Foam Sheets (current product) cut to the needed size.

Once all the snowmen and WINTER are adhered to the base, then it is time to die cut some snowflakes from White Glimmer Paper using the retired Snowfall Dies (2018 Holiday catty). With Tombow Multipurpose Glue, adhere the snowflakes by sliding under the snowmen and WINTER as shown in the photo above. Finish your masterpiece with Red Rhinestones and Rhinestone Jewel embellishments.

Then put your Sampler in a Shadow Box Frame and you are all set for the rest of Winter!


If you'd like to explore the Samplers we made last year, the links are below.


Grateful Wall Sampler (This link is for Nov. 5, but the rest of the posts are Nov. 2, 3, 4, 2021)


**************************
Learn how to get more done in less time by signing up for my exclusive "Insider" bi-monthly newsletter. Twice a month the news will share card class information, Stampin' Up! promotions, hot tips from me, and free tutorials! Subscribe to my Bi-Monthly Newsletter today. Plus you’ll receive a FREE 14 Card One Sheet Wonder Tutorial to download when you receive my thank you email for signing up.


Please contact me or email me at stampinwitheva@gmail.com if you have any questions about products, techniques, or card designs. Comments below are welcomed and appreciated too!

Wednesday, November 23, 2022

Spread Some Christmas Cheer with Stampin' Up!s Sweetest Christmas Woven Candy Canes Technique to Create This Sweet Holiday Card

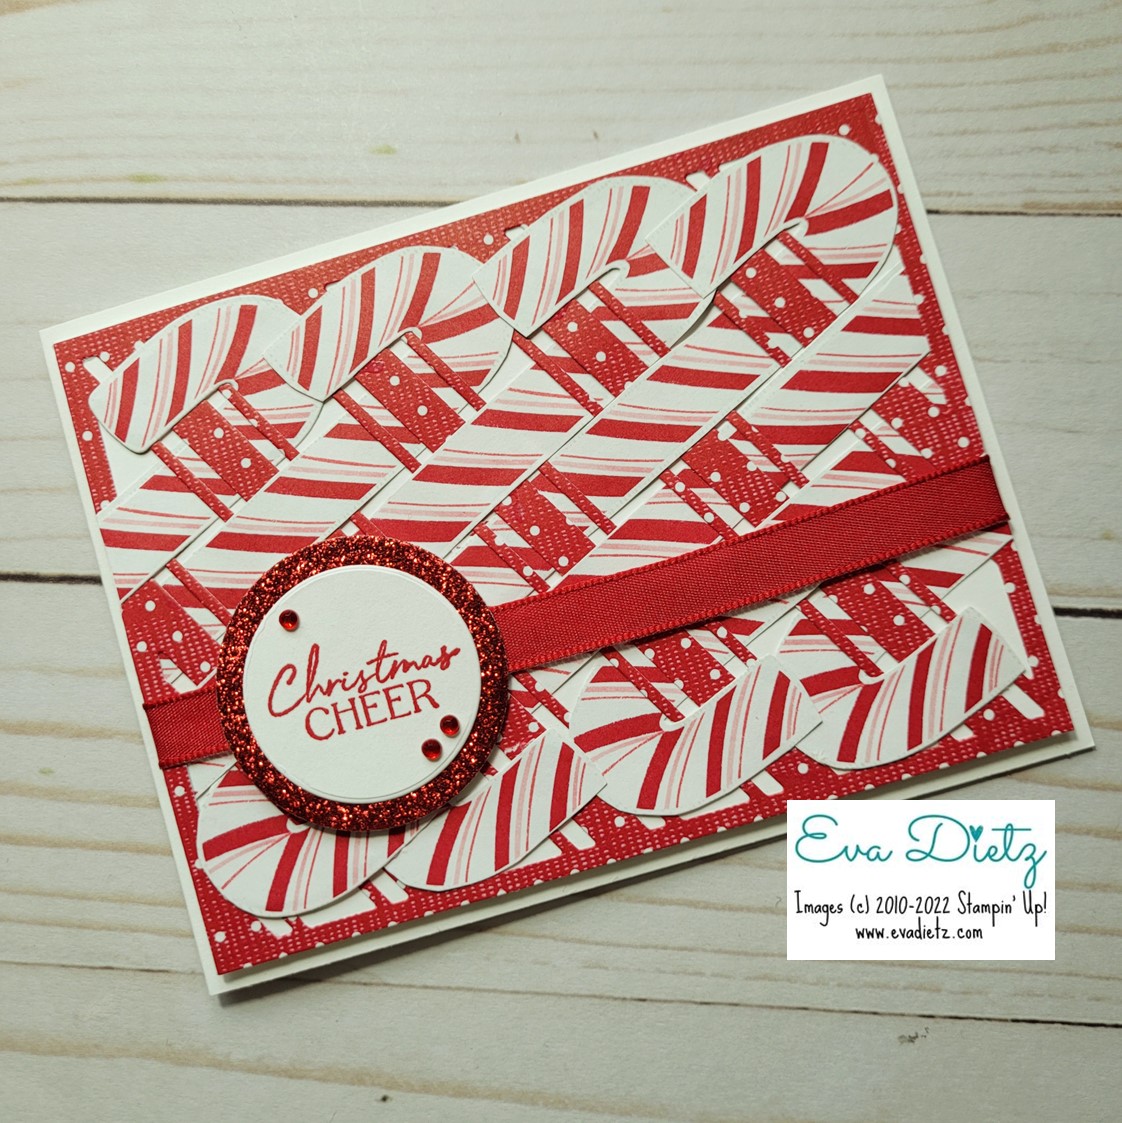
Do you remember doing weaving art projects in Elementary School? I do, and that was my inspiration for this card design. When I saw the Candy Cane Dies that came in the Bundle, I immediately thought it would be fun to try to weave the candy canes in and out of the large striped frame die cut. What worked out so nicely is you can hide the overlapping ends of the two candy canes that go in each weaving space.


This photo illustrates the over and under weaving effect that you will do with the die cut paper from the striped frame die.


You will need 9 candy canes from the Designer Series Paper all going the same direction. (One will be saved for the card insides.

As you can see in the above photo you will have some ends of candy canes that will get cut off and hidden underneath the edge of the die cut frame.


Close-up of the ribbon and tag accent on the card front.


One more look at the finished card.


The fun inside sentiment and using one more candy cane here.


Project Measurements:

Thick Basic White Cardstock 4-1/4” x 11”, scored at 5-1/2” and cut a 2” square piece

Basic White Cardstock cut 4” x 5-1/4”

Sweetest Christmas Designer Series Paper – red polka dot 4” x 5-1/4”

Sweetest Christmas Designer Series Paper – Die cut or fussy cut 9 “peppermint” canes

Real Red Ribbon cut 6-1/2” long piece

Real Red Glimmer Paper cut 2-1/4” square

Sweetest Christmas Designer Series Paper for envelope flap – 2-3/8” x 6”

Project Instructions:

 Center the background striped die on the red polka dot 4” x 5-1/4” piece from the Sweetest Christmas Designer Series Paper. Die cut out.

Weave 8 candy canes as shown in photo, once you have the spacing how you like, use the Multipurpose Liquid Glue, and apply a dot here and there to hold the heads and ends of the candy canes in place on the red dot frame.  Weave and piece two candy canes using portions of trimmed candy canes that are hanging outside the frame.

Glue the entire trimmed and woven background to the Basic White Cardstock piece. Let dry.

Wrap the 6-1/2” Real Red ribbon around the layers at 1-1/2” from the bottom edge. Secure ribbon ends on back of layer.

With Real Red ink stamp the “Christmas Cheer” greeting in the center of the Basic White 2-1/4” square. Take both Basic White square and Real Red Glimmer paper square and die cut with the two circle dies. Using the liquid glue adhere both layers together. Let dry.

With the Memento Tuxedo Black ink, stamp your choice of sentiment from the Sweet Candy Canes stamp set inside your card. Glue the final remaining candy cane inside (use photo as guide.)

Adhere your candy cane layer with Dimensionals to the Thick Basic White card base.

With Dimensionals adhere your circle tag, centering it over the ribbon.

Add three Red Rhinestones on tag with Take Your Pick Tool.

Finish by adhering matching red polka dot envelope flap piece and trim off excess.

Using the links provided below you can order the products you need to complete this fabulous card project through my online store. 

Learn how to get more done in less time by signing up for my exclusive "Insider" bi-monthly newsletter. Twice a month the news will share card class information, Stampin' Up! promotions, hot tips from me, and free tutorials! Subscribe to my Bi-Monthly Newsletter today. Plus you’ll receive a FREE 14 Card One Sheet Wonder Tutorial to download when you receive my thank you email for signing up.


Please contact me or email me at stampinwitheva@gmail.com if you have any questions about products, techniques, or card designs. Comments below are welcomed too!

Wednesday, November 2, 2022

Sweethearts Global Collective Holiday Blog Hop - Cottage Wreaths Twisted Easel Chrismas Card


WHO WE ARE:

Welcome to the second blog hop by the Sweethearts Global Collective. The Sweethearts Global Collective is an International group of Independent Stampin’ Up! Demonstrators. We are a group of women who are members of an exclusive Direct Sales Coaching Group, called The Elite Suite led by Brenda Ster. We are all working to improve our direct sales business' online through providing value that you can use. 

We share our love of creativity with not only our customers, but with one another. This month, the theme for our blog hop is “Share a Holiday.” We hope our projects and creativity inspire you in your stamping and papercrafting. Just a quick reminder…as we span the globe, not only are we in different countries, but in different seasons. Thus, you may see projects for Winter cards from one and Summer cards from another. At the end of this post, please “hop” along with me to visit the other blogs and see the amazing creativity of these wonderful demonstrators from around the world! Don’t forget to leave a comment and show them a “little love!”

***********************
LET'S GET STARTED!

Here's my contribution, a Cottage Wreath Twisted Easel Christmas Card for you! This card design packs a lot of pizzazz in a small package. Laying flat for sliding in the envelope, but then the front easel portion can stand up and become a 3D card! So festive for the holidays!

I am sure whomever you gift your masterpiece to, they will display it proudly for a long time!

Top Down View

Easel Standing up for 3D effect.


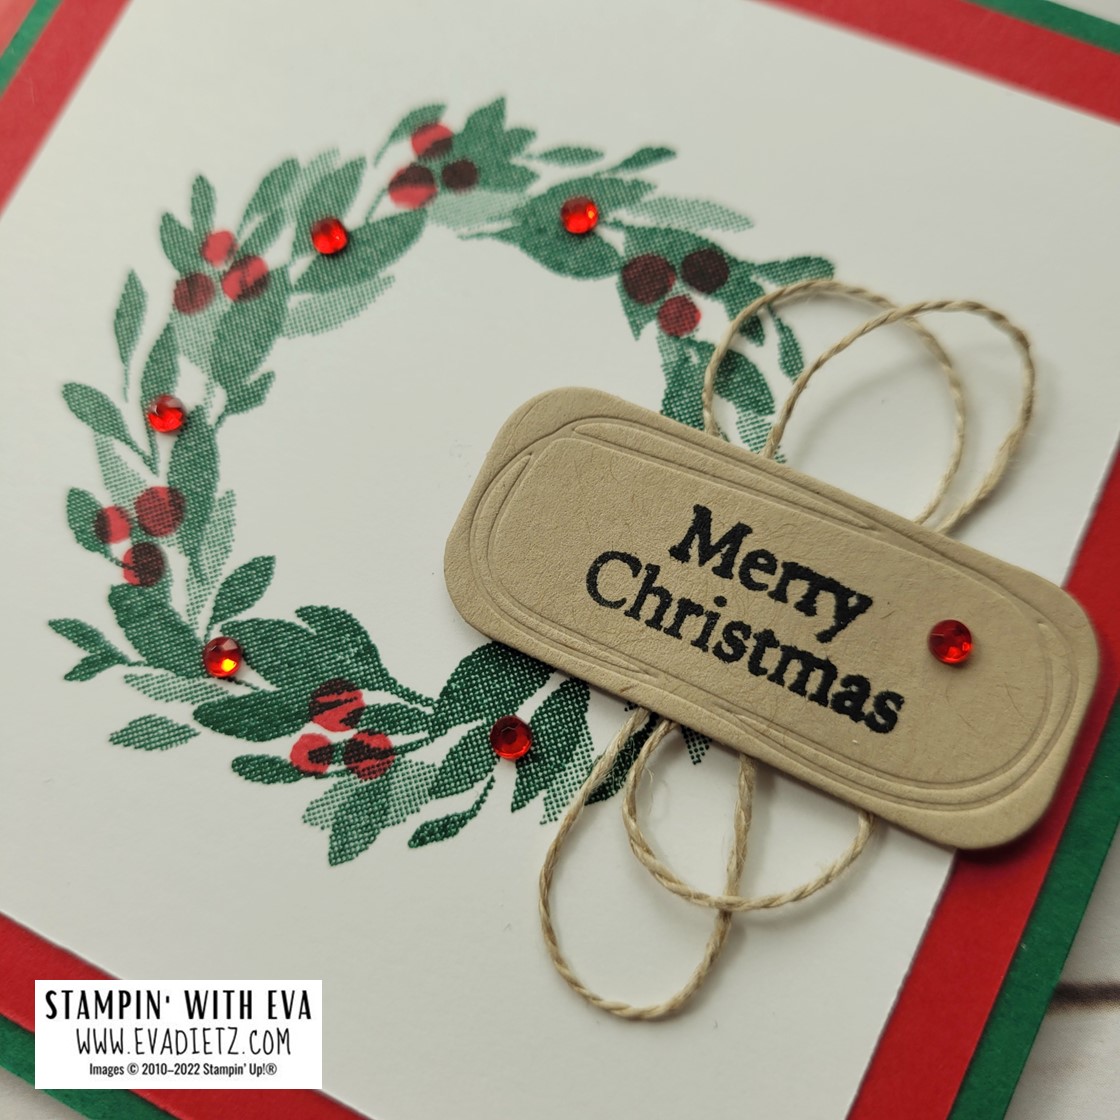
Close up of the wreath and tag.


CUTTING DIMENSIONS:

-Shaded Spruce Cardstock for card base cut 4¼” x 11”, score at 4¼”, 4-3/8" and 5½”

-Shaded Spruce Cardstock for easel cut 4¼” square

-Real Red Cardstock for card layer 4” square

-Real Red Plaid of the Gingham Cottage Designer Series Paper (DSP) 1" x 4" and 4" square, plus envelope flap at 2-3/8" x 6"

-2 pieces of Thick Basic White Cardstock for Wreath inner card layer cut 3-1/2"” square, and 1 piece for easel stop!' x 1-1/2"

-Crumb Cake cardstock for tag 1-1/4" x 2-1/2"


ASSEMBLY INSTRUCTIONS:


Cut all pieces from the measurements above.


One more diagonal score line will be needed on the card base as shown in the diagram below. With the card base open flat facing you and the card front on the right side, score from the upper right corner to the lower left stopping at the 4¼” score line of what will be the front of the card. This will create the easel effect. Crease all score lines with a bone folder or edge of a clear stamping block. This additional easel fold will be a "mountain fold."


Closing the card on the 5-1/2" score line, adhere the book binding narrow section to the back of the card base with Stampin' Seal or Tear and Tape on the inside.

Apply the 1" x 4" piece of the Gingham Cottage DSP to the outside of the book binding section aligning with the 4-3/8" score line to create the 1/8" margin around that section.

Stamp the Thick Basic White Liner with the holiday greeting of your choice in Shaded Spruce ink and adhere the Basic White to the Gingham Cottage DSP. Adhere those two layers to the inside of the Shaded Spruce card base.

Next, prepare the separate Front Easel Square. Adhere Real Red cardstock to Shaded Spruce square.

Stamp the Thick Basic White top layer with Shaded Spruce ink by centering the Cottage Wreath stamp. With Real Red ink stamp the triple dots evenly around wreath.

Stamp with Memento ink the "Merry Christmas" stamp on the small piece of Crumb Cake. Die cut out with the Beautiful Shapes Dies. Take a 12" piece of Linen Thread and wrap around 3 fingers multiple times. Place the loops on the back of the die cut tag and scotch tape in place. Raise tag up on dimensionals on right side of wreath. Finish with adding single red rhinestone jewels around wreath as shown in the close-up photo.

The easel stop is made by stamping the double leaves stamp with Shaded Spruce ink on small piece of Thick Basic White cardstock. Fussy cut out the pair of leaves as one unit with a generous border. Raise the leaves up on two dimensionals and place about half way up the right side of the inner card which will hold the easel in position when opened. Refer to the photo above.

Finish with preparing the envelope flap.

*************************


Online shopping for the products used in this card is easy by clicking each photo link below.


I hope this card idea has inspired you with some possibilities for the Cottage Wreaths Bundle! Have fun!

If you'd like to see another idea with the Cottage Wreaths Bundle, visit here!

Learn how to get more done in less time by signing up for my exclusive "Insider" weekly newsletter. Each week the news will share card class information, Stampin' Up! promotions, hot tips from me, and two or more free tutorials! Subscribe to my Weekly Newsletter today. Plus you’ll receive a FREE 14 Card One Sheet Wonder Tutorial to download when you receive my thank you email for signing up.


Please contact me or email me at stampinwitheva@gmail.com if you have any questions about products, techniques, or card designs. Comments below are welcomed too!

Monday, February 7, 2022

Let Me Sweet Talk You With This Card

I've been doing a lot of sweet talking over the past few weeks here on my blog. That's because I LOVE the Sweet Talk Suite from Stampin' Up! in the January to June Mini Catalog. I LOVE everything about it! The color scheme, the stamp designs, and the Designer Series Paper. Everything, I'm saying!  

So when I came across this great idea from www.kimplayswithpaper.com I knew I had to give it a try and I hope you will too. I just happened to have some leftover pieces that were the perfect size for this card. All I did was change the layout from horizontal three panels to vertical three panels.

Let's explore some suggestions below on how to make this card.


It's always a great idea to cover the flap of your envelope with matching paper so your recipient feels very special when they open the card. Cut the piece you want to cover the flap at 2-3/8" x 6". Adhere the pretty paper securely to the exterior of the flap. Let dry. Trim off the excess paper.


Here's a fun idea for the inside of the card you can try. I used the Sweet Conversation Stamp Set to stamp the "X" and "O" in Blushing Bride ink, then stamped the greeting over the top in Real Red. In the lower right corner, I added a fussy cut heart from the Sweet Talk Designer Series Paper and glued it down. 


Here are the products used to create this card and all are available at 
my online store link in the yellow box below.

Blushing Bride cardstock card base cut 5-1/2" x 8-1/2", scored at 4-1/4"

Real Red cardstock layer cur 4" x 5-1/4"

Basic White cardstock for inner card layer 4" x 5-1/4"

Three pieces of Sweet Talk Designer Series paper cut at 3-3/4" x 1-9/16"

3" square piece of Real Red cardstock for the envelope that you will diecut with the Sweetheart Dies. Fold the envelope on the score lines and burnish with a bone folder. Using liquid glue carefully assemble the three flaps and place a large clear stamp block on it for pressure. Allow drying for at least 10 minutes.

Another 3" piece of Real Red needs to be die-cut with the 2-1/2" Scalloped Circle of the Layering Circle Dies.

A 3" square piece of Blushing Bride needs to be die-cut with the 2-3/8" Regular Circle of the Layering Circle Dies. Adhere both circles together. Affix the prepared Real Red envelope to the Blushing Bride circle.

1-1/4" square piece of Blushing Bride stamped in Real Red with the "Luv U" outline stamp from the Sweet Conversation Stamp Set. Using the Sweetheart Dies, cut out the small heart and adhere to the assembled envelope as shown in the photo.

Using two 1-1/4" squares of Basic White cardstock, stamp the shaded heart image using Pool Party for one heart and Highland Heather for the other heart. Using the Sweetheart Dies, cut out the two small hearts. The Highland Heather heart is affixed to the back of the envelope flap and tucked into the envelope. Then place a mini-dimensional near the top on the backside of the Pool Party heart and add some liquid glue to the back of the point. Slide into the envelope on top and tilt so both hearts show as shown in the photo.

Raise the entire assembled scalloped circle/envelope focal point on dimensionals.

Embellish with four Red Rhinestone Jewels to finish off all this cuteness!

Prepare the Interior of the card as explained above.

Do you have someone in mind who would love to receive your work of art? 
 
Drop me a comment below or sign up for my free tutorial here! Thanks!


#stampinwitheva #valentinescard

Wednesday, January 26, 2022

Sweet Conversations Double Heart Card

 Hello Stamping Friends! Sorry to be absent here on the blog for the last couple of days, but I have been training my replacement at my church bookkeeping job. I only have two more training days and I am "free" starting Feb. 1, 2022!  I hope I've taught her everything she needs to know!

Last weekend I held my in-home stamping classes with a great group of 14 ladies over three sessions. This cute card I cased from Simply Sweet in Ink Designs because it was so darn cute! It was a popular one in class too!

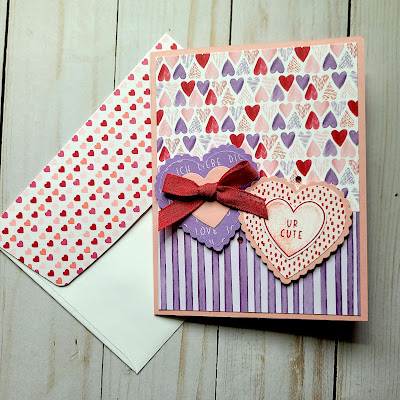
The Sweet Talk Suite in the January - June 2022 Mini Catalog makes up a beautiful card.


The envelope flap paper was retired "From My Heart" Designer Series Paper. Cut a piece 2-3/8" x 6." Adhere and trim off excess.


The Sweet Conversations stamp set makes for a cute inner card greeting and accent!


Here are the details you'll need to make your own cute card:

Cutting and Assembly Directions:

Blushing Bride card base - 5-1/2" x 8-1/2", scored at 4-1/4"

Sweet Talk Designer Series Paper (DSP) - two pieces - 1) 2" x 4" and 2) 3-1/4" x 4"

Scotch tape the two DSP pieces together on the backside before adhering to the card front.

Basic White cardstock cut 4" x 5-1/4" for inner card liner. 

Stamp with word greeting and heart border in Real Red ink, and the heart shading in Blushing Bride ink before adhering to the card inside. 

Next, you'll need 2-3/4" square of Highland Heather and Blushing Bride cardstock for the scalloped heart using the Heart Punch Pack.

Two DSP pieces 2-1/2" square with the plain heart punch from the Heart Punch Pack
.
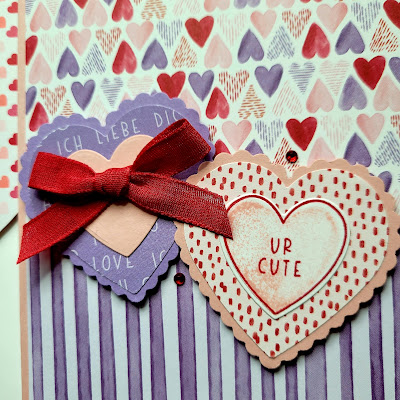
Using the Sweet Heart Dies you'll die cut one 1-1/2" square piece of Blushing Bride cardstock. Then with a 1-1/2" piece of Basic White stamp another heart like you did on the inner layer exactly the same, then die cut.

Assemble the three heart layers like the photograph. Using Dimensionals arrange and attach to card front as shown.

Tie a pretty bow with the Real Red Faux Linen Ribbon and attach it to the left heart with a couple of glue dots.

Finish the card with two red rhinestone jewel embellishments as shown.

What do you think? Darling card isn't it? Perfect to give to someone you LOVE for Valentines Day.

All the products used in this card can be purchased at the yellow box link below in my online store. 
If you don't have your own Demonstrator, I'd love to be yours! 

Have a Sweet Day!


#stampinwitheva #sudemo

Friday, December 17, 2021

Easy Origami Pocket Fold Treat Pouch

Need an easy treat holder? This origami pocket is perfect for a Ghirardelli Chocolate Square or a tea bag or even a gift card!

This sample was made by my downline Anne when we were together at OnStage at Home last month.


Anne used the Gingerbread and Peppermint Designer Series Paper, plus a fussy cut tree from that same paper, with red rhinestones for added bling! The tree is raised up on dimensionals.

If you'd like to give this origami pocket a go, here's a link with a great explanation and drawings.

Pocket Origami

You can make a bunch of these and they would be fun favors for your Christmas Dinner table. You could also add your guests' names and it would become a place card too!

Happy Creating!


#stampinwitheva #sudemo
#pocketorigami

Tuesday, September 14, 2021

Sweet Gingerbread and Peppermint Angled Tri Fold Card

I am really on a Christmas kick lately. Maybe it is a distraction from the pandemic. Or could it be that Stampin' Up! has designed the most "delicious" Suite ever? I think that must be it! Since I love to bake and travel, this suite is the best combination of both worlds. Memories of baking cookies with my mom and my daughter plus my German travels and eating lots of gingerbread while visiting there in November or December.

Maybe you would appreciate this sweet distraction this week to inspire your card-making. I plan on sharing four different cards using this "yummy" Suite.

This Angled Tri-Fold Card layout is inspired by Stampin with Lorraine's YouTube video. I changed it up to be a Christmas Card design using the Gingerbread and Peppermint Suite.


Here's the entire Suite below:


Products used from the July-December 2021 Mini Catalog in this card:

Frosted Gingerbread Stamp Set

Gingerbread and Peppermint 6" x 6" Designer Series Paper (DSP)

Gingerbread Dies

Seasonal Labels Dies

Real Red, Garden Green, and Basic White cardstock

Real Red and Garden Green Inks

Tear and Tape

Red Rhinestones

Basic White Envelope with a piece of matching DSP that's 2-3/8" x 6" to cover the outer flap and fussy cut off the excess.

If you'd like to order these products to make your own card collection, please click the "Shop Online" box under my name.

Come back tomorrow for a new creation! Have a "sweet" day!


#stampinwitheva #sudemo
#gingerbreadandpeppermint #stampinup

Friday, August 27, 2021

August Stamp and Chat Card #5

Wanna get a head start on your Christmas Card Making? Here's a great idea for you!

The Sale-a-Bration reward Peaceful Prints Designer Series Paper makes the easiest Christmas cards with just a few supplies. All you have to do is go to your Stampin' Up! wish list that you have made from either the Annual Catalog and/or the Fall Mini Catalog and order $50 USD before shipping and tax and you can select this darling paper for FREE! It's an $11.50 value!

 Cased from Wendie Waldman with a few minor additions.


Products needed to make these Cards:

Basic White Thick cardstock cut 5-1/2" x 8-1/2", scored at 4-1/4"
Basic White cardstock strip cut 1/2" x 4"

From the Peaceful Print Designer Series Paper (DSP) - cut a row of deer at a height of 2-1/8", then square up the deer as shown in the photo. 

Using the Christmas to Remember stamp set and Memento Tuxedo Black Ink, stamp the greeting. (HINT- I cut the stamp in two so each word was separate.)

Mount the deer on a 2-3/8" square of Basic Black cardstock

From your choice of the DSP cut two 4" x 5-1/4" vertical pieces
Slice those pieces horizontally at 3-1/4"

Mix and match the pieces to look similar to the photo. Adhere to the card base. Add the Basic White 1/2" strip to hide the seam. Then raise the deer up on dimensionals. Add red rhinestones for embellishment and a small black and white gingham bow with glue dots. Wasn't that fast?
--------------------------------------------------

You'll be able to mass product at least a dozen of these cards from the DSP pretty quickly. Give it a try. 

You can order these products at my online store by clicking the yellow link below my name.

Thanks for stopping by!


#stampinwitheva #stampinupproducts