
Are you looking for something a little different to decorate your home with? A multilayered, handmade sampler might just be the thing you need for your walls!
You can make this! A DIY Home Decor piece to celebrate Valentine's Day! This Love Sampler can be made with stamp sets, dies, and designer series paper you probably already have in your craft room.
I purchased a 12" x 12" Shadow Box frame from Michael's Craft Store which will allow me to make a variety of samplers this year to celebrate the seasons or the holidays, and just change each sampler I make in/out of the frame when the time is right.
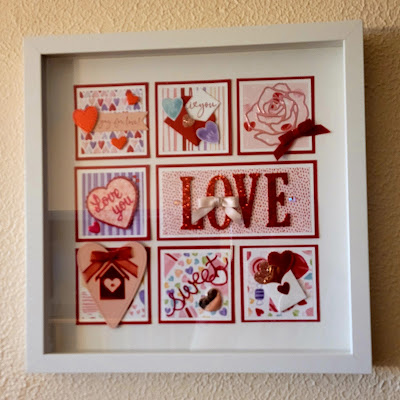
Here's mine hanging in my dining room.
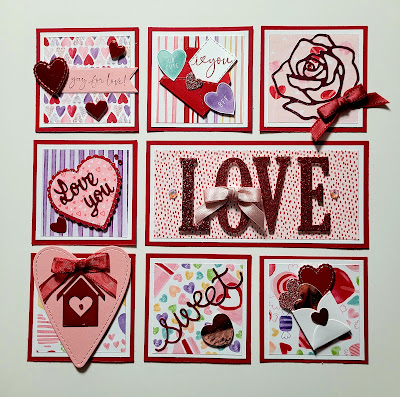
Before framing above.
Here is a list of supplies (some current, some retired) I used to create this Sampler, but you can make yours with whatever you have on hand. Refer to the photo for inspiration and layout.
The glue I used for this project is not a Stampin' Up! product, but it is the best around I have found. Art Glitter Glue with the added metal tip and stainless steel straight pin I purchased on Amazon. It can go on in small amounts, dries quickly, and dries clear.
Start by cutting with your paper trimmer these pieces:
Real Red Cardstock
7 pieces of cut 3" square
1 piece cut 3" x 6-1/4"
Basic White Cardstock
7 pieces cut 2-3/4" square
1 piece cut 2-3/4" x 6"
Sweet Talk Designer Series Paper (DSP) from the
Jan.-June 2022 Mini Catalog refer to the photo for patterns needed
7 pieces cut 2-1/2" square
1 piece cut 2-1/2" x 5-3/4"
If you happen to have a backing board from a package of Designer Series Paper, that is the perfect weight paper to make yourself a frame that will help you space all the squares out when you are ready to glue them down on your 12" x 12" Basic White Cardstock.
Cut four strips 1-1/4" x 12". Lay two of 4 pieces horizontally spaced approximately 12 " apart from outside edge to outside edge. Next lay the remaining 2 pieces vertically on top of each of the horizontal pieces in a square outline shape (like stacking Lincoln Logs), making sure when you glue each corner only, that your corner angles are precise. Your result will be a frame that you can clip to your 12" x 12" piece of Basic White Cardstock and be able to lay your sampler pieces inside and they will be much easier to line up and glue one at a time.

The same photo for reference purposes.
Top Row left square - 3 various sizes of red glimmer paper hearts punched or die-cut. Banner tag stamped with a greeting in Real Red ink.
Top Row middle square - Snail Dies to make Real Red cardstock envelope. Fussy cut two hearts from Sweet Talk DSP. A scrap of Basic White to stamp a greeting that will fit in the envelope. Add a small heart punched from Blushing Bride glimmer paper to the envelope.
Top Row right square - Retired Rose Garden die-cut in Blushing Bride Foil. Add a Real Red bow with glue dots and red rhinestone in the center of the rose.
Middle Row left square - DSP punched with the Heart Punch Pack and Love You More Than Dies die-cut in Lovely Lipstick Foil. Add one more die-cut heart in the Lovely Lipstick and two red rhinestones.
Middle Row - LOVE - Using the Large Letter Dies and Red Glimmer Paper, cut out LOVE, raise up on pieces of dimensionals. Add a Blushing Bride bow with glue dots and two Iridescent Rhinestones.
Bottom Row left square - Blushing Bride cardstock with the heart die-cut from Stitched Be Mine Dies. Red foil house die-cut from Home Together Dies. Add a Real Red Bow with glue dots.
Bottom Row center square - The word "sweet" cut from Lovely Lipstick Foil and the Cupcake Cutout Dies. Add a separate heart die cut from Blushing Bride foil.
Bottom Row right square - Die cut a Basic White envelope from the Sweetheart Dies, glue it into shape, and fill it with 3 various hearts - one in Real Red Foil, one in Blushing Bride Glimmer paper, and one in Blushing Bride foil. Add a mini heart punch from Real Red Foil on the envelope as shown.
Once all your squares are done here is the gluing sequence:
1) The four corners first with corner edges touching the paper frame you made for being precise.
2) The LOVE piece so you can space it evening between the top and bottom right side square pieces.
3) The middle row left square is lined up with the left paper frame edge and aligned with the top and bottom edges of the LOVE piece.
4) The top row middle piece so its left edge lines up with the left edge of the LOVE piece and touches the top of the paper frame.
5) The bottom middle piece so its left edge lines up with the left edge of the LOVE piece and touches the bottom of the paper frame.
Remove the thick paper frame. Insert in your shadow box frame and admire what a great job you have done! Way to go getting this sampler finished!
I know this project looks like a ton of work, but allow yourself several hours of "ME" time and you will have a keepsake you will want to put up year after year.
I'd love to hear in the comments what you think of this project or tell me how yours turned out.
Have fun!

#stampinwitheva #valentinesampler
No comments:
Post a Comment
Thanks for taking the time to leave me a comment! I appreciate hearing from my readers. If you have a question or anything I can help with please let me know. Have a wonderful day!