Pages

Showing posts with label beautiful shapes dies. Show all posts

Wednesday, February 15, 2023

Use Stampin' Up!s Deckled Rectangle Dies to Make Layered Cards Where You Cut the Middle Out, Flip It Over and Have a Fun New Look!

Today I used Stampin' Up!s Deckled Rectangles Dies to make these fancy looking, but really very simple cards using Basic White Cardstock and Favored Flowers Designer Series Paper (DSP). This DSP is a Sale-a-Bration reward item you can choose when you place a $50 USD order with me before tax and shipping. Selecting this package of DSP is a $12 retail value you can receive free. Sale-a-Bration only lasts until February 28, 2023, then it is gone until next January, 2024, so don't miss out!

Here's a quick description of how to make this card:

1. Cut your Basic White card stock into the normal 5 1/2" x 8 1/2" with a score line at 4 1/4". You can make one or more quick cards when you cut your DSP 3 7/8" x 5 1/8". Use the largest die to die cut the outer edge. then select whichever rectangle you'd like for the center rectangle. Lay the die carefully so all margins are as equal as you can make it and make the center die cut. You will be flipping the center DSP piece over to get the shown effect.

2.  You'll need an extra piece of Basic White to cut 1/4" larger all around from the deckled rectangle you chose to use for the center. Glue those two layers together and tie a ribbon with bow around those two layers. The center layers are adhered directly to the larger DSP layer that is adhered to the card front.

3. Select your sentiment from the Something Fancy stamp set and find a die that will work from the Beautiful Shapes Dies. Stamp your sentiment in matching ink then die cut. Raise the tag up with dimensionals in your choice of location on the card front

4. Be sure to cut an extra of the smaller flower with the black edge and adhere it to the inside of your card for a nice surprise of color! Embellish with your choice of bling.

5. It is always a nice touch to add a 2 3/8" x 6" matching DSP piece to the exterior envelope flap and trim off the excess.


Something Fancy Stamp Set 160416  $23USD


#160833 Favored Flowers Designer Series Paper from Sale-a-Bration 2023
Free with a $50 USD Order before shipping and tax

Images (c) Stampin' Up!

Deckled Rectangle Dies #159173 $30
Images (c) Stampin' Up!


Beautiful Shapes Dies # 158046 $29
Images (c) Stampin' Up!


Just by purchasing two of the 3 items shown above you'll surpass the minimum order amount needed to select the Favored Flowers DSP. Now that's a sweet deal! My online store shopping link is down below just a little bit.

If you don't already have your own Stampin' Up! Independent Demonstrator, I'd love to be yours!


Learn how to get more done in less time by signing up for my exclusive "Insider" bi-monthly newsletter. Twice a month the news will share card class information, Stampin' Up! promotions, hot tips from me, and free tutorials! Subscribe to my Bi-Monthly Newsletter today. Plus you’ll receive a FREE 14 Card One Sheet Wonder Tutorial to download when you receive my thank you email for signing up.


Please contact me or email me at stampinwitheva@gmail.com if you have any questions about products, techniques, or card designs. Comments below are welcomed too!

Wednesday, November 2, 2022

Sweethearts Global Collective Holiday Blog Hop - Cottage Wreaths Twisted Easel Chrismas Card


WHO WE ARE:

Welcome to the second blog hop by the Sweethearts Global Collective. The Sweethearts Global Collective is an International group of Independent Stampin’ Up! Demonstrators. We are a group of women who are members of an exclusive Direct Sales Coaching Group, called The Elite Suite led by Brenda Ster. We are all working to improve our direct sales business' online through providing value that you can use. 

We share our love of creativity with not only our customers, but with one another. This month, the theme for our blog hop is “Share a Holiday.” We hope our projects and creativity inspire you in your stamping and papercrafting. Just a quick reminder…as we span the globe, not only are we in different countries, but in different seasons. Thus, you may see projects for Winter cards from one and Summer cards from another. At the end of this post, please “hop” along with me to visit the other blogs and see the amazing creativity of these wonderful demonstrators from around the world! Don’t forget to leave a comment and show them a “little love!”

***********************
LET'S GET STARTED!

Here's my contribution, a Cottage Wreath Twisted Easel Christmas Card for you! This card design packs a lot of pizzazz in a small package. Laying flat for sliding in the envelope, but then the front easel portion can stand up and become a 3D card! So festive for the holidays!

I am sure whomever you gift your masterpiece to, they will display it proudly for a long time!

Top Down View

Easel Standing up for 3D effect.


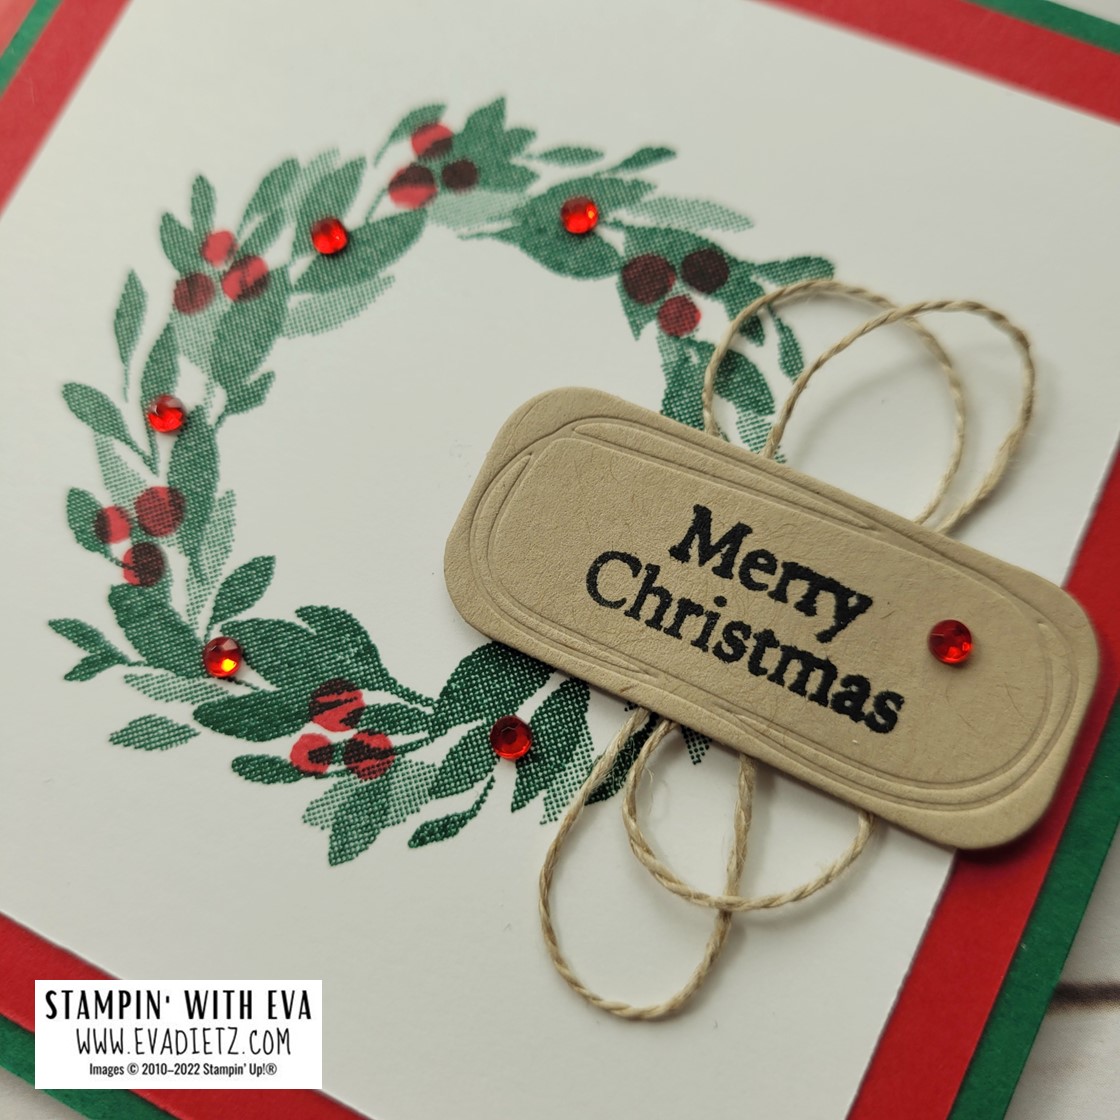
Close up of the wreath and tag.


CUTTING DIMENSIONS:

-Shaded Spruce Cardstock for card base cut 4¼” x 11”, score at 4¼”, 4-3/8" and 5½”

-Shaded Spruce Cardstock for easel cut 4¼” square

-Real Red Cardstock for card layer 4” square

-Real Red Plaid of the Gingham Cottage Designer Series Paper (DSP) 1" x 4" and 4" square, plus envelope flap at 2-3/8" x 6"

-2 pieces of Thick Basic White Cardstock for Wreath inner card layer cut 3-1/2"” square, and 1 piece for easel stop!' x 1-1/2"

-Crumb Cake cardstock for tag 1-1/4" x 2-1/2"


ASSEMBLY INSTRUCTIONS:


Cut all pieces from the measurements above.


One more diagonal score line will be needed on the card base as shown in the diagram below. With the card base open flat facing you and the card front on the right side, score from the upper right corner to the lower left stopping at the 4¼” score line of what will be the front of the card. This will create the easel effect. Crease all score lines with a bone folder or edge of a clear stamping block. This additional easel fold will be a "mountain fold."


Closing the card on the 5-1/2" score line, adhere the book binding narrow section to the back of the card base with Stampin' Seal or Tear and Tape on the inside.

Apply the 1" x 4" piece of the Gingham Cottage DSP to the outside of the book binding section aligning with the 4-3/8" score line to create the 1/8" margin around that section.

Stamp the Thick Basic White Liner with the holiday greeting of your choice in Shaded Spruce ink and adhere the Basic White to the Gingham Cottage DSP. Adhere those two layers to the inside of the Shaded Spruce card base.

Next, prepare the separate Front Easel Square. Adhere Real Red cardstock to Shaded Spruce square.

Stamp the Thick Basic White top layer with Shaded Spruce ink by centering the Cottage Wreath stamp. With Real Red ink stamp the triple dots evenly around wreath.

Stamp with Memento ink the "Merry Christmas" stamp on the small piece of Crumb Cake. Die cut out with the Beautiful Shapes Dies. Take a 12" piece of Linen Thread and wrap around 3 fingers multiple times. Place the loops on the back of the die cut tag and scotch tape in place. Raise tag up on dimensionals on right side of wreath. Finish with adding single red rhinestone jewels around wreath as shown in the close-up photo.

The easel stop is made by stamping the double leaves stamp with Shaded Spruce ink on small piece of Thick Basic White cardstock. Fussy cut out the pair of leaves as one unit with a generous border. Raise the leaves up on two dimensionals and place about half way up the right side of the inner card which will hold the easel in position when opened. Refer to the photo above.

Finish with preparing the envelope flap.

*************************


Online shopping for the products used in this card is easy by clicking each photo link below.


I hope this card idea has inspired you with some possibilities for the Cottage Wreaths Bundle! Have fun!

If you'd like to see another idea with the Cottage Wreaths Bundle, visit here!

Learn how to get more done in less time by signing up for my exclusive "Insider" weekly newsletter. Each week the news will share card class information, Stampin' Up! promotions, hot tips from me, and two or more free tutorials! Subscribe to my Weekly Newsletter today. Plus you’ll receive a FREE 14 Card One Sheet Wonder Tutorial to download when you receive my thank you email for signing up.


Please contact me or email me at stampinwitheva@gmail.com if you have any questions about products, techniques, or card designs. Comments below are welcomed too!

Saturday, May 28, 2022

Wonderful Hues of Happiness Suite Fun Fold

As we all do, I have a few people I like to "follow" on Instagram. One of those people is the amazing Stampin' Up! Demonstrator Jaimie Babarczy of New York. I really liked this card she created recently (she cased it from @karenksenzakovic), but I have improved it just a bit.

As I was looking at the card, she only put one layer of Basic White inside and I thought to myself, hmmm, writing a message inside that card is going to prove difficult because it will show if you aren't careful. (Not to mention you would have an interesting shaped message inside if you got long-winded!)

My improvement was to use a 4" x 10.5" Basic White piece scored at 5.25". Glue the folded piece inside with the fold at the top. That way you have a spot to write your greeting on the bottom layer inside, but you also have the top white layer that will create the desired effect with this fun fold design. 


You will start with a full sheet of Cardstock and score it both directions at 4-1/4" and 5-1/2". Use the photo above at the cutting diagram for the two angled folds.

Select the piece of Hues of Happiness Designer Series Paper you like and cut a 4" x 5-1/4" piece then slice it diagonally to match the photo above. One piece is glued to the left side flap. Then flip over the other piece to glue to the top flap, thus creating the two tone look.

Adhere your folded Basic White insert inside and fussy cut one flower to glue as decoration to the inner layer.

Finish it up using the photo above for reference for the hexagon tag.


Click on the Online Shopping Link here:

115320 Melon Mambo Cardstock $10.25

158822 Hues of Happiness Designer Series Paper $12.00

159276 Basic White Cardstock $10.25

159283 Happiness Abounds Stamp Set $23.00

147110 Night of Navy Classic Stampin’ Pad $8.00

158046 Beautiful Shapes Dies $29.00

158136 Brushed Brass Butterflies $10

159236 Basic White Medium Envelopes $7.50

Envelope Flap paper is retired

Adhesives

104430 Stampin’ Dimensionals $4.25

144108 Mini Dimensionals $4.25

152803 Stampin’ Seal Adhesive $8.00

152814 Stampin’ Seal Refill $5.50

103683 Glue Dots $5.25

Tools

152392 Paper Trimmer $25.00

152391 Cutting Blades Multipack $12.00

103579 Paper Snips $11.00

149653 Cut & Emboss Machine $125.00

150673 Mini Cut & Emboss Machine $63.00

144107 Take Your Pick Tool $10.00

147042 Simply Shammy $8.50

Clear Stamp Blocks various sizes on page 149 of Annual Catalog


I encourage you to try this card, make several and give to those extra special friends you have! 


Please contact me anytime if you have any questions 
or 
stampinwitheva@gmail.com

With love and gratitude,

Thank you for taking the time to comment on my post, you've made my day!