
Pages

Showing posts with label Seasonal Labels Dies. Show all posts

Monday, August 1, 2022

Stamp and Tear this Beautiful Christmas Card using the Christmas Season Stamp Set

If you love nature and all things outdoorsy, then this Christmas Card design might be one you would decide to make for your handmade holiday cards.

This card is pretty easy to assemble, just lots of stamping to create the corner design.

Start off with a 5-1/2" x 8-1/2" Shaded Spruce cardstock card base. Score the fold at 4-1/4".

The Cherry Cobbler cardstock layer is 4" x 5-1/4".

Hidden inside is a Basic White cardstock layer for your handwritten message also cut at 4" x 5-1/4". Adhere down.

With the Painted Christmas Designer Series Paper, find the green holly design 
and cut a piece 3-3/4" x 5". Adhere to the Cherry Cobbler cardstock layer.

Cut another piece of Basic White cardstock the same size 3-3/4" x 5". This is the layer you will die cut your tag out of the lower right corner and then stamp it with a greeting of your choice. 

Punch small 1/8" hole in ends of tag and thread 6" of copper ribbon through the holes. Raise tag up on Dimensionals. Stick in position as shown, then scotch tape ribbon ends to back of Cherry Cobbler layer.
Adhere the double layer to the Shaded Spruce card base.

The nature design stamping will begin in the upper left corner of the remainder of the Basic White cardstock piece.


Order and Colors to Stamp the Nature Images:
1. Berries – Cherry Cobbler Ink 
2. Holly – Garden Green Ink 
3. Base of Pinecone - Cinnamon Cider
4. Front of Pinecone – Early Espresso Ink 
5 Long Sprig – Two step stamping with Old Olive Ink 
6. Short Sprig – Two step stamping with Mossy Meadow Ink
7. Finish with Two step stamping with the Dots similar to photo above – Crumb Cake Ink 

When finished with the stamping, gently tear by hand a curved edge from top to left side. Once you are happy with the look, adhere to Holly Designer Series Paper layer.

Finish with 6 rhinestones - 3 on tag and 3 with the berries in the upper left corner.


Christmas Season Stamp Set  (the lower right pinecone is the base stamped in Cinnamon Cider ink, and to the left, the thinner lined pinecone is stamped in Early Espresso ink.
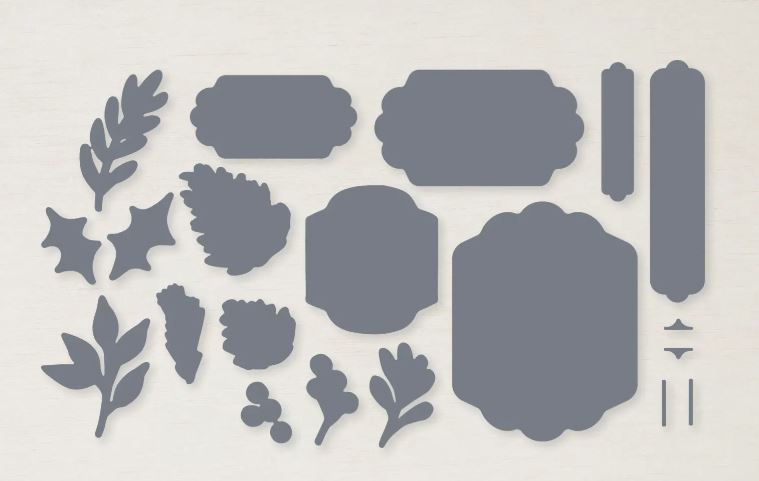

Seasonal Labels Dies


Painted Christmas Designer Series Paper


The following products are retired:
You may be able to purchase them from Ebay or Etsy

Cinnamon Cider Ink
 Watercolor Christmas Stamp Set
 150457 Holiday Rhinestones
Basketweave & Metallic Ribbon Combo Pack

I hope you'll give this outdoorsy holiday card a go. You can easily get an assembly line going with this design too!

I'd love to read a comment about my card design. What do you think?

Shop or Join at https://evadietz.stampinup.net/

Please contact me anytime if you have any questions 
or  write me at
stampinwitheva@gmail.com

Monday, July 25, 2022

Christmas in July Card Ideas for Cardmakers Who Never Start Early Enough Making Their Own Cards

We all like to give thoughtful gifts for the holidays, especially when we take the time to make beautiful handmade cards. 

But often we get behind on our to-do list and sometimes those cards never get made at all, or only partially finished, or we don't make enough, and have to choose which special people will be the lucky ones for this year. 

That's why I've designed ten great card layout ideas for you to try. They will help you make some easy, but beautiful holiday cards. You can start now and get a head start on your Christmas Card to-do list for those special handmade cards you want to send in December!

The best part is you can repeat these layouts with a variety of stamp sets and fancy paper you may have on hand. My card designs are made with Stampin' Up! products - stamps, inks, Designer Series Papers, and embellishments. They are the best products around in my opinion! Color Coordinated, sturdy papers, and beautiful designs to work with.

As a Stampin' Up! Demonstrator I have a stash of products in my craft room. Some are retired now, since I didn't use them up before they retired from the various catalogs. However, you can still recreate the layouts easily and that is why I'm sharing them with you to help you with your holiday cardmaking.


The only item retired on this card layout is the Peaceful Prints Designer Series Paper #156628, but maybe you can find some through Ebay or Etsy.

You will also need a 1/4" handheld hole punch.

To purchase the items used in the card above, just click the image links.


Quick Cutting Measurements:
Real Red Cardstock - 5.5" x 8.5", scored at 4.25"
Basic Black Cardstsock - 4" x 5.25"
Designer Series Paper - two pieces of coordinating paper. Cut each 3.75" x 5". Then stack both pieces together and slice diagonally with the Paper Trimmer. You actually have enough for two cards!
Basic White Cardstock inner card layer - 4" x 5.25"
Basic White Cardstock for tag 2.75" square
Envelope flap piece of matching Designer Series Paper - 2-3/8" x 6"

********************


The only retired items on this card layout are the Peaceful Prints Designer Series Paper #156628, Flurry of Wishes Stamp Set #139732, Stitched So Sweetly #151690,and the Frosted & Clear Epoxy Droplets #147801, but maybe you can find them through Ebay or Etsy.

To purchase the items used in the card above, just click the image links.


Quick Cutting Measurements:
Thick Basic White Cardstock - 5.5" x 8.5", scored at 4.25"
Designer Series Paper - 4" x 5.25"
Basic White Cardstock for tag 2.5" x 3"

Thanks for checking out this post, I hope you will be inspired to give these designs a try this week.

I'd love to read a comment about my original card designs. What do you think of them?

Shop or Join at https://evadietz.stampinup.net/

Please contact me anytime if you have any questions 
or  write me at
stampinwitheva@gmail.com

Friday, October 29, 2021

Lori's Christmas Tags to Share

My demonstrator friend, Lori P. has been holding monthly Christmas card classes this year via Zoom since she lives in Southern California, and I've been joining in as much as I can. Today was the last class until the new year and it focused on holiday tags! 

Lori did all the hard work designing these but she shared that she was inspired by the July-December 2021 Mini Catalog. She said that the catalog has over 20 tag ideas to case.


A Lori original layout using 3" strips of the recently retired Sale-a-Bration products Penguin Playmates punched with the retired Scalloped Tag Topper punch and punched starburst circles of the Sale-a- Bration Be Dazzling Specialty Paper. The Retired Itty Bitty Christmas Greetings stamp set was the one I used throughout these tags. Plus very retired glimmer enamel dots whose name I can't even remember! The 1/8" satin white ribbon is not a Stampin' Up! product, just something hanging around my craft room.


Seasonal Label Dies shapes cut in Garden Green and Basic White with a narrow strip of Sale-a-Bration Peaceful Prints Designer Series Paper adhered. Fussy cut animals from the
Sweet Stockings Designer Series Paper raised on mini dimensionals.


These two tags were influenced by page 78 above
More Sweet Stockings Designer Series Paper used along with more fussy cut images from the paper as well.


She was influenced by the lower right corner tag on page 61. The Painted Christmas Designer Series Paper and Basic White cardstock were die cut with Tailor Made Tags. I used some retired White Glimmer Paper and a very retired snowflake die to add the accent.


A similar idea is found on page 3 using the Christmas Season Bundle, Christmas to Remember stamp set, and the Painted Christmas Designer Series Paper. I added the Real Red Ruffled 3/8" ribbon for more pop at the tag top! The red 1/8" ribbon was some more non Stampin' Up! ribbon laying around my craft room.

So if you need some quick holiday package tags or tags for cookie swaps, these are some great ideas to try. Making tags are also a great way to use up those retired products or scraps you have hanging around. Give these designs a try!

Happy Creating!


#stampinwitheva #sudemo
#stampinup #christmastags

Monday, October 18, 2021

Herringbone Paper Strip Pattern to Try

Since I've been so carried away with Christmas cards, here's another design for you!

The Christmas to Remember stamp set and the Painted Christmas Designer Series Paper (DSP) make a beautiful card using 3/4" strips in a Herringbone pattern. I cased the layout from Teresa Leggo but used a different set of products.

The Herringbone Paper Strip Technique is a wonderful one to try when you have lots of strips hanging around your scrap bin. It is so easy to cut your strips in 3/4" widths. Length doesn't matter. You can decide where you want the starting diagonal strip to go and continue from there. 

On this card, my starting diagonal was at 1" on the left side of the Basic White piece you will build on, and 3-1/4" on the right side. Make small tick marks so you can cover them when you place the first strip. Glue down the strips in the herringbone pattern and trim the excess paper that hangs over the edge off with your paper snips. 

Add the ribbon and scotch tape on the backside. Adhere the strip layer to the Crumb Cake and Card base. Add the inner Basic White layer. Add a sponge dauber edge to the tag after stamping the greeting. Add some holly and berries (you will only need 3 of the 4 berries) stamped and die cut out. Finish with your pearl embellishment. Don't forget to do your envelope flap too!


Products used in this Card:

Soft Sea Foam card base
Crumb Cake Layer
Basic White Layer that strips will attach to and for the card interior
Basic White cardstock for the tag, holly, and 3 of the 4 berries on the die
Christmas to Remember stamp set 
Painted Christmas Designer Series Paper
Seasonal Labels  Dies
Sponge Dauber
Soft Sea Foam, Garden Green, and Real Red Ink
Stampin' Write Garden Green marker
Retired 1/8" All the Trimmings Ribbon Combo Pack - Real Red roll
Gold Metallic Pearls
******
These products are available at my online store at the link below. Stock up before they go on backorder due to supply chain problems. If you don't have your own demonstrator I'd love to be yours! Sign up for my email list and free tutorial under the Welcome tab.

Happy stamping!


#stampinwitheva #sudemo
#stampinup #christmascards

Friday, September 17, 2021

Yummy Gingerbread & Peppermint Gift Card Holder

Today wraps up my eight days of the Gingerbread and Peppermint Suite over the last two weeks here on my blog. I hope I've inspired you, and shown you a wide variety of projects you can make with this fabulous Suite. 

Everyone needs a Holiday Gift Card Holder! GCH's have become one of the easiest ways to give a loved one who has everything, a special treat! But you still want to make an impact with your gift, so this great holder would do the trick!

The flap is made with the largest Seasonal Labels Dies scored at one end and attached to the backside of the Basic White before you adhere to it.


I discovered that the gift card flap really wouldn't hide the gift card when closed, so that's why I turned it on end. It hides nicely under the Seasonal Label shape.

The mini velcro fasteners that I used below, are years old and I don't remember where I purchased them. However, our dear friend Amazon has something similar here. I would recommend you cut those 3/8" circles in half or even in fourths, so they will hold, but not rip the cardstock or DSP.


Products Used to Produce this Gift Card Holder can be purchased here:

Cinnamon Cider cardstock 
Basic White cardstock 
Real Red cardstock
Gingerbread and Peppermint 6" x 6" Designer Series Paper (DSP) 
Gingerbread Dies
Seasonal Labels Dies
Layering Oval Dies
Frosted Gingerbread Stamp Set 
Real Red Ink
Multipurpose Liquid Glue 
Rhinestone Basic Jewels
Dimensionals and Stampin' Seal adhesive
Tiny piece of mini velcro (see Amazon link above.)

Don't forget to cover the outer flap of your Basic White Envelope with a piece of matching DSP that's 2-3/8" x 6" and fussy cut off the excess.

------------------------------------------------

Thanks so much for stopping by this week. Next week I'll be sharing the six card designs from my Stamp and Chat classes I'll be hosting this weekend. Come back and take a peek.


#stampinwitheva #sudemo
#stampinup #gingerbreadandpeppermint

Tuesday, September 14, 2021

Sweet Gingerbread and Peppermint Angled Tri Fold Card

I am really on a Christmas kick lately. Maybe it is a distraction from the pandemic. Or could it be that Stampin' Up! has designed the most "delicious" Suite ever? I think that must be it! Since I love to bake and travel, this suite is the best combination of both worlds. Memories of baking cookies with my mom and my daughter plus my German travels and eating lots of gingerbread while visiting there in November or December.

Maybe you would appreciate this sweet distraction this week to inspire your card-making. I plan on sharing four different cards using this "yummy" Suite.

This Angled Tri-Fold Card layout is inspired by Stampin with Lorraine's YouTube video. I changed it up to be a Christmas Card design using the Gingerbread and Peppermint Suite.


Here's the entire Suite below:


Products used from the July-December 2021 Mini Catalog in this card:

Frosted Gingerbread Stamp Set

Gingerbread and Peppermint 6" x 6" Designer Series Paper (DSP)

Gingerbread Dies

Seasonal Labels Dies

Real Red, Garden Green, and Basic White cardstock

Real Red and Garden Green Inks

Tear and Tape

Red Rhinestones

Basic White Envelope with a piece of matching DSP that's 2-3/8" x 6" to cover the outer flap and fussy cut off the excess.

If you'd like to order these products to make your own card collection, please click the "Shop Online" box under my name.

Come back tomorrow for a new creation! Have a "sweet" day!


#stampinwitheva #sudemo
#gingerbreadandpeppermint #stampinup