Pages

Showing posts with label pale papaya. Show all posts

Monday, June 27, 2022

June Stamp and Chat Class Card + Favor Box

Do you ever have something catch your eye, then you have to go find out what it is, and then purchase it? That is what happened to me with the Split Card Textures Dies. I started noticing other demonstrators using using them in their card creations and I had to get my own set. They were hiding in the 2022-23 Annual Catalog and I'd never noticed them! 

This original card was a popular card this past weekend at my Stamp and Chat classes. 

It is very easy to make with only 5 cardstock pieces, plus ribbon and embellishments.

Start with Evening Evergreen cardstock base cut at 5.5" x 8.5", scored at 4.25". Add inside layer of Basic White cut 4" x 5.25" for handwritten message.

Retired – Beautifully Penned Designer Series Paper (Sale-A- Bration freebie) but you can substitute whatever you think looks best from your stash of Designer Series Papers. Cut 4" x 5.25", then die cut with Split Card Texture die. Glue down to card front.

Pale Papaya cardstock cut at 3.25" x 4.25" and die cut with Scalloped Contours Die.

Stamp greeting from Happiness Abounds stamp set with Evening Evergreen ink near bottom of Pale Papaya piece.

Wrap a 5" piece of Evening Evergreen Organza ribbon around top of Pale Papaya layer. Secure with scotch tape on reverse side. Adhere Pale Papaya layer flat to card front as shown in photo.

Basic White cardstock cut 3" x 4", stamped in Memento Ink with Hand Penned Petals stamp set image. Die Cut out and affix with dimensionals to card front as shown in photo.

Add Evening Evergreen ribbon bow, glue dotted down as shown. Add bling of your choice.

Finish with a matching envelope flap of 2-3/8" x 6" adhered to back of envelope. Trim off excess paper.


The shopping cart is filled with the products used to make this card. The tools listed below are not added, but you sure can. You can delete anything out of the cart you already have or add additional products you need.

Hand Penned Happy Birthday Card

155574 Evening Evergreen Cardstock $9.25

159162 Split Card Textures Dies $35

155668 Pale Papaya Cardstock $9.25

155560 Scalloped Contour Dies $35

155070 Hand Penned Petals $22

155557 Penned Flowers Dies $30

159276 Basic White Cardstock $10.25

132708 Memento Tuxedo Black Ink $6

159238 Happiness Abounds Stamp Set for greeting $23

155576 Evening Evergreen Classic Stampin’ Pad $8

155573 Evening Evergreen 3/8” Open Weave Ribbon $7

159185 In Color Opal Rounds $8.50

159236 Basic White Medium Envelopes $7.50

Retired – Beautifully Penned Designer Series Paper (SAB)

Envelope Flap paper is retired

13 current products in shopping cart - total cost $210.75 before shipping & sales tax.

If the shopping cart doesn't match my quantity and total above that means some items are currently unavailable, but should be returning to inventory pretty soon when more are received. 

--------------------------------------------------------

Every time I hold card classes in my home I always give my stampers a little table favor. This month was a simple one created with items I already had on hand. 

The mini pizza boxes received a top layer of Strawberry Designer Series Paper then I added a Sweet Strawberry stamped in Poppy Parade and Real Red on a punched out Basic White circle. Little greeting was in Memento ink. Heart embellishment was very retired and needed to be used up. Finished circle was raised on dimensionals.


Inside the mini pizza box were two different cards that were created with extra pieces from the June 2022 Pick of the Crop Paper Pumpkin kit I had just received plus other items I had on hand.  My guests loved there treat!


Below are additional tools you will need to cut, die cut, and assemble the card shown.

Adhesives

104430 Stampin’ Dimensionals $4.25

144108 Mini Dimensionals $4.25

152803 Stampin’ Seal Adhesive $8

152814 Stampin’ Seal Refill $5.50

103683 Glue Dots $5.25


Tools

152392 Paper Trimmer $25

152391 Cutting Blades Multipack $12

103579 Paper Snips $11

149653 Cut & Emboss Machine $125

150673 Mini Cut & Emboss Machine $63

144107 Take Your Pick Tool $10

147042 Simply Shammy $8.50

Clear Stamp Blocks various sizes on page 149 of Annual Catalog


Have you joined my email list yet? When you do, you will receive a free 14 card One Sheet Wonder tutorial!

Join my Sunflower Friends team at https://evadietz.stampinup.net/   Join Now

Please contact me anytime if you have any questions 
or 
stampinwitheva@gmail.com

Monday, March 28, 2022

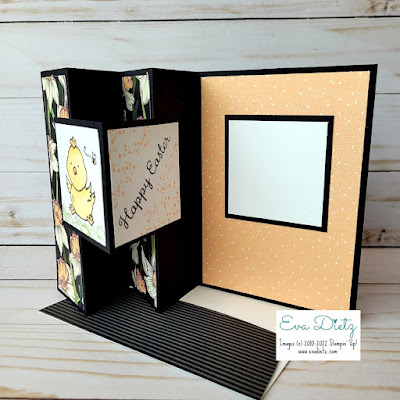
Easter Card Idea with a Cute Chick

Do you have memories of watching your children or of yourself going on Easter Egg hunts as a child? I sure do of my children. They loved hunting for eggs out in our yard, but they weren't the best at sharing. We resorted to writing their names on the plastic eggs, so they could find only the ones with their name on them. That's how we could keep it fair. We often added some money in a few of the eggs and they really loved that!

 With those memories in mind, I designed this card after being inspired by Terri Gaines fun fold. It is hard to believe Easter will be here in just a few short weeks. It is April 17 this year. So at my Stamp and Chat Classes this past weekend, this is one of the Double Z with Pop Out Fun Fold cards we made.


Fun fold cased from Create with Terri Gaines - her Jan. 22, 2022 post. 

The Card base is 5.5" x 11". Score at 1.75", 3.5", 5.25" and 7".

The Designer Series Paper pieces are: 2 pieces at 1.5" x 5.25" and 1 piece 4" x 5.25"

The Pop Out is made from one piece of Basic Black cut 2.5" x 5", scored at 2.5". Two pieces of Basic White are cut 2.25" square.

I changed up her measurement just a bit. The back section of the card, I increased the Basic Black to be 2.5" square with the Basic White piece at 2.25" square, so all the squares are the same size.


Products Used in this Card Design:

Retired – Welcome Easter stamp set

Retired Sale-a-Bration item – Daffodil Afternoon Designer Series Paper

Use whatever springy paper and Easter stamp sets you have.

The Following items are current and in my Online Store. 
You can order by clicking on the yellow box link below.

157786 Daffodil Daydreams $23 for splatter stamp

121045 Basic Black Cardstock $9.75

159276 Basic White Cardstock $9.75

132708 Memento Tuxedo Black Ink $6

155670 Pale Papaya Classic Stampin’ Ink Pad $7.50

100082 Stampin' Write Basic Black Marker $3 for bee body

154905 So Saffron Stampin’ Blends $9 - chick body

155519 Pale Papaya Stampin’ Blends $9 - chick legs and cockscomb

153105 Cinnamon Cider Stampin Blends $9 (will be retiring May 2, 2022) - Chick beak

147104 Pear Pizzazz Classic Stampin’ Ink Pad $7.50 - grass

159236 Basic White Medium Envelopes $7.50 with piece of coordinating Designer Series Paper cut 2-3/8" x 6" adhered to exterior envelope flap and trimmed with paper snips.

Adhesives

154031 Tear & Tape $7

152803 Stampin’ Seal Adhesive $8

152814 Stampin’ Seal Refill $5.50


Tools

152392 Paper Trimmer $25

152391 Cutting Blades Multipack $12

103579 Paper Snips $10

147042 Simply Shammy $8

Clear Stamp Blocks various sizes on page 145 of Annual Catalog


As you walk through your Easter memories, consider making a card similar to this one for your grandchild and/or your children.

Have a lovely day!
Subscribe and receive a free card tutorial

Friday, February 11, 2022

Relax with In the Moment Stamp and Paper Quilt Blocks

The weekend is almost here. Will you be making room for some "Me" time in your weekend schedule? I hope so. Reading (or crafting) is such a good way to relax. We all need to relax every day to keep our sanity intact and to remain healthy and balanced. 

Today's card is my favorite of the three paper quilts I have shared with you this week. When I was playing with the Black and White (Pattern Party Designer Series Paper) 1" paper quilt squares on the 3" Basic White cardstock base, I said to myself, "What would it look like if I cut the 3" square into four 1-1/2" squares? So I did. I started to move them around trying different designs when all of a sudden this "window" arrangement came into view and I said, "That's it!" I immediately thought of the Reading Girl stamp from the In The Moment stamp set. So I set to making this card to share with you.


Production Details:

Start with a Pale Papaya cardstock base cut at 5-1/2" x 8-1/2", scored at 4-1/4".
Add a 4" x 5-1/4" Pale Papaya layer from the 12" x12" Hand Penned Designer Series Paper.

To build your window/seat effect:
Adhere your four windows squares to a piece of Pale Papaya 3-3/8" square. Then adhere to a 3-5/8" square of Basic Black cardstock. The window seat is a 1" strip of Basic Black that I trimmed to those diagonals at each end before it or the window was affixed to the card front. Affix it all when you are happy with your diagonals for the window seat. That helps give the card some perspective and depth.

The reading girl was stamped in Memento Tuxedo Black ink on a 3" square of Basic White. She was colored with assorted color pencils and I smoothed the color out with a Blender Pen. She looks so soft and cuddly. The friendly dog and her hair received some love from some of the new Natural Tones Stampin' Blends pens. I loved having so many brown-tone shades to work with. Then I fussy cut carefully around the image and raised her up with dimensionals on the card front.

As you look at the stamp set images below you will see that I masked off the rest of the stamp so I would only have the word "Relax" stamped in Memento Tuxedo Black ink on a scrap of Basic White. I punched Relax with the Double Oval Punch. and mounted with dimensionals. The final embellishment was two Matte Black Dots.

Don't forget to add your Basic White inner card layer of 4" x 5-1/4".

Have some fun with quilting your envelope flap too. My hint is to start on one side of the flap and top fold and work your way across. You will have less piecing to do. Trim any excess hanging over.


157987 In The Moment Stamp Set $24


160940 Natural Tones Stampin' Blends  Collection $45

Now that you have seen my three paper quilt cards I hope you will really give this technique a try. It is so fun to experiment with designs and colors. The sky is the limit with what you can create!

You can order all the items at my online store in the yellow box link below. I find the fastest way to find products in my online store is to use the search feature.

Let me know in the comments if you've enjoyed learning about this technique!


#stampinwitheva #enjoythemoment

Wednesday, December 8, 2021

Some More OnStage at Home Card Ideas

Here are two more cards my dear demo friends, Anne and Lori, shared with me. We made these together while we were at OnStage at Home in San Diego last month. 


Delicate Dahlias stamp set, with Basic White card base, Crumb Cake and Pale Papaya cardstocks, and the 3/8" Pale Papaya organza ribbon. Unfortunately, I didn't note the name of the Designer Series Paper or the stamp set name, and I don't have those in my own collection. So sorry.


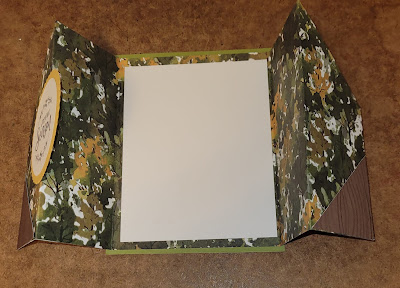
Double Gate Card Fun Fold using Designer Series Paper

Old Olive card base Basic White and Crushed Curry cardstock, Beauty of the Earth DSP, Layering Circle Dies, and Encircled in Warmth stamp set in Memento Basic Black ink. 


The secret to the Double Gate Fold in the corners you trim off of the top edge, get flipped over, and glued to the bottom corners. The corner trim piece is approximately 2" from each corner.

The Double Gate Fold card is a good one to use up some of your Designer Series Paper stash.

Have fun experimenting with a variety of Designer Series Papers and see what wonderful cards result.

Happy Creating!


#stampinwitheva #sudemo

Tuesday, September 21, 2021

Lets Have Tea Time Together

"Love is a warm cup of tea," says the sentiment in the retired Tea Together stamp set. When I saw this layout by Danielle Peck, I knew I had to case it. Especially since it was a Z Fold fun fold card and it used the You're a Peach Designer Series Paper that is currently in the Annual Catalog.

I love having a cup of mint or orange spice tea when I need a little pick me up. Since we are on the last day of summer, it seems like a great way to say so long to the season until next year. 

I don't know about you, but my retired stamp sets, go months without being used, but when I saw this idea, I knew I had to find my tea stuff and make this card. 
It's so CUTE!

Of course, I was also reminded of Mrs. Potts and Chip from the Beauty and the Beast Disney animated movie. Did you think of that too?


The color theme of Calypso Coral, Pale Papaya, and Basic White plus the Designer Series Paper, just work so nicely together.
Did you know you could stamp directly on the Designer Series Paper? Isn't that a cool technique? I think it works perfectly for this card design.


On the panel behind the teapot, there is a layer of Pale Papaya and Basic White to write your personal message.  The envelope also has a decorated flap with a piece of the striped Designer Series Paper to make a finished looking set.

Products Used to Create this Z Fold Card can be purchased at my online store (link below):

Retired Tea Together Stamp Set  (could purchase on Ebay or Etsy maybe)
Retired Tea Time Dies (same note above)
Calypso Coral, Pale Papaya, and Basic White cardstock
You're a Peach Designer Series Paper
Double Oval Punch
Calypso Coral Ink
Champagne Rhinestones

Maybe you have a sweet friend you could share a cup of tea with today? 


#stampinwitheva #sudemo
#funfolds #stampinup

Friday, July 30, 2021

Special Blog Hop Highlighting a Fun Fold Card

Welcome! A group of Silver level Stampin' Up! Demonstrators from across the globe have combined their incredible talents to share some Fun Folds for today's blog hop! We also are working on building our businesses by making connections with each other. It's a great group of very creative ladies. You probably know that by now since you're about half-way through the hop when you've arrived here.

However you have arrived here, either from Tricia's Stamping Creations or from one of my social media links, I'm very glad you are here to enjoy my creation! Don't forget to leave a comment, I'd love to read your thoughts about today's fun fold card.

Vertical Center Step Card

Color Theme - Misty Moonlight, Pale Papaya, Pear Pizzazz and Basic White.

f

Start with the Hand-Penned Petals Stamp Set and matching Penned Flower Dies plus the Hand Penned Designer Series Paper. I make my own storage for my dies in case you were wondering.


Sneak Peek of the card inside and how the center step fun fold works.


Let's Begin Creating this Card:


Step 1: Use the template above to cut and score your 4-1/4" x 11" piece of Misty Moonlight cardstock.

Step 2: Cut your Hand-Penned Designer Series Paper as follows:
Center Piece - 2-1/8" x 4-1/2" and glue that down first.
Bottom Horizontal Piece - 7/8" x 4-1/8" glue that down next.
Two Vertical Pieces both cut 7/8" x 4-1/4" and glue those down.
Basic White Cardstock for inside card - 4" x 4-1/4" and glue down.

Step 3: With a 3/4" x 4-1/2" piece of Misty Moonlight, die cut the scallop edge treatment. Hint! Line up the straight edge with the straight edge of the 4-1/2" side. Run through die cutting machine. Affix as shown in photo.

Step 4: Using either circle punches or circle dies, select 1-1/4" and 1-3/8" circles. Stamp the get well greeting on a scrap of Basic White Cardstock. Then cut your Basic White circle, followed by a scrap of Misty Moonlight and cut that circle. Affix those two circles together. Use mini-dimensionals to affix to card front as shown.

Step 5: Cut a 12" piece of Pale Papaya 3/8" Open Weave Ribbon and wrap around center section and tie a bow as shown near the greeting.

Step 6: Making the Focal Point Floral image (Don't give up - you're almost finished!)
  • You will need small pieces of Pale Papaya, Pear Pizzazz and Basic White cardstock, plus Cardstock Vellum.  
  • Using the outline largest floral die cut the Pale Papaya piece. 
  • With scraps of Pear Pizzazz you will cut the leaf portions again with the same die. 
  • Die cut the floral image in Basic White. 
  • Using the Basic White die cut, you will fit and trim the Pear Pizzazz leaf pieces into position then glue them down.  Let dry. 
  • Using a Fine Tip Glue Pen, glue your Basic White floral frame to a larger piece of Vellum Cardstock. Let glue dry. When dry, carefully fussy cut around the flower edges and expose the leaves so the Pear Pizzazz will show through when you glue the layers together next. 
  • Using the Fine Tip Glue Pen again glue the white and vellum layer to the papaya and pear layer. Weight with a clear stamp block to dry.
Step 7: When flower focal point is all dry. Put several mini-dimensionals on the back and attach to the center of the card as shown in the photo. Embellish with Champagne Rhinestones to complete the card.

Step 8: Cut a 2-3/8" x 6" matching piece of the Hand Penned Designer Series Paper for your envelope flap. Glue down and trim with paper snips.

---------------------------------
Thanks for stopping by! If you don't have your own personal connection with a Stampin' Up! Demonstrator, I'd love to connect with you and get our stamping on! Sign up for my email list in the right margin. I look forward to hearing from you!


#stampinwitheva #stampinupproducts  

Click this Image for the next Hop Stop!


Or if you want to hop around here's the whole list!

1. Janice Piechowiak Creating Treasures with Janice
2. Linda Moore Moore Fun Stamping and Creating with Linda
3. Nedine Hunter DuPree Craft Lounge Creations
4. Libby Fens libbystamps
5. Kelly Taranto The Late Night Stamper
6. Karen Egan Crafty Karen Designs
7. Tricia Butts Tricia's Stamping Creations
8. Eva Dietz Homemade with Heart - Stampin' with Eva
9. Diane Marie Creative Stamper
10. Cathy Rocca FromTheStampStudio
11. Sue Kremer NorthStarStamper
12. Tracy Byers Cards, Crafts and Stamps with Tracy
13. Laurie Bradshaw Craft Coach Laurie
14. Nancy Reynolds Stampin' With Nutsy
15. Xenia Stanford   Heritage Stamp Arts

Wednesday, July 28, 2021

Sweet as a Peach Card

Continuing on with my focus on the You're a Peach Suite this week, I love this card layout! I cased it from Rose Ward at stampersdelight.com

The artist who designed the You're a Peach Designer Series Paper at Stampin' Up! sure knows how to make the colors Pop! I love the combination of Balmy Blue, Pear Pizzazz, Pale Papaya and Calypso Coral with the touch of Basic White in the background. So Pretty!


You should give this card a try! Here's what you need to know.

Products and Dimensions:

Balmy Blue Cardstock card base - 5-1/2" x 8-1/2", scored at 4-1/4"
Basic White layer with additional inner card layer 4" x 5-1/4"
You're a Peach Designer Series Paper 3-3/4" x 5"
Basic White punched with 2-1/2" Circle Punch
3-1/4" piece of Pale Papaya cardstock to stamp two peaches in Mango Melody ink
Using a Blending Brush touch up the peaches with Calypso Coral ink
Basic White piece 1-1/2" x 3" to stamp two leaves in Pear Pizzazz ink
With the Peach Dies, cut out both peaches and leaves
Attach leaves to peach and affix one directly to the circle and raise the other up with dimensionals.
Add three champagne rhinestones
Place finished focal point on card with dimensionals.
Ta-Da! 

Thanks for stopping by today! Keep creating!


#stampinwitheva #stampinupproducts  

Tuesday, July 27, 2021

Peachy Thanks with Biggest Wish

Do you love Peaches as a summer fruit? I love cutting up chunks of a ripe peach and adding it to my morning yogurt! Yum! 

At my Stamp and Chat Classes earlier this month, this was one of the cards we made using the You're a Peach Designer Series Paper. The artwork is so realistic you just want to gobble it up! It is a nice and easy card that won't cost you anymore in postage, because the gold doily is the embellishment! 

I just love the touch of the Balmy Blue inked mini flower stamp in the two corners! It's another way to help a card have some pizzazz. Just use one of the other colors in the Designer Series Paper pack and you'll be guaranteed a good looking card!


Products and Dimensions:

Calypso Coral Cardstock card base - 5-1/2" x 8-1/2", scored at 4-1/4"
Basic White inner card layer 4" x 5-1/4" and 2-3/4" x 4-1/4" for Scalloped Contours Die
You're a Peach Designer Series Paper - 2 designs 1) 1-1/2" x 5-1/4" and 2) 2-1/2" x 5-1/4"
Retired Gold Doily cut in thirds
Biggest Wish stamp set with large Thanks stamped in Pale Papaya Ink and cursive thanks in Calypso Coral Ink, with mini flowers stamped in Balmy Blue ink

Like I've been suggesting here on my blog in recent weeks, this layout would create lovely cards with whatever package of Designer Series Paper you may have on hand. Experiment and see what results!

Be creative!


#stampinwitheva #stampinupproducts  

Thursday, June 24, 2021

Hand Penned and Foil Butterfly Card

Yesterday I shared my tent/top fold version of my original card design. Today is the side fold/vertical version. Now you have two designs to make or chose between. They both are stunning in my biased opinion. 


This card has a blank basic white liner to write your own message on.


Here's the Products I used that are available at my online store (click below).

Basic White and Pale Papaya cardstocks
Scalloped Contour Dies
Tasteful Textures Embossing Folder
Cut and Emboss Machine for Dies and Embossing Folder
Hand-Penned Designer Series Paper
Double Oval Punch
Champagne Foil
Butterfly Brilliance Bundle
Dragonfly Garden stamp set for greeting
Genial Gems for spine of butterfly
Dimensionals

Today also happens to be FREE SHIPPING DAY with Stampin' Up! so you could save a minimum of $6.95 with a $50 qualifying order USD at my online store link below.

I hope you have a wonderful day!


#stampinwitheva #stampinupproducts   

Wednesday, June 23, 2021

Tent Style Hand Penned Card Idea

I am still so in love with the beautiful Hand-Penned Designer Series Paper, I thought I'd share another original card design with you today!  This tent style card is a good choice so it will stand easily on its own, but it reminds me of an easel that shows your "masterpiece" is on display!

I love how soft the color combinations are too!


Here's a peek at the card liner below.


Here's the Products I used that are available at my online store (click below).

So Saffron, Basic White, and Pale Papaya cardstocks
Scalloped Contour Dies
Tasteful Textures Embossing Folder
Cut and Emboss Machine for Dies and Embossing Folder
Hand-Penned Designer Series Paper
Double Oval Punch
Champagne Foil
Butterfly Brilliance Bundle
Dragonfly Garden stamp set for greeting
Genial Gems for spine of butterfly
Dimensionals

If you haven't tried the Hand-Penned Designer Series Paper, you are missing out! It is one of the most beautiful papers Stampin' Up! has had in a very long time, in my opinion!

Happy Creating!

  
#stampinwitheva #stampinupproducts   

Monday, June 21, 2021

Hand Penned Memories and More Card Idea

I love easy cards to make quickly. This layout definitely fills that need. Using the Hand Penned Memories and More Card Pack you can make gorgeous cards quickly!


The focal point on this card is just one Memories & More card that I die cut with the Scalloped Contour Dies. I love the cool result! Wrap with the Pale Papaya Open Weave Ribbon and tie a pretty bow, raise with dimensionals, and add several Genial Gems embellishments and you're all done!


Cutting an inner liner from Basic White and adding one of the stickers included in the card pack, you will be finished in no time!

Easy Peasy! You can order these items at my online store at the link below.
Pale Papaya and Basic White Cardstock
Hand Penned Memories and More Card Pack
Pale Papaya Open Weave Ribbon
Genial Gems

Have a lovely, creative day!


#stampinwitheva #stampinupproducts