Pages

Showing posts with label mossy meadow. Show all posts

Wednesday, September 6, 2023

Abundant Beauty Decorative Masks - Pattern 1 - Masculine Birthday Card

Have you purchased products with the intention of using them, then they sit on your shelf and you never get around to using them? Well that has been me with previous stencils I've purchased from Stampin' Up! But this time I decided, "not this time" so over the next few days you'll be seeing each mask used in a card design. Feel free to CASE any or all!

 Abundant Beauty Decorative Masks, page 47 in the new Mini Catalog

#162331 $10.50 USD


Houndstooth Pattern Mask below


Blending Brushes #153611 $13 USD

Images © Stampin' Up!

Technique - Blending Brushes with Classic Ink Pad

Here's how you do this technique:

Cut to size the cardstock layer you want the mask to go on. Use a very small piece of adhesive (like tape runner or double sided tape) to stick the cardstock to your grid paper. Be sure to use the lines of your grid paper to square the paper up. Next lay the mask on top of the cardstock and use some small bits of scotch tape or washi tape to hold the mask in place.

Grab one of your Blending Brushes and the color of ink you desire. I used Pebbled Path ink on Very Vanilla cardstock. You will use a circular motion to load your blending brush with ink, then start from the outside edge of the mask and go inward in the opposite circular motion to apply. Depending on how much pressure you apply to the blending brush your ink can be lightly applied or dark like my sample.

Repeat this process until you are happy with the look. Then carefully peel off the tape on the mask and gently lift the cardstock from the grid paper.

Now you are ready to build your masculine birthday card!


The Houndstooth pattern seemed masculine to me, so I used the Gone Fishing Stamp set and Let's Go Fishing Designer Series Paper (DSP) to design this Birthday Card.
Additional Products used were Mossy Meadow Cardstock and Ink, Very Vanilla cardstock, and retired from several years ago Mossy Meadow Braided Linen Trim. You can substitute whatever trim you have that looks good to you.


The Phrases for All stamp set provided the Happy Birthday greeting on the inner layer.
Decorate your envelope flap with matching DSP. Cut 2 1/4" x 6", adhere to exterior flap and trim off excess.


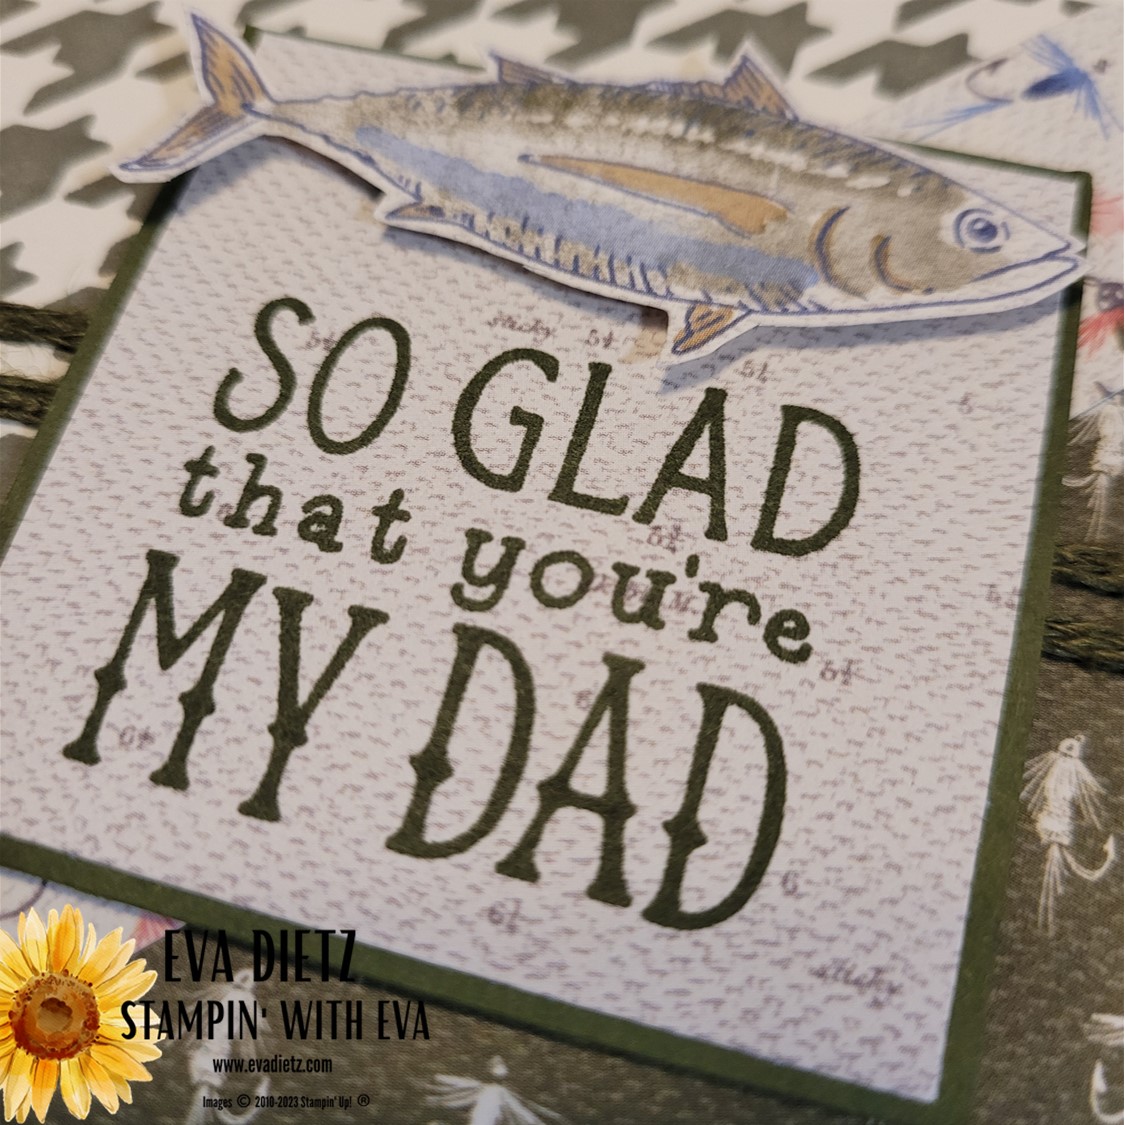
Close Up of the tag. The Mossy Meadow layer is 2 1/4" square. The DSP layer is 2 1/8" square. The greeting was stamped in Mossy Meadow ink from the Gone Fishing stamp set. The two layers were adhered together and raised up over the linen trim with dimensionals. The fish was fussy cut from the DSP and raised up on mini dimensionals.


As a bonus for you if you live in the USA - I have prepared a product shopping list, just click HERE. You can uncheck any item on the list you already have, or say add all to the cart if you are a newer card maker. 

If you are looking for a demonstrator to help you, I would be happy to mentor you and provide you with guidance and support through my bi-monthly newsletter. Please subscribe HERE.

Saturday, August 5, 2023

Stampin' Up!s Gone Fishing Bundle Easy Card to Make will Definitely be Enjoyed By Those Who Wait for Good Things!

Today's Gone Fishing Stamp Set card is a vertical version of what I shared here a few days ago. This masculine fishing card definitely says exactly what fishing is all about, "Good things come to those who wait". I think fishermen and women must be some of the most laid back people around, since they never know when a fish is going to bite. Might be quick, might take all day!


This card does not have a stamped greeting on the inside so you can make it whatever type of card you need. It could be a Retirement card, Birthday card, even potentially a wedding or engagement card for the right person.


Color Palette:
Card base - Very Vanilla
Layer 1 - Let's Go Fishing Designer Series Paper (DSP)
Layer 2 - 2 sets of 2 pieces of Let's Go Fishing Designer Series Paper (DSP)

Very Vanilla Tag die cut from the tackle box die (you get 5 tags in one cut, now that's a sweet deal!)
Backing the tag is a piece of Mossy Meadow cardstock.
Early Espresso ink to stamp the greeting.

Inner Card Layer 1- Mossy Meadow Cardstock
Inner Card Layer 2 - Very Vanilla stamped with Wild Wheat ink to stamp the lures on the edge.

 Highlighted Products:
Gone Fishing Stamp Set
Gone Fishing Dies
Let's Go Fishing Designer Series Paper 
2023-25 In Color Dots embellishments
Paper Snips for fussy cutting the fish out.


The combination of the Wild Wheat (new 2023-25 In Color and Mossy Meadow work so nicely together. A very outdoorsy feel.


The important details:

Very Vanilla Card base is 5 1/2" x 8 1/2", scored at 4 1/4"
Layer 1 is Plaid from Let's Go Fishing Designer Series Paper (DSP)
Fly Fish Lures of DSP are cut 1" x 2 5/8"
Wild Wheat fishing poles are cut 1" x 3 7/8"
Mossy Meadow layer under tag is 1 1/2" x 2 3/4" with corners rounded 
with paper snips matching the Very Vanilla tag
1 fussy cut fish from the DSP raised on dimensionals
Mossy Meadow Inner Layer 4" x 5 1/4"
Very Vanilla inner layer 3 3/4" x 5"


Be sure to add a  2 3/8" x 6"matching piece of the Let's Go Fishing DSP to the exterior flap of the Very Vanilla envelope. It really makes a fabulous gift that way!


As a bonus for you if you live in the USA - I have prepared a product shopping list, just click the blue bar below. You can uncheck any item on the list you already have, or say add all to the cart if you are a newer card maker. 


If you enjoyed this post, please be sure to . . . 

  • Leave a comment below.
  • Subscribe to my twice monthly newsletter here, and in my thank you email, you can download a FREE 14 Card One Sheet Wonder PDF tutorial. 
  • Click for my Monthly Host Code and how you can earn up to a $40 shopping spree with my Loyal Shopper Rewards.
  • Check out my Online Store clearance rack and save up to 70%.
  • Save 10% on coordinating product bundles!
  • The $99 Starter Kit is the best deal of ALL! Discounts & benefits here. I'd love to have you join my growing team.
  • Explore all the blog posts here for over 1,000 paper crafting and greeting card ideas to enjoy.
  • Follow me on PinterestFacebook, & Instagram
  • Subscribe to my YouTube paper crafting video tutorials.
  • If you don't already have your own Stampin' Up! Independent Demonstrator, I'd be honored to be yours! Let me help you be creative and proud of your cards that you make and send.
  • Please contact me if you have any questions about products, techniques, or card designs. 


Tuesday, June 20, 2023

Stampin' Up!s So Refreshing Stamp Set makes for the Cutest Diagonal Front Fold Gift Card Holder for Retirements and More!

During this time of year there is always a need for Gift Card Holders with Graduations, Retirements, Birthdays and the like coming around on the calendar. You are going to love this Diagonal Front Fold Gift Card Holder, because it is super easy to make with only 5 main pieces of paper and some stamping to match.

With the Summer Solstice starting tomorrow I thought it would be fun to focus on Stampin' Up!s new set called "So Refreshing" photopolymer stamp set this week in my social media. Liquid Beverages are always so welcome during the warm summer months, and with this stamp set you can make practically any shade of beverage to coordinate with what you are desiring for your gift card needs. I went for Pink Lemonade in my sample I'm sharing with you today.

Before you start making this gift card, I recommend you read all the directions first, so you have a complete understanding of how this gift card holder is constructed.


Paper Needs:
4 1/4" square cardstock base
4" x 12" piece of Designer Series Paper, scored at 4" and 8"
Colored cardstock layer 3" square
2 pieces of Basic White 2 3/4" square layers
For the envelope flap 2 3/8" x 6" piece of matching Designer Series Paper


The supplies I used were:
4 1/4" Mossy Meadow cardstock and matching ink pad
4" x 12" Dainty Flowers Designer Series Paper (retired), scored at 4" and 8"
3" square Melon Mambo cardstock and matchingink pad
2 pieces of 2 3/4" Basic White cardstock
Memento Tuxedo Black Ink Pad
Daffodil Delight ink pad
4 Pastel Adhesive Backed Sequins (retired)
Small scraps of Basic White for Glass and citrus
1/2" circle punch (retired)

I suggest practicing on your grid paper with both pitcher, glass, and their filling stamps before going for it on the actual front Basic White cardstock piece.

Bonus Hint #1:  Stamp the thank you saying first. Then stamp the Mambo Melon pitcher filling, then do the outline of the pitcher with Memento Tuxedo Black ink. It is much easier to line up this way. Making sure you've left some room for the glass to be placed.

Bonus Hint #2: For the inside liquid of the glass, stamp off the Melon Mambo Ink once on your grid paper, then stamp, followed by the Memento ink glass outline. Fussy cut out the glass image. 

With the Daffodil Delight ink and another scrap of Basic White, stamp several slices of "lemon" and punch them out.

Bonus Hint #3: Use an exacto knife and a cushion to carefully cut in the narrow section at the top of the glass to insert the lemon slice. The lemon slice was only cut to its center with paper snips so it would fit on the glass edge. (Like the real thing, of course!)

Raise the finished glass with lemon slice up on three mini dimensionals and place as shown in photo.


Bonus Hint #4: Add the front closure mechanism using a citrus slice as mentioned above in the photo.

Diagram below on how to do the Designer Series Paper folding:


With the second piece of the Basic White cardstock stamp the greeting in Mossy Meadow ink, and stamp the double lemon image next with Daffodil Delight ink. Stamp the lemon filling stamp first after you've stamped off once, then followed by the outline stamp at full ink strength. Add another citrus slice partially on top of the two lemons with adhesive.

Apply your piece of Designer Series Paper onto the envelope flap and trim off excess.


Awesome! You are finished! Now you can make a bunch of these for any occasion you need with any combination of supplies you have.

However, if you love the So Refreshing Stamp Set like I do, please order in my online store at the link below.

If you live in the USA - Shop for Stampin' Up Products here-

https://evadietz.stampinup.net  click Shop Now tab

----------------------------
If you don't already have your own Stampin' Up! Independent Demonstrator, I'd be honored to be yours! Let me help you be creative and proud of your cards that you make and send.

Learn how to get more done in less time by signing up for my exclusive "Insider" bi-monthly newsletter. Twice a month the news will share card class information, Stampin' Up! promotions, hot tips from me, and free tutorials! Subscribe to my Bi-Monthly Newsletter today. Plus you’ll receive a FREE 14 Card One Sheet Wonder Tutorial to download when you receive my thank you email for signing up.

Join Stampin' Up! I'd love to have you be part of my growing team.

Please contact me or email me at stampinwitheva@gmail.com if you have any questions about products, techniques, or card designs. 

Comments below are appreciated and welcome too!

Wednesday, June 29, 2022

Wonderful World Sale-a-Bration Preview Card - June Stamp and Chat Class

As I was creating cards for my June Stamp and Chat classes, I wanted to share a card from the upcoming (on July 1, 2022) Second Sale-a-Bration offering. This original card design used the Wonderful World stamp set and matching Designer Series Paper which will be free with a qualifying $100 purchase. These two products have a total value of at least $28. 

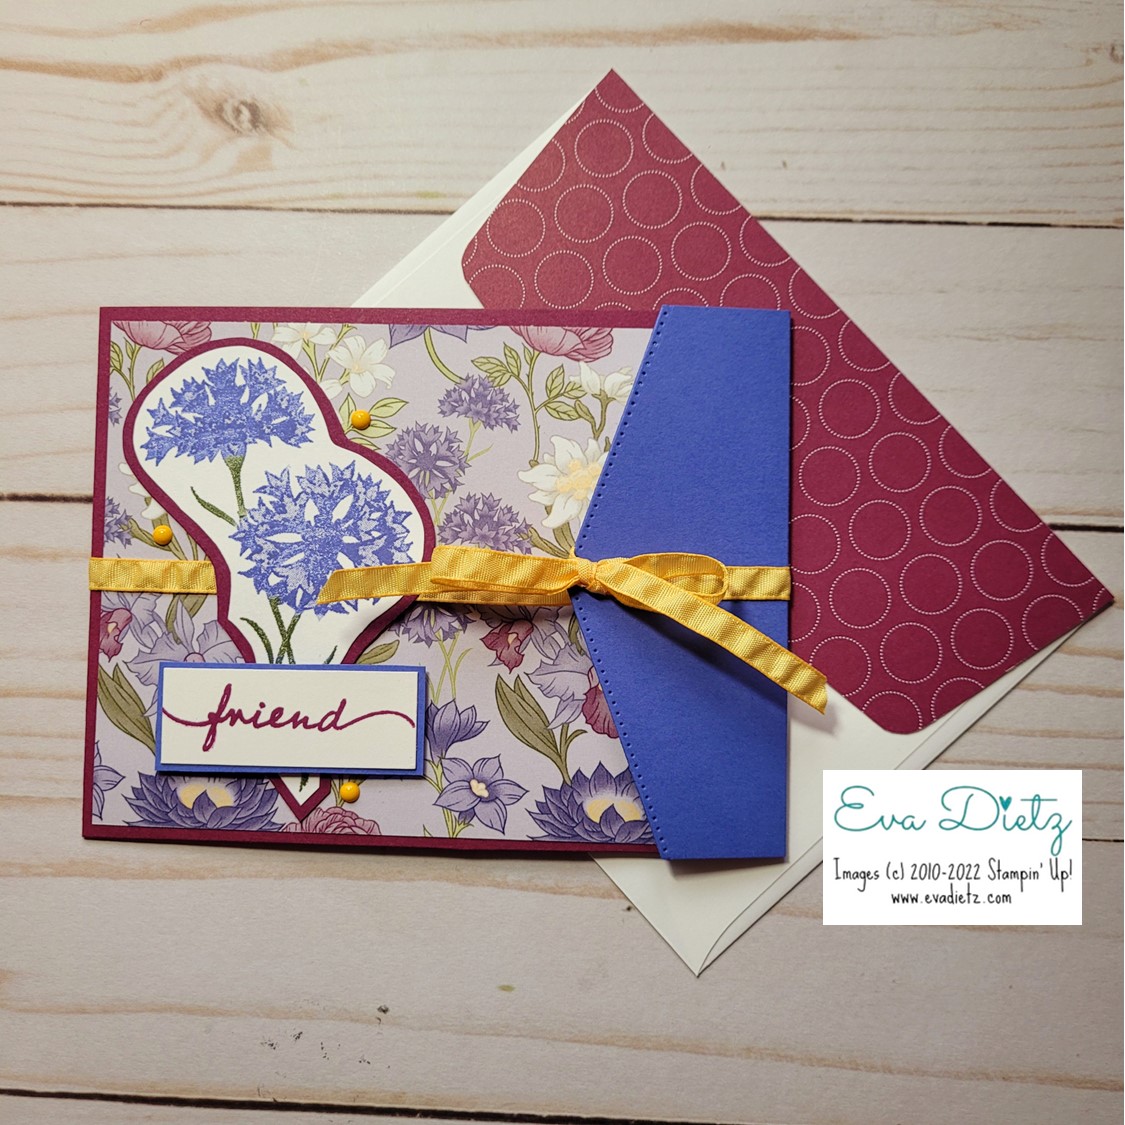
The bachelor button floral stamp caught my eye first, so I designed with that in mind. I used Orchid Oasis and Mossy Meadow Stampin' Write Markers to color the cling stamp in their individual sections and then gave it "the breath of life" to stamp it on the Basic White cardstock piece. I fussy cut around the image and mounted it on Rich Razzleberry cardstock and mirrored my previously cut edge. Set that aside for a few minutes.


This Rich Razzleberry card base is 4.25" x 11", scored at 5.5". 

The Wonderful World Designer Series Paper layer is 4" x 5.25". Adhere to card front.

Use a 4" x 5.25" layer of Basic White cardstock adhered on the inside of the card to write your personal message.

The Orchid Oasis Flap starts out as a 4.25" x 2.25" piece.  Use the "pocket" edge die from the Basic Borders Die set to create the "flap". Then score 1/2" on the opposite long side which will be attached to the back of the card opening. Using a 1/4" hole punch, punch a hole near the pocket tip of the flap for the ribbon to thread through.

A 22" long piece of Daffodil Delight Ruched ribbon is wrapped around the card. Feed the top piece ot ribbon through the hold in the flap, even up the ends, then tie a bow on the Orchid Oasis flap area.

Now attach your prepared Bachelor Button piece directly to the card front, as that is what will hold the closing ribbon in place.

The Friend tag is a 2" x 3/4" piece of Basic White cardstock stamped in Rich Razzleberry ink, mounted on a 2-1/8" x 7/8" piece of Orchid Oasis cardstock. Raise on dimensionals placing it over the base of the floral image.

Embellish with bling of your choice.

Decorate your Basic White envelope flap with a 2-3/8" x 6" piece of coordinating Designer Series Paper. Adhere and trim off excess.

Now you have a unique, one-of-a-kind card!


Go Straight to My Online Store with Filled Shopping Cart for You

The shopping cart is filled with the current products used to make this card.  You will need to creatively substitute for products not on the list which have retired. The tools listed below are not added, but you sure can. You can delete anything out of the cart you already have or add additional products you need.

Flap Over Fun Fold Card

115316 Rich Razzleberry Cardstock $9.25

159267 Orchid Oasis Cardstock $9.25

155558 Basic Border Dies $29

159238 Happiness Abounds Stamp Set for greeting $23

147091 Rich Razzleberry Classic Stampin’ Pad $8

159276 Basic White Cardstock $10.25

147158 Set of Neutrals including Mossy Meadow Stampin’ Write Marker $30

159219 Set of 5 including Orchid Oasis Stampin’ Write Marker $15

159236 Basic White Medium Envelopes $7.50

Retired – Daffodil Delight Ruched Ribbon

Retired – It’s My Party Enamel Dots (Daffodil Delight)

¼” hole punch – non Stampin’ Up!

9 products without the Sale-a-Bration freebie, cost $141.25
Select 159918 Wonderful World Stamp Set & Wonderful World Designer Series Paper – FREE with $100 purchase before Ship/Tax

If the shopping cart doesn't match my quantity and total above that means some items are currently unavailable, but should be returning to inventory pretty soon when more are received. 


Adhesives

104430 Stampin’ Dimensionals $4.25

144108 Mini Dimensionals $4.25

152803 Stampin’ Seal Adhesive $8

152814 Stampin’ Seal Refill $5.50

103683 Glue Dots $5.25


Tools

152392 Paper Trimmer $25

152391 Cutting Blades Multipack $12

103579 Paper Snips $11

149653 Cut & Emboss Machine $125

150673 Mini Cut & Emboss Machine $63

144107 Take Your Pick Tool $10

147042 Simply Shammy $8.50

Clear Stamp Blocks various sizes on page 149 of Annual Catalog

I'd love to read a comment about my original card design. What do you think of it?

Join my Sunflower Friends team at https://evadietz.stampinup.net/

Please contact me anytime if you have any questions 
or 
stampinwitheva@gmail.com

Saturday, September 4, 2021

Enjoy National Bacon Day Today

Happy National Bacon Day! My husband loves his bacon! He will take it however he can get it. Bacon bits in Cougar Gold Mac & Cheese, or in Scrambled Eggs, or multiple whole strips beside his fried eggs, or on a bar-be-cue sauce pizza with chicken, and best of all at an all-you-can-eat breakfast buffet! I'm not kidding he could eat a pound of bacon if he dared!

Here's a just-for-fun card I created this morning to celebrate this major national holiday when I woke up way too early!


The card started with a Bumblebee card base and Basic White layer that I stamped with Memento Tuxedo Black ink with the "What's Cookin'?" greeting from the What's Cookin' stamp set. 

I used the smallest Diorama Dies for the Eggs (Basic White and 3/4" circle punch of Bumblebee), but ended up trimming them down a bit more to fit on my Mossy Meadow oval platter cut with Layering Oval Dies.

My funny strips of bacon were made with Cinnamon Cider and Petal Pink cardstock, then all crumpled up multiple ways to appear "fried." 

The napkin is made from retired Plaid Tidings 6x6 Designer Series Paper Stack. 

The silverware was fashioned from the What's Cookin' stamp set and matching dies. The "fork" if you can call it that, was trimmed down from a slotted pancake-turner. Maybe it's a utensil a giant would use!?!

No matter how to "slice" it today, enjoy National Bacon Day!


#stampinwitheva #sudemo #nationalbaconday #whatscooking

Tuesday, May 11, 2021

Create a Card with the Art Gallery Stamp Set

Well, there's some good news and bad news on the card I'm showing you today. 
The Good News is the Art Gallery Stamp Set is carrying over into 
the new 2021 Annual Catalog. Yay!

 The Bad News is the Fine Art Floral Designer Series Paper will be 
ending on June 30, 2021. So that means you are in the 
sweet spot to get both now (if you haven't already)!


Inspired from Julie Petrie

This is a great card for an advanced beginner stamper. One who 
has a die cutting machine, but likes quick beautiful cards. This one has it all.

Products used in this Card and available in my Online Store:

Pool Party cardstock - cut 5-1/2" x 8-1/2", score on 4-1/4"

Fine Art Floral Designer Series Paper cut 4" x 5-1/4"

Use the largest Stitched So Sweetly Die on Basic 
White - cut a piece 3-1/2" x 4-1/4" for good measure.

Art Gallery Stamp Set

Classic Label Punch is retired, but feel free 
to stamp right on the Basic White.

Classic Inks needed - So Saffron, Bumblebee, Terracotta Tile 
retires on May 3rd, 2021) but again you substitute another 
color for the flower center, and Mossy Meadow for the leaves.

Dimensionals to raise up the Basic White stamped panel.

Stampin' Seal adhesive

Paper Trimmer

Any of your friends or family would love to receive this card 
for their birthday.  Why not get the supplies and whip out a dozen!

Happy Stamping!


#stampinwitheva #stampinupproducts   

Tuesday, April 20, 2021

A Lovely Card Idea with Beautiful Friendship and More!

I have been wanting to try the combination of the Beautiful Friendship and Very Versailles stamp sets. When I saw this layout from Gloria Valle, I just had to try it. 

The color combinations of Gorgeous Grape, Mossy Meadow, Seaside Spray and the exquisite Hydrangea Hill Designer Series Paper is soooo beautiful. However, I didn't realize I had used the wrong color ribbon until I was cutting the card kits for my customers for last weekend's class. The ribbon I used here is the 3/8" Blackberry Bliss Striped Ribbon but it was supposed to be the 3/8" Gorgeous Grape Sheer Ribbon. Trust me - using the correct ribbon makes this card look even better!


Products Used in this Project and Available at my Online Store:
Beautiful Friendship Stamp Set - retires on May 3, 2021
Very Versailles Stamp Set
Seaside Spray Cardstock - retires on May 3, 2021
Hydrangea Hill Designer Series Paper - retires on May 3, 2021
Gorgeous Grape Cardstock - cut 4" x 2-5/8"
Basic White Cardstock - cut 3-3/4" x 2-3/8" and for tag 5/8" x 4-1/4"
Sahara Sand Ink
Gorgeous Grape Ink
Mossy Meadow Ink
Seaside Spray Ink - retires on May 3, 2021
Tailored Tag Punch
3/8" Gorgeous Grape Sheer Ribbon
2019-2021 In-Color Faceted Gems - retires on May 3, 2021
For Envelope and Inner Card layer - Highland Heather Ink and Mossy Meadow Ink were used.

I encourage you to give this card a try! Happy Stamping!


If you enjoyed this post, please be sure to click on the buttons below…


#stampinwitheva #stampinupproducts  

Friday, April 2, 2021

Fine Art Floral Suite - Two Cards for You

The Fine Art Floral Suite really appeals to me for multiple reasons. 1) I have studied the Impressionist Artists with their broad brush strokes, 2)  I love the bright, intense colors used in this Suite, 3) I love to grow flowers in my summer garden, and 4) a Casual Stamper would be able to create these two cards easily.

The Fine Art Floral Suite are currently part of the January - June 2021 Mini Catalog. The stamp set and dies will also be in the new 2021 Annual Catalog. However the Fine Art Floral Designer Series Paper will not. So if you decide you love this exquisite paper, now is the time to purchase before June 30, 2021.

Let's explore what products I used and how I created these cards together.

Art Gallery Bundle
includes the Art Gallery Stamp Set and Floral Gallery Dies


Fine Art Floral Designer Series Paper


Products Used:

Balmy Blue cardstock 5-1/2" x 8-1/2", scored at 4-1/4"
Fine Art Floral Designer Series Paper cut 4" x 5-1/4"
Basic White
Art Gallery Stamp Set
Mossy Meadow ink
Bumblebee Ink
Calypso Coral Ink
Scalloped Stitched Rectangles
Classic Label Punch


Products Used:

Petal Pink cardstock tent card 5-1/2" x 8-1/2", scored at 4-1/4"
Fine Art Floral Designer Series Paper cut 4" x 5-1/4"
Flirty Flamingo cardstock 3" x 3-1/2" cut vertically and spread behing Basic White label
Basic White cardstock 3" x 3-1/2"
Petal Pink cardstock tag  3/4" x 2-1/2"
Art Gallery Stamp Set
Flirty Flamingo ink
Petal Pink ink
Old Olive Ink
Tasteful Labels Dies
Elegant Faceted Gems

Thanks for stopping by today to see these two new cards. You can purchase all these products by clicking on my shop online button below.

Happy Stamping!


If you enjoyed this post, please be sure to click on the buttons below…


#stampinwitheva #stampinupproducts