Pages

Showing posts with label crumb cake. Show all posts

Thursday, June 29, 2023

You Can Make a Pretty Peacock Book Fun Fold Card Using Stampin' Up!s Share a Milkshake Stamp Set - Part 2

Here's the nitty gritty on the cutting and assembling of this cute Book Fun Fold Card.


A reminder of the two stamp sets used.


Card base - Pretty Peacock 4 1/4" x 11", scored at 4 1/4" and 5 1/2"

Front Layer - Glorious Gingham Designer Series Paper - Pretty Peacock
Narrow Piece - 1" x 4"
Square Piece - 4 1/4" square


Adhere together the 1 1/4" Binding portion of Fun Fold with adhesive.

Cut Inner Layer of Basic White Square Piece - 4" square.

Select greeting from Best Family Ever stamp set and stamp in Pretty Peacock Ink.

Adhere stamped Basic White layer inside of card.


From Left to Right around card base

Early Espresso cardstock  2" x 3", die cut burlap piece from Share a Milkshake Dies.

Pretty Peacock - Soft Shimmer Specialty Paper 3 1/2" square, die cut with largest Stylish Shapes Circle.

Basic White cardstock 1 3/4" x 3 1/4" for tag. Stamp greeting first in Pretty Peacock Ink, then die cut with second to the smallest Countryside Corners Die.

Pecan Pie sheet of Glorious Gingham Designer Series Paper 2 1/2" square, 
and die cut with waffle cone die. 


On the front of the book fun fold, adhere the Pretty Peacock Shimmer Circle.

Then with liquid glue, lightly dot the Early Espresso "burlap" piece and 
adhere to Shimmer paper as shown.

Place Dimensionals on the back of the tag and adhere as shown.

With 3 scraps of Basic White cardstock 1 1/4" x 1 3/4", stamp your ice cream scoops in Crumb Cake ink, Pecan Pie ink, and Early Espresso ink. (The reason you see more scoops than are needed is I couldn't decide if I liked the scoops stamped on Crumb Cake or Basic White, but Basic White won out!)

With a very small scrap of Early Espresso cardstock, die cut the little blob of fudge sauce.

Fold waffle cone into the cone shape and adhere the front flap to close it only. 
You need the room inside to arrange the ice cream scoops.


With Linen Thread wrap it multiple times around the "binding" and tie a knot then a bow.

Assemble your ice cream scoops inside the cone as shown. I scotch taped mine together to hold them. When placing the Dimensionals you can secure any wobbly pieces.

Use mini and regular Dimensionals to raise up the finished cone on the card front.

3 Neutrals Adhesive Backed Sequins in Copper color. Affix as shown.

Finish with decorating your Basic White Medium Envelope flap.
 
Cut a 2 3/8" x 6" piece of Glorious Gingham Designer Series Paper - Pretty Peacock.

Adhere envelope flap piece, then with paper snips, trim off excess. 

 You have made one "sweet" card to share with a loved one or friend!

As a bonus for you if you live in the USA - I have prepared a product shopping list at this LINK. You can uncheck any item on the list you already have, or say add all to the cart if you are a newer card maker. 

If you missed yesterday's Part 1 blog post, you can access it here.
----------------------------
If you don't already have your own Stampin' Up! Independent Demonstrator, I'd be honored to be yours! Let me help you be creative and proud of your cards that you make and send.

Learn how to get more done in less time by signing up for my exclusive "Insider" bi-monthly newsletter. Twice a month the news will share card class information, Stampin' Up! promotions, hot tips from me, and free tutorials! Subscribe to my Bi-Monthly Newsletter today. Plus you’ll receive a FREE 14 Card One Sheet Wonder Tutorial to download when you receive my thank you email for signing up.

Join Stampin' Up! I'd love to have you be part of my growing team.

Please contact me or email me at stampinwitheva@gmail.com if you have any questions about products, techniques, or card designs. 

Comments below are appreciated and welcome too!

Wednesday, June 28, 2023

You Can Make a Pretty Peacock Book Fun Fold Card Using Stampin' Up!s Share a Milkshake Stamp Set - Part 1

As a Foodie, I always love it when Stampin' Up! comes out with a food stamp set. There are so many possibilities for your cardmaking creations. Over the next week I'm going to share 3 projects that I hope will inspire you to give this set a try for yourself especially if you have a sweet tooth like I do. 

This food stamp set would be perfect for children's birthday party invitations, dessert buffet signage, or even tags for an ice cream toppings gift basket! So many possibilities!


The Share a Milkshake collection includes the photopolymer stamp set above for $19.00 and a set of 12 metal dies for $30.00. The Best Family Ever photopolymer stamp set costs $24.00. Both of these sets will be in my stamp room for a long time to come.


Here's the front of the Book Fold Fun Fold card  and matching envelope. The color scheme used was a new color - Pecan Pie; one returning color - Pretty Peacock; and two inks, Crumb Cake and Early Espresso, that have been in the Neutrals Collection for quite a while.


Here's the inside of the Book Fold Fun Fold card that uses the Best Family Ever stamp set for the inner greeting. I love that stamp set because you can mix and match so many of the stamps. I think they have included every relative possible that you could make a card for!


Here's a close up of the front. My intent was ice cream in the flavors of caramel, fudge brownie, and peanut butter, with some fudge sauce on top. The Glorious Gingham 6" x 6" Designer Series Paper (DSP)  in Pecan Pie lent itself well to the waffle cone die. You really can't see it in the photo, but the waffle cone die, put little ridges into the paper so it feels textured like a real waffle cone. 

Behind the cone is Pretty Peacock Soft Shimmer Specialty Paper that I haven't seen many demonstrators use yet. It was easy to cut on my die cutting machine. Also the glitter/shimmer didn't get all over the place like other brands do. Behind that layer was more of the Glorious Gingham DSP in Pretty Peacock. 

Return here to my blog tomorrow to get the cutting measurements and assembly instructions (and more photos)! I'll see you then!

However, if you love the Share a Milkshake stamp set  # 160394 for $19 and die set #160395 for $30, and Best Family Ever stamp set #160720 for $24, please order in my online store at the link below.  

If you live in the USA - Shop for Stampin' Up Products here-

https://evadietz.stampinup.net  click Shop Now tab

----------------------------
Just in case you missed the next post that has a shopping list link included, go HERE.

If you don't already have your own Stampin' Up! Independent Demonstrator, I'd be honored to be yours! Let me help you be creative and proud of your cards that you make and send.

Learn how to get more done in less time by signing up for my exclusive "Insider" bi-monthly newsletter. Twice a month the news will share card class information, Stampin' Up! promotions, hot tips from me, and free tutorials! Subscribe to my Bi-Monthly Newsletter today. Plus you’ll receive a FREE 14 Card One Sheet Wonder Tutorial to download when you receive my thank you email for signing up.

Join Stampin' Up! I'd love to have you be part of my growing team.

Please contact me or email me at stampinwitheva@gmail.com if you have any questions about products, techniques, or card designs. 

Comments below are appreciated and welcome too!

Sunday, June 26, 2022

June Paper Pumpkin Kit Pick of the Crop

 When my June Paper Pumpkin kit arrived, I dug right in, which is not typical for me. I usually wait a few days to see what others are posting on the Facebook Paper Pumpkin Fan Club page. But not this time, I finished so fast I was able to post my alternative creations on the Paper Pumpkin Demonstrator Page and got lots of positive feedback. I hope you'll enjoy my creations below.


Each kit came with one small canvas bag that will hold some of the cards you create so you can give it as a gift.

The Hello was stamped in Night of Navy ink, looks black I know.
The lavender was stamped in Rich Razzleberry or you could stamp in Blackberry Bliss. I folded one of the left over tags in half, punched a rectangular hole, and stamped "for you" which came from a retired set. Soft Succulent 3/8" Organza Ribbon tied it to the handle.

These next three photos are of the kit cards made exactly following the instructions included.


When I was done with the 9 cards, there were a lot of assorted pieces left, so I started making alternative designs.


I had to trim the bread loaves as they looked like banana slugs to me.
The gingham tissue and greeting are from prior Paper Pumpkin kit leftovers I had around.


Next I decided to use the Jar Punch with the Rainbow Glimmer Paper and create some assorted Lavender cards.


As I was digging around through my older Paper Pumpkin kit leftovers I discovered I had some 3" x 3" Crumb Cake cards and matching "fruity" envelopes. So that got me creating with the (retired) Sweet Strawberry stamp set and matching Strawberry Builder punch. Also found I had some more Berry Delightful Designer Series Paper which coordinated nicely with my design ideas.


Next I located my Harvest Hellos stamp set and Apple Builder punch for the next set of cards below.


Back to the Berry Delightful DSP and the current kit blueberry stamp that I colored and punched out.


Next came the Full Basket dies to weave myself some baskets in Soft Suede to place the strawberries, blueberries, and trimmed small breads. I really like how all these turned out.


I repurposed some of the mini pizza boxes I had into holders for the 3" x 3" cards I created.


This June kit and all the extras I played with made these creations I'm sharing with you extra special! 
I hope you enjoyed viewing these ideas.

I'd love to know in the comments which of my alternate cards you liked the most.

Shop or Join at https://evadietz.stampinup.net/

Please contact me anytime if you have any questions 
or 
stampinwitheva@gmail.com

Wednesday, December 8, 2021

Some More OnStage at Home Card Ideas

Here are two more cards my dear demo friends, Anne and Lori, shared with me. We made these together while we were at OnStage at Home in San Diego last month. 


Delicate Dahlias stamp set, with Basic White card base, Crumb Cake and Pale Papaya cardstocks, and the 3/8" Pale Papaya organza ribbon. Unfortunately, I didn't note the name of the Designer Series Paper or the stamp set name, and I don't have those in my own collection. So sorry.


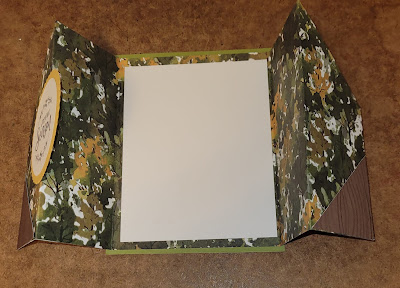
Double Gate Card Fun Fold using Designer Series Paper

Old Olive card base Basic White and Crushed Curry cardstock, Beauty of the Earth DSP, Layering Circle Dies, and Encircled in Warmth stamp set in Memento Basic Black ink. 


The secret to the Double Gate Fold in the corners you trim off of the top edge, get flipped over, and glued to the bottom corners. The corner trim piece is approximately 2" from each corner.

The Double Gate Fold card is a good one to use up some of your Designer Series Paper stash.

Have fun experimenting with a variety of Designer Series Papers and see what wonderful cards result.

Happy Creating!


#stampinwitheva #sudemo

Thursday, November 4, 2021

Grateful 12 x 12 Fall Sampler Part 3

 So how is your sampler coming along so far? Great I hope. 

One of my friends yesterday offered a great suggestion for a future sampler. She said make it a one-page scrapbook layout and place photographs in some of the squares. I told her that was a fabulous idea.

But going back to today's project. You are over halfway now with the bottom row to go. Tomorrow is embellishments!


Bottom Row, Left Square again uses a precut lace shape from the September 2020 Paper Pumpkin kit. The leaves are die-cut from the Seasonal Layers dies. The solid one is Cajun Craze cardstock. The other is Sahara Sand Foil with Early Espresso veins. The "Give Thanks" tag is stamped on Basic White cardstock in Early Espresso ink and mounted on Mint Macaron cardstock.


Bottom Row, Center Square has two different pumpkins from two different stamp sets. The larger pumpkin comes from the Harvest Hellos stamp set. The smaller pumpkin image comes from the Jar of Haunts stamp set. Both are stamped on Pumpkin Pie cardstock. The larger one with Calypso Coral ink and the small one with Cajun Craze ink. Both have leaves stamped in Old Olive ink. Both are fussy cut-out.


Bottom Row, Right Square has two matching seedpods from the Enjoy the Moment stamp set stamped in Early Espresso ink on Cajun Craze cardstock then fussy cut out. The small tag contains one of the sayings from the stamp set and is both stamped with and mounted on Early Espresso.

And Introducing...

Wanna save 40% off your stamping wish list? Yes? Then November is the time to join Stampin' Up! Give yourself an early Christmas present! The joining opportunity price hasn't been this low in a long, long time! It's such a sweet deal - future 20%-25% discounts every time you order, get all the inside scoop about new products ahead of everyone else, and if you want to meet some new nice creative people this is the place. There's nothing better! Plus I'd love to have you on my team. We have so much fun! Learn more here https://evadietz.stampinup.net/join_now


Think about it, won't you? It is the best decision I've ever made. My life has been so enriched by Stampin' Up! and all the wonderful people I've met.


#stampinwitheva #sudemo
#stampinup #falldecor #fallsampler

Wednesday, November 3, 2021

Grateful 12 x 12 Fall Sampler Part 2

Today's installment will be creating the top row for this Fall Sampler. More details will be under each photo. Have fun being creative! You can use leaves, pumpkins, bushel baskets, apples, cornstalks, bales of hay - whatever you have in your stamp collection. 


Top Row, Left Square has two of the same seedpod images from Enjoy the Moment stamp set stamped in Cajun Craze ink on Crumb Cake cardstock. They were fussy cut out.


Top Row, Center Square has the "Happy Thanksgiving" image from the Tags 4 You stamp set punched out with its Label Bracket punch. The small Crumb Cake leaf was die cut using the Seasonal Layers Dies. The Cajun Craze leaf was die cut using the Nature's Roots Dies.


Top Row, Right Square has two more leaves die cut from Nature's Roots dies. One in Early Espresso cardstock and the other in Cajun Craze cardstock. Saraha Sand Foil was punched with the Sunburst Punch to mount the leaves on. Behind the foil was a precut image from September 2020's Paper Pumpkin Kit that I had as a leftover. A different seed pod was stamped with Early Espresso ink on Mint Macaron cardstock and fussy cut-out and arranged with the other leaves.

Come back tomorrow for the bottom row. I hope you're having fun!


#stampinwitheva #sudemo
#stampinup #falldecor  #homedecor

Tuesday, November 2, 2021

Grateful 12 x 12 Fall Sampler Part 1

Over the next few days I'll be sharing with you a home decor piece you can make that will be useful year after year during the fall season. It's a Fall Sampler.

Do you have to make it just like mine? Of course not! Use whatever supplies you have in your stash and use retired products like I did if you have some similar. This project is meant for inspiration!

Below each photo are the supplies and sizes to cut to start building your own sampler. Have fun!


In Good Taste 12" x 12" Designer Series Paper - Dark Woodgrain
12" x 12" square Basic White cut down to 10-1/2" square
12" x 12" square Crumb Cake cut down to 10-1/4" square


The six smaller squares are 3" x 3" in size and cut from Basic White, Mint Macaron, and Cajun Craze cardstock.
The four 2-3/4" square corner pieces come from Gilded Autumn Designer Series Paper (retired).
The center top and bottom 2-3/4" square comes from some very, very retired Designer Series Paper in my collection whose name I don't have anymore.

The center piece of cardstock is Early Espresso cut 10" x 3".
The Crumb Cake plaid Designer Series Paper comes from retired Sale-a-Bration Peaceful Prints and is cut 9-3/4" x 2-3/4".


The Early Espresso felt sheet from the Festive Felt Sheet Combo Pack was backed with Adhesive Sheet so I could use the retired Large Letter Dies to die cut "Grateful."  
What I thought was a great idea to have the adhesive on the felt, turned out to be a little tricky for actually placing the letters on the plaid paper. One thing I tried was to use washi tape at both ends of my thin ruler on my desktop so I would have a secure "line" to line up the letters on. 

Look at that, after the first day it already has taken the shape of a sampler. Come back tomorrow to see how I decorated the top row of squares. 


#stampinwitheva #sudemo
#stampinup #homedecor #fallsampler

Monday, October 18, 2021

Herringbone Paper Strip Pattern to Try

Since I've been so carried away with Christmas cards, here's another design for you!

The Christmas to Remember stamp set and the Painted Christmas Designer Series Paper (DSP) make a beautiful card using 3/4" strips in a Herringbone pattern. I cased the layout from Teresa Leggo but used a different set of products.

The Herringbone Paper Strip Technique is a wonderful one to try when you have lots of strips hanging around your scrap bin. It is so easy to cut your strips in 3/4" widths. Length doesn't matter. You can decide where you want the starting diagonal strip to go and continue from there. 

On this card, my starting diagonal was at 1" on the left side of the Basic White piece you will build on, and 3-1/4" on the right side. Make small tick marks so you can cover them when you place the first strip. Glue down the strips in the herringbone pattern and trim the excess paper that hangs over the edge off with your paper snips. 

Add the ribbon and scotch tape on the backside. Adhere the strip layer to the Crumb Cake and Card base. Add the inner Basic White layer. Add a sponge dauber edge to the tag after stamping the greeting. Add some holly and berries (you will only need 3 of the 4 berries) stamped and die cut out. Finish with your pearl embellishment. Don't forget to do your envelope flap too!


Products used in this Card:

Soft Sea Foam card base
Crumb Cake Layer
Basic White Layer that strips will attach to and for the card interior
Basic White cardstock for the tag, holly, and 3 of the 4 berries on the die
Christmas to Remember stamp set 
Painted Christmas Designer Series Paper
Seasonal Labels  Dies
Sponge Dauber
Soft Sea Foam, Garden Green, and Real Red Ink
Stampin' Write Garden Green marker
Retired 1/8" All the Trimmings Ribbon Combo Pack - Real Red roll
Gold Metallic Pearls
******
These products are available at my online store at the link below. Stock up before they go on backorder due to supply chain problems. If you don't have your own demonstrator I'd love to be yours! Sign up for my email list and free tutorial under the Welcome tab.

Happy stamping!


#stampinwitheva #sudemo
#stampinup #christmascards