We all say we never have enough time to do things, but we are only fooling ourselves. We make the time for the things we really want to do.
If you think of your cardmaking as a process to organize, and break the steps down like a project manager or mathematician would, you would be amazed at what you can accomplish in a short amount of time.
Here's how to think about breaking down the task of making Christmas cards into manageable chunks.
Using the card above as my example...
The first thing to think about is how many pieces can be cut out of one sheet of 12" x 12" Painted Christmas Designer Series Paper (DSP). That helps to be efficient with your use of paper.
The strip of the pretty pinecones design is 2" x 5-1/2".
So you can make 12 Christmas cards from one sheet of this Designer Series Paper.
********
Next you'll need 6 sheets of Soft Succulent Cardstock, cut crosswise at 5-1/2" x 8-1/2", then score all 12 pieces at 4-1/4". You have 12 card bases. Use a bone folder or your fingernail to crease the fold line when matching the cardbase corners.
********
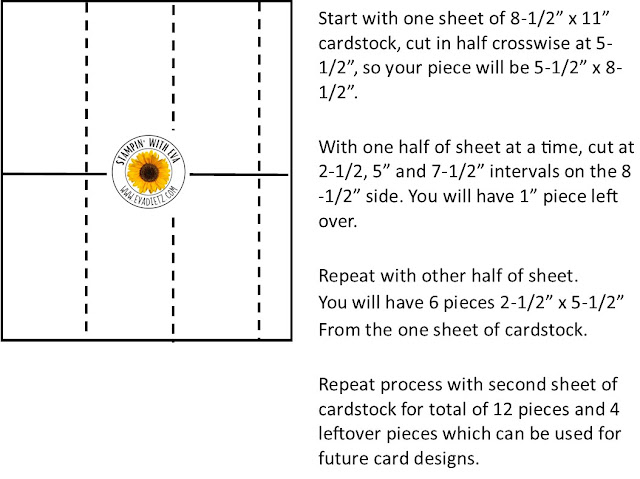
The next piece to prepare is the Evening Evergreen cardstock 2-1/2" x 5-1/2" layer pieces. You will need 2 sheets of cardstock.
********
Next step is to cut your Soft Succulent ribbon pieces. You will need 4" pieces. Cut 12.
********
Since the Double Oval Punch was used in this card design, 2-3 strips of 1-1/4" x 11" of Basic White cardstock will be perfect for the stamped greeting done in Evening Evergreen ink. The greeting used was from a retired stamp set called Arrange a Wreath, but you could use a stamp set similar that would fit into the plain edge oval. Stamp 5-6 images per strip horizontally. Remember to turn the punch over in your hand so you can see the alignment of each stamped image in the oval as you slide the stamped strip through the punch and you will have a portion of the cardstock strip to hold on to as you punch.
Next prepare 3 strips of 1-1/2" x 11" of Evening Evergreen cardstock, and punch out 12 scalloped ovals from the three strips.
********
3 sheets of Basic White cardstock are needed to make 12 4" x 5-1/4" pieces for the inner card layer for your personal greeting.
***************
Using the Tasteful Textile Embossing Folder and your Die Cutting Machine, run just the front of the card in the embossing folder through your machine, while the back of the cardbase is exposed on the back of the embossing folder.
********
The No Naked Envelope Suggestion - Two Optional Choices you can do:
1) Cut Designer Series Paper Envelope Flap pieces 2-3/8" x 6". 10 pieces can be cut from one 12" x 12" piece of matching Designer Series Paper. Adhere with adhesive to envelope flap and trim excess with paper snips.
OR 2) Stamp in matching ink on your envelope flap or on the lower left corner on envelope front with coordinating images or greetings.
********
NOW you are ready for your Card Assembly Production Line. You'll be just like Santa's elves!
1. Adhere the two narrow strips together - Pinecones and Evening Evergreen, making 12 sets.
2. With scotch tape secure 1 ribbon piece ends to back of double layer done in step 1. Repeat 11 more times.
3. Adhere this unit directly to embossed card front with 1/2" left margin spacing. Total 12 cards.
4. Adhere both oval tag (1 stamped plain oval and 1 scalloped oval) pieces together making 12 sets.
Use 2 Dimensionals to raise each tag up on each card front similiar to photo.
5. Add 3 Rustic Metallic Adhesive Backed Dots to each card as shown in photo.
6. Adhere Basic White inner card layer to the inside of each card.
7. If you have your own personalized stamp, stamp the back of each card. If you don't, handwrite your name and year on the card back.
8. Decide what (if anything) you will be do with your Basic White envelopes from the previous suggestions. Pair one envelope with one card.
TA-DA You now have 12 cards made. Well Done!
The following products are retired:
You may be able to purchase them from Ebay or Etsy
152587 Arrange a Wreath Stamp Set for greeting
152718 Tasteful Textile Embossing Folder for subtle texture on the Soft Succulent card base
I'd love to read a comment from you. Was the detailed process and pictures helpful for you? Making one card at a time takes a LONG time, but using the assembly line method will result in time well spent. I use this assembly line method every time I prepare card kits for my classes.
Shop or Join at https://evadietz.stampinup.net/
Please contact me anytime if you have any questions
or write me at
stampinwitheva@gmail.com


No comments:
Post a Comment
Thanks for taking the time to leave me a comment! I appreciate hearing from my readers. If you have a question or anything I can help with please let me know. Have a wonderful day!