Pages

Showing posts with label Circle Punch. Show all posts

Wednesday, April 27, 2022

He's the Man Suite Arriving Soon

Do you struggle to come up with masculine cards? This new suite is going to make that task much easier!

Introducing "He's the Man" Suite coming soon on May 3rd in the new 2022-23 Annual Catalog.

You are going to love this collection as it is more contemporary with up-to-date sayings and on trend colors that guys should love.

I whipped up this card below using a small number of supplies:
Soft Succulent cardstock
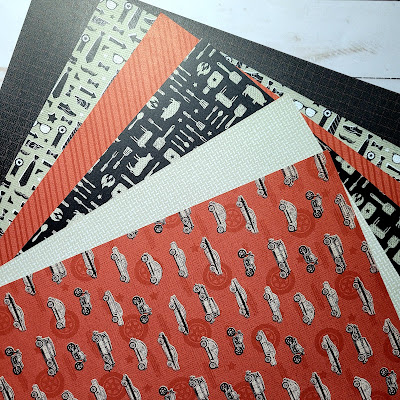
He's the Man 12" x 12" Designer Series Paper
1-3/4" circle punch (retired)
Paper Trimmer and Paper Snips
Stampin' Seal Adhesive
Dimensionals and Glue Dots
Basic White Envelope with decorated exterior flap


You could make this easy beginner card, and even make multiples using other designs in the paper pack.

He's the Man 12" x 12" Designer Series Paper
2 sheets of 5 designs plus two die-cut sheets


Above one side of the designs and below the other side of the designs.


Do you think this suite is something that would appeal to the guys in your life? It definitely will for the guys in my life. I'd love to hear what you think about this suite in the comments.

Come back tomorrow to see another easy to make card with this Suite.

Thanks for stopping by!

Wednesday, December 15, 2021

Christmasy Luminary Lantern

Anne, my downline, shared this cool holiday paper and vellum lantern with me when we were together last month. It glows with a flickering battery-powered candle inside.


Here are the basics on how to construct this lantern:
Cherry Cobbler cardstock - 2 pieces cut 6" x 8-1/2", score at 4" and 8" on the long side. That 1/2" section will be what connects the two sections together later. 
Use the bone folder to fold the score lines well on each piece. 

With more Cherry Cobbler for the top and bottom- cut 2 pieces 5-1/8" square. 
Score at 1/2" on all 4 edges. (We will come back to this in a bit.)

You'll need the 3rd largest Stitched Rectangles Die to die cut the "window" in each lantern section before you assemble the lantern pieces into one unit.

Cut 4 pieces of vellum cardstock for windows - size 3-3/4" x 5" 
The windows will be attached on the inside with tear and tape around all 4 edges of the window opening. Use the bone folder to guarantee good adhesion.

Using the Christmas Tree Dies, select which tree you'd like to use and die cut four matching trees out of Garden Green cardstock. Using the Tombow Liquid Multipurpose Glue, very carefully apply small dots of glue to your tree die cuts. Let the glue dry thoroughly.

To assemble the lantern you will put tear and tape on each 1/2" section. Line up the section carefully and attach the two sections together. Use the bone folder to guarantee good adhesion.

Now for the lid and base. Use the bone folder to fold the score lines well. Cut into the 1/2" corners to create a tab for gluing the edges together. Use a paper clip on each corner to let the glue dry well and hold the shape for both the lid and base pieces.

With a 1-3/4" circle punch, punch out two pieces of Cherry Cobbler that will become the "pull" for the top lid, so you can turn your battery-operated candle on and off easily. Score the circle through the middle on each circle piece. Only glue one-half of the circles together to form a "tab" and the other half will be glued to the lantern top when it is finished drying.

To attach the base to the lantern, put some pieces of tear and tape around the inside of the entire 1/2" lip and set the lantern inside the base when you've peeled the protective strip off the tape. Put your hand inside the lantern and gently press the sides to the 1/2" section until well secured.

Attach your lid tab with glue. Let dry. Set your battery-operated candle inside and place the lid on top of the lantern.  All done! So pretty! These would be fun to make and set in your window sills on Christmas Eve!


#stampinwitheva #sudemo #christmaslantern

Tuesday, August 24, 2021

August Stamp and Chat Class Cards #2

Today brings in the end of the six Sharing Sunshine stamp set cards I've shared over the last couple weeks. It was so fun to create multiple card designs from one stamp set at one time. Yes, my stamp room got very messy in the process, but it was worth it! This stamp set has a lot of value in it because you can make such a variety of cards with it. Give it a try!

The basic layout idea was cased from Deb Joy Smeak, but I made it my own.


Here's the products used to make this card:

Sharing Sunshine Stamp Set
Polished Pink Card base 5-1/2" x 8-1/2", scored at 4-1/4"
Daffodil Delight Layer 4" x 5-1/4"
Basic White Layer 3-3/4" x 5"

Blending Brush with Daffodil Delight Ink to place a circle of color behind the die cut sunflower.
Polished Pink 4" square for die cutting the sunflower
Sunflower Dies with Die Cut machine of your choice

Basic White for Tag 3/4" x 4"
Stamp Happy Birthday greeting with Memento Tuxedo Black Ink
Blending Brush with Daffodil Delight Ink to lightly color the tag
Tailored Tag Punch for the banner ends

Basic White 1-1/2" square for face
Basic White 3" square for rays
Daffodil Delight Ink for rays and face
Circle Punch or Circle Die to layer face and ray pieces
Memento Tuxedo Black  and Polished Pink Ink for face details
Dimensionals to raise face/rays up from sunflower die cut
----------------------------

This card makes sending a birthday card to a friend far away easy because it is flat, no bumpy embellishments on this one.

I'd love it if you'd subscribe to my email list so you can receive a 14 card One Sheet Wonder tutorial for FREE. It is a very versatile design you can use over and over again!

Have a lovely day!


#stampinwitheva #stampinupproducts

Monday, August 2, 2021

Sweet Strawberry Summertime Card

This is the final card to share from my July Stamp and Chat Classes. Another fruity card, but this time Strawberries!  This layout was cased from the StampingNinja.com


These beauties came from my garden in July. The plants are going crazy with berries this year. I think they love the combination of warmer weather and consistent watering via our timer system.

The berries above look really close to the artist inspired berries on the Designer Series Paper below, don't you think?


Here's how to make this card!

Products Needed and Dimensions:

Poppy Parade Cardstock card base 5-1/2" x 8-1/2", scored at 4-1/4"
Basic White inner card layer 4" x 5-1/4"
Retired Berry Delightful Designer Series Paper 4" x 5-1/4" and 2-3/4" square
Basic White punched with 2-1/4" Circle Punch and another piece punched with 1" Circle Punch
4" piece of 2019 3/8" Sale-a-Bration Organza Ribbon in Granny Apple Green
Sweet Strawberry Stamp Set and Punch
Poppy Parade Ink for berries and Granny Apple Green in for leaves
Pearl Jewels for embellishment
------------------------------
Tomorrow is the Big Day - The new Fall Mini Catalog goes live and so does the Second Sale-a-Bration offering for this year. If you need catalogs be sure to let me know via the contact tab.
---------------------------------

Have a sunny summer day!


#stampinwitheva #stampinupproducts  

Thursday, July 29, 2021

Peach Mango Sanitizer Holder to Make

Earlier this month when I held my Stamp & Chat classes, I always try to give a favor to my customers as a way to show how much I appreciate them and to encourage them try making 3D items. The theme for the classes were a combination of Christmas in July, Peaches and Strawberries, plus we played Bingo for prizes! 

This favor holder is designed for the Bath & Body Works Mini Sanitizers and is my original design.

One sheet of Balmy Blue cardstock will make 4 holders.
Cut Strip - 2-1/8" x 11"
Score at 3", 6", 7-1/2". 8-1/2", and 10" on the long side. Fold the score lines gently, it doesn't need a bone folder.

You're a Peach Designer Series Paper (DSP):
For the back piece - 2" x 2-7/8"
Small front piece - 7/8" x 2"

For Tag on Front
1" circle punch for scraps of Basic White cardstock
1-1/4" circle punch for scraps of Calypso Coral or Petal Pink cardstock
Just for You stamp from Sweet Strawberry Stamp set
Balmy Blue Ink

Retired Layering Ovals Dies
Die Cutting Machine of Choice


This photo shows you the size oval you need.


After the DSP is adhered, you will need to take your paper snips and fussy cut around the back side of the oval, as the sanitizer bottles are just a little wider than the oval die selected. Start with only trimming 1/16" and gently try the bottle in the oval. You want the bottle to be hugged inside the oval, not sit loosely.


Flip holder strip over and add Stampin Seal adhesive so back of holder will be double thickness.
Fold on score line and press well to adhesive.


I was using up some wider double stick tape I had on hand, but two pieces of Stampin' Up!s Tear and Tape would work nicely. Position as shown in photo.
If you want a cleaner edge on your Tear and Tape, use a credit card to tear the tape against.


Peel off Tear and Tape


Notice how the 1" DSP covered section on the front and the 1" section on the end of the cardstock goes nicely against the back section to create a level surface where the sanitizer will go.


Going with my peach theme, the ladies received Peach Mango hand sanitizer.


Punch out the needed circles and stamp the greeting. Adhere layers together and adhere directly to the front of the holder as shown.


These little holders will fit nicely in a Stampin' Up! Clear Envelope with the flap folded down a bit more.

Ta-Da! 10 holders as favors for my customers.


Here's a close up of the design of the DSP sheet I used.

I hope you'll give this Mini Hand Sanitizer Holder a try. It's a perfect little gift for any time of year. It's also a great way to use up little scraps of Designer Series Paper you may have in your collection.

Happy Creating!


#stampinwitheva #stampinupproducts  

Monday, July 19, 2021

Christmas in July Use Whatcha Got!

When you want to do Christmas in July but the new Fall Mini Catalog hasn't be released yet, you must use what you have, so thanks to Rachel Traudt's lovely idea, I cased most of her layout for my July class cards. 


Products and Dimensions:

Just Jade cardstock card base - 5-1/2" x 8-1/2", scored at 4-1/4"
2020-2022 InColor 6" x 6" Designer Series Paper - 4" x 5-1/4"
Just Jade cardstock layer - 3" x 4-1/4"
Basic White cardstock layer - 2-3/4" x 4"
Stamp with Christmas greeting of your choice in Real Red ink
Gold Foil punched with 2-1/4" Circle Punch - both retired
Just Jade Cardstock punched with Tree Punch
Red Glimmer Paper punched with Mini Heart Punch - both retired
3/8" Real Red Organza Ribbon - one piece 4" long and another piece for 
separate bow attached with glue dots

Hope this card gets you in the Christmas spirit! It's a beautiful but easy card to make!
Come back and visit as Christmas lasts all week!


#stampinwitheva #stampinupproducts  

Tuesday, July 6, 2021

Revisiting Some Easy Punch Art Ideas

 As I mentioned in yesterday's post, I'm taking a ten-year walk through my blog and sharing some of my posts that I think still have merit and could be made today.

Punch Art still continues to be a popular trend.  I'm revisiting three of my cards that would still be so easy to make today.

Darling Rabbit Head:

Upside down Heart Punch

Two Oval Punches for Ears

Small circle punch for nose

Hand drawn eyes and whiskers 

Sponge dauber the cheeks and ear color

Any scrap of fabric or piece of ribbon would make a cute accent.

 
Darling Daisy Flower:

Circle Punch for Flower center
Oval Punch for Petals


If you would like to see the original post of the above two cards
 
Baby Bib with a Tuxedo Touch:

This design isn't quite using all punches but it is still an easy baby card to create.
Oval Framelits
Piercing tool
Striped embossing folder,
Pennant and Circle Punches to create the bow tie.


Here's some links to previous posts that include some more bib ideas like this one.


I can imagine these designs with today's Designer Series Papers and coordinating Cardstock and they still will be wonderful to make and send!

Do you think these ideas are still relevant? I'd love to know in the comments.
Have fun trying these "timeless" ideas! 


#stampinwitheva #stampinupproducts  

Friday, April 16, 2021

Easy Vertical Drapery Fold Technique

Here's a card layout idea for YOU! I saw this Vertical Drapery Fold Card idea recently which I had never seen before, but there were no measurements available to CASE. So I decided to break all the rules and just have some fun. Wow, that was so freeing! No measuring except for the initial cut.

This card layout is super easy to do and you get two cards from this layout. 


Here's how:

1. Prepare two card bases - 4-1/4" x 11" with score at 5-1/2" to match the Designer Series Paper you choose.

2. Select a Designer Series Paper that has an all-over design.  I am using Botanical Butterfly Designer Series Paper which is retired. Cut a 6" x 12" piece.

3. With a pencil on the 6" size, make a tick mark at 2" from the left side. Rotate the paper 180 degrees and do this step again for another tick mark. Then place your paper on your paper trimmer and line up the two tick marks and cut.

4. On the resulting 4" end run a line of Stampin' Seal adhesive, on the other 2" end, do the same.

5. Carefully stick the 4" end down on your card base and then stick the 2" end down. You will have a "hill" of paper between the two ends.  Here's where the FUN begins. Go ahead and make 3 or 4 pleats in your paper until all the pleats lay flat. Use your bone folder to score the creases. Make sure you try to keep the right edge lined up.

6. Then lift up the entire set of pleats and add some adhesive underneath. Press to card front.

7. Lift the small folded pleats and run adhesive down each one. Press down.

8. Finish your card with whatever greeting, colors, and embellishments you need. I used the Ridiculously Awesome Stamp Set and circle punches that I have in my collection.

This card layout is a great way to use up some of your Designer Series Paper in your stash. 
Have fun with this!


If you enjoyed this post, please be sure to click on the buttons below…


#stampinwitheva #stampinupproducts  

Monday, March 22, 2021

Six Easy Designer Series Paper Cards to Make

Not too long ago I stumbled across this idea online from Alison Okamitsu of nicepeoplestamp.com and I knew I wanted to give it a try. I bet you will too! It's so easy and a great way to use up full 4" x 12" strips of Designer Series Paper from your collection. (I have a collection, don't you too?)

For my set of 6 cards I am using Hydrangea Hill Designer Series Paper (DSP) from the Hydrangea Hill Suite in the January-June 2021 Mini Catalog. My greeting stamps were from a variety of stamp sets. The little hydrangea flower is from the Hydrangea Haven stamp set and stamped with Highland Heather ink.

Let's Get Started!

Step 1: Select 3 pieces of coordinating DSP that you like. Cut a 4" x 12" piece from each sheet, for a total of three strips.


Step 2: Using the Cutting  Diagram below, you will cut each strip into two - 4" x 5-1/4" pieces and two 4" x 3/4" pieces.


The photo below shows an easy way to organize your cut pieces, so you know you haven't made any cutting mistakes. Do pay attention to the directionality of the DSP.


Step 3: You will cut each 4" x 5-1/4" piece precisely in half at 4" x 2-5/8".
Flip over the bottom piece from each larger piece so you can see both sides of your DSP.


Step 4: Then have fun starting to mix and match the lower pieces with the upper pieces until you have 6 different card fronts. Then take the 3/4" x 4" strips and experiment with them to see which side of the DSP looks best with your card front pieces.


Step 5: Once you have the card fronts the way you like them, it's now time to select the matching cardstock and quantities to cut your card bases. I chose one sheet of each cardstock of Old Olive, Seaside Spray, and Gorgeous Grape. Cut the bases 5-1/2" x 8-1/2" then score at 4-1/4".


Step 6: Adhere your DSP pieces to your card fronts. Make sure you have a 1/8" margin on the top and bottom and sides. If the DSP has to overlap a bit in the middle that's okay. Also you can decide if you want your 3/4" strip smack dab in the middle or you can adjust it up or down on how you want it to look.

At this point, you can also cut your inner card layer. I used Basic White and cut 6 pieces at 4" x 5-1/4". Then adhere those to the inside of each card.


Step 7: Finally select a circle punch or circle die that is at least 2" in diameter (it can be larger if you desire.) Punch/Cut six circles out of Basic White. Next go through your collection of stamp greetings and select some to fit the circles. I stamped my greetings in Tuxedo Black Memento Ink, then accented with a small hydrangea stamp around the edge of the circles for a little pizzazz.


Here's the finished set in my photo booth. Then enjoy the individual photos with their matching envelope flaps. (You know the rule - NO naked envelopes!)


Now for fun, I tried this method again with the Snail Mail Suite. I love the totally different look!


Now you give this a try! The cards go together fast and easy! Have fun!

If you would like to purchase any of these projects just click the shopping link below.

Happy Crafting!


If you enjoyed this post, please be sure to click on the buttons below…


#stampinwitheva #stampinupproducts