Pages

Showing posts with label pattern party designer series paper. Show all posts

Friday, November 25, 2022

Stampin' Up!s Sweetest Christmas Suite Designer Series Paper Candy Canes meets the Jingle Jingle Jingle Stamp Set for This Fun Ho Ho Ho Holiday Card

Once I saw the Sweetest Christmas Designer Series Paper (order # 159559), I knew I had to design a slim line card using the candy canes turning them into letters. As shown in the photo below the reverse side of the red and white candy cane revealed the red, green, and white candy cane. 

The bottom "stick" portion of the candy canes are fussy cut into the "H". Two hooks off the candy canes makes the "O". The letters are assembled with liquid glue and left to dry before they are added to the card front with mini dimensionals (Order #144108).


To construct the card, begin with a 8" x 9-1/4" piece of thick Basic White (order # 159229). Score at the 4" line on the 8" side.

Next cut a "sky" piece from whatever Designer Series Paper you think looks best. I used retired Pattern Party Designer Series Paper cut to 3-7/8" x 9-1/8".

Another piece of thick Basic White will be cut 2-1/2" x 9-1/8" and torn as shown for the "snow".


You will need a total of 6 (maybe 7) of the red and white candy canes to make the letters.
The three sets of "HO" will be positioned like they are climbing in the snow.


Using the Jingle, Jingle, Jingle stamp set (order # 153438) and Real Red ink (order #147084), stamp the words shown on each piece of the "snow". Add a Red Real Rhinetsone as shown(Order # 146924). 


On a small scrap of Basic White, stamp the Santa Hat image from the Jingle, Jingle, Jingle stamp set  in Memento Ink (Order #132708). Fussy cut it out and color in the red portion with a Dark Real Red Stampin' Blends pen (Order # 154899).

Here's a trick - use a Basic Black Stampin' Write Marker (Order # 100082to carefully color the cut edge of the hat black so it will look finished with the brush pen end. Add one Red Rhinestone as shown.


Add the complete Santa Hat on the middle H with mini dimensionals.

You can also add a 1-1/2" x 10" exterior envelope flap on your business #10 size envelope. Adhere and trim off excess.

You can order the majority of these products at my online store. The link is below.

I hope you enjoyed learning how to make this original design. This card would definitely be a treasured card on a fireplace mantle for a very long time!

**********************

Learn how to get more done in less time by signing up for my exclusive "Insider" bi-monthly newsletter. Twice a month the news will share card class information, Stampin' Up! promotions, hot tips from me, and free tutorials! Subscribe to my Bi-Monthly Newsletter today. Plus you’ll receive a FREE 14 Card One Sheet Wonder Tutorial to download when you receive my thank you email for signing up.


Please contact me or email me at stampinwitheva@gmail.com if you have any questions about products, techniques, or card designs. Comments below are welcomed too!

Sunday, May 22, 2022

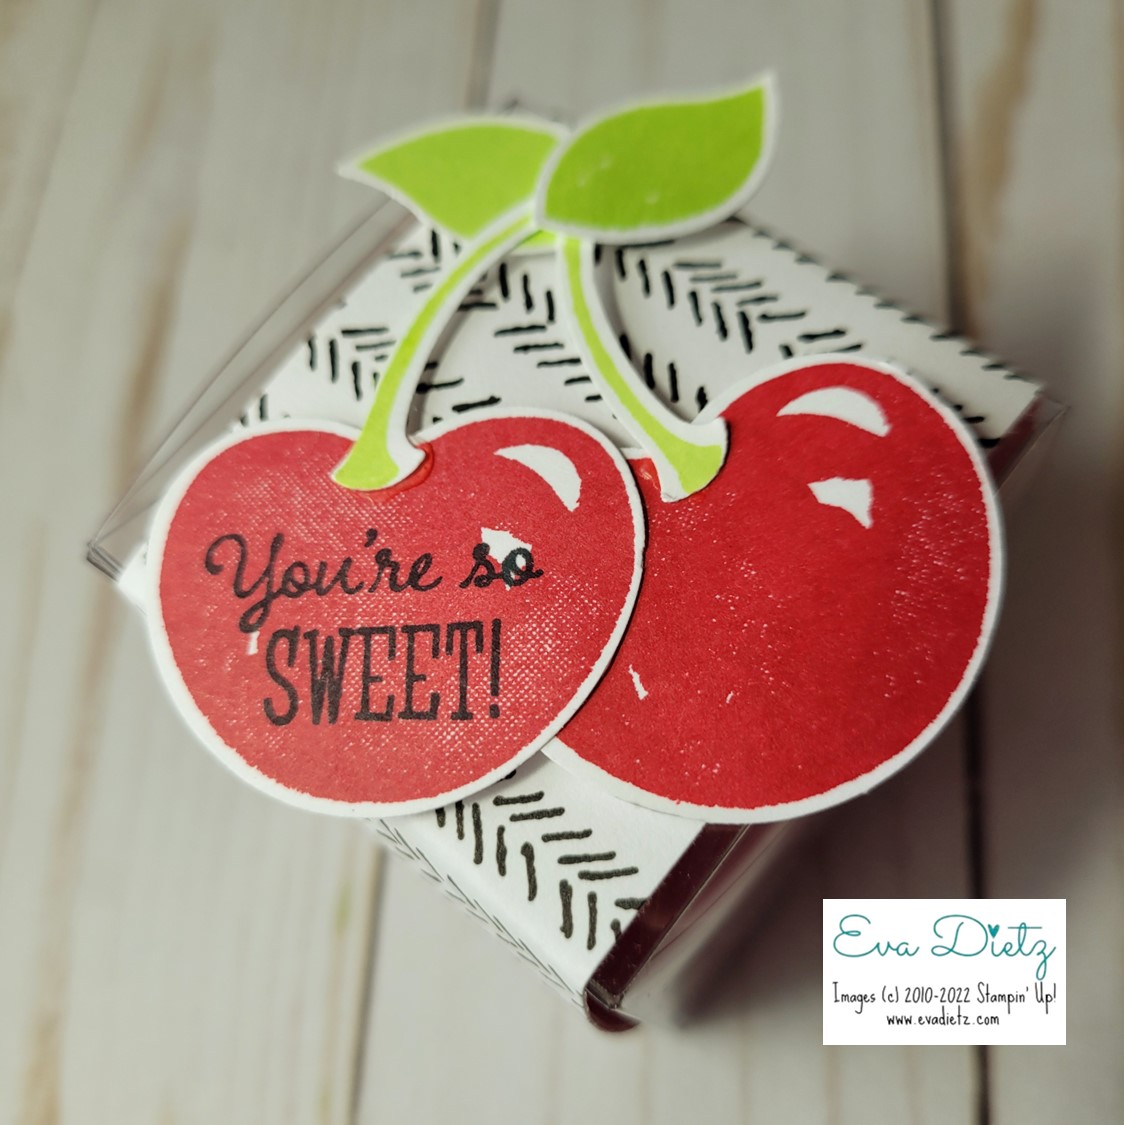
Very Sour Cherry Filled Sweet Favor Box

At every Stamp and Chat class, I  provide a little table favor for my customers. They love being surprised with what they find at the table. I usually forget to take a photo and post about it, but this month I remembered!  


I combined the new Sweetest Cherries Bundle with the "You're the Sweetest" sentiment from the retired Little Ladybug stamp set for a darling result.


Using 2" acetate cubes I had on hand (but can be purchased from Amazon), they were filled with Sour Cherry Candies I purchased at my local Safeway store. 


A  belly band strip 1-3/4" x 12" of Pattern Party Designer Series Paper (retired) wrapped the box after it was filled. (It can be slipped off to eat the candies.) It was hand creased at each box edge and overlapped at the bottom and adhered with Stampin' Seal adhesive to itself, but not the acetate box.


Using the two stamp sets above, the Cherry Builder punch, Basic White cardstock, Real Red ink, Parakeet Party ink, and Memento Black ink, plus Amazon purchased Glitter Glue (the best glue ever with a fine tip applicator) these cherries went together pretty quickly. They were attached to the belly band with dimensionals.

Here's a few hints to share:
1) Stamped the greeting prior to gluing the two cherries together.
2) I used the whole cherry stamp twice, so when they were punched out, I'd have something to glue together. (Notice the stamp set above has a partial cherry, I didn't use that one.)
3) I ended up fussy cutting some of the cherry stems because it was hard for me to see the ink color inside the punch. I should have used brown ink for "normal" stems.
4) The stems were sandwiched between the two leaves to hide them.

Current Products List linked to my Online Store for purchase:

This favor idea can be adapted for a variety of party occasions. I encourage you to give it a try!


Please contact me anytime if you have any questions 
or 
stampinwitheva@gmail.com

With love and gratitude,
Thank you for taking the time to comment on my post, you've made my day!

Monday, April 4, 2022

Introducing the Good Feelings Stamp Set

As a demonstrator one of the perks you get is to see the new catalog early and be able to order some of the products. When I do this, I get so excited! I can get a head start of designing cards for all of you! 


I love the new stamp sets I've seen and this Good Feeling Stamp Set #158737 will be available to customers starting May 3rd, when the 2022-23 Annual Catalog goes LIVE! Starting today through Friday, I'll be sharing card ideas using all the stamps in this fun set. 


Today we are starting off with the largest stamp in the set. I love this saying! It is perfect for any occasion really. Get Well, Happy News, A New Job, you get the idea.


Every product I've used in this card will continue into the new catalog except for the Pattern Party Designer Series Paper.  The great thing about card layouts, you can substitute with some new Designer Series Paper that will be in the new catalog.


Tried out the idea of using the Stitched with Whimsy Dies for the inner card liner to add some pizzazz to the inside. These stitching lines give a whole new meaning to "margins"!


Products Used to Make this Card:

#153081 Misty Moonlight Cardstock 5" x 8.5", scored at 4.25" and Ink, plus one scrap 1" x 3"
#155426 Pattern Party Designer Series Paper 4" x 5.25", plus one scrap 5/8" x 3"
 #141416 Flirty Flamingo Cardstock 2-7/8" x 3-5/8"
#159276 Basic White Cardstock 2-5/8" x 3-3/8" and for inner liner 4" x 5.25"
#158737 Good Feelings Stamp Set
#155314 Stitched with Whimsy Dies
#153608 Banners Pick a Punch
#158136 Brushed Brass Butterflies
#151326 Crinkled Seam Binding Ribbon
#159236 Basic White Envelope with matching 2-3/8" x 6" exterior envelope flap

The Corner Rounder I used is a Creative Memories tool that is quite old. If you happen to own the Stampin' Up! Envelope Punch Board, it has a corner rounder built in. You may have another corner rounder in your collection you can use.

Adhesives - #149699 Stampin' Seal, #104430 Dimensionals, and #103683 Glue Dots
Tools - #152392 Paper Trimmer, #103579 Paper Snips, #144107 Take Your Pick Tool, #149653 Full size Cut and Emboss Machine and #147042 Simply Shammy.

I want you as a customer! Purchase the items you need now (except for the stamp set) by copying and then pasting the item number into the search box in my online store. That is the fastest way to navigate the store.  Shop here.

If your order is over $50 please use the host code here to receive an extra gift from me!

If you'd like to watch my Instagram Reel on the making of this card that I posted April 3, 2022, visit this link https://www.instagram.com/stampinwitheva/

I encourage you to come back here to see more fun and easy card layout ideas using the Good Feelings set this week!

Thanks for stopping by!

Thursday, March 31, 2022

Magnolia Double Bridge and Flip Card

Even though the Good Morning Magnolia stamp set retired last June, I just couldn't resist pulling it off the shelf to create with it once again. I have a special occasion coming up for this card later this week. This design is the Double Bridge and Flip card. 

I thought the Magnolia was the perfect focal point and accented the Black and White patterns I used from the current Pattern Party Designer Series Paper. Adding the Basic Black card stock layers gave the card just the POP it needed!

Coloring the Magnolia bloom with Petal Pink and Mossy Meadow Stampin' Blends Alcohol Markers made the flower come to life. The Thinking of You tag accented with a Petal Pink circle, balances the color of the magnolia nicely.

I love to make sure the envelope flap matches the card for an extra touch of class. Paper size 2-3/8" x 6".


Sneak Peek inside below.


The Bridge portion full open to reveal the next layer!


Card front fully open.


Cutting & Assembly Directions:

Thick Basic White cardstock card base cut 5.5" x 8.5", scored at 4.25".On what will be the front of the card you will measure in from each side 1.25". With your paper trimmer you will slit up to the score line to create each side section. This leaves the middle section 3" wide.

With Basic Black cardstock cut four pieces 1" x 4" and one piece 2.75" x 4". Adhere two pieces to their front sections referring to the first photo above. The other two pieces adhere to the inner portion of the card as shown in the fourth photo.

Select three different Black and White patterns from the Pattern Party Designer Series Paper collection.
Cut four pieces 7/8" x  3-7/8" and one piece 2-5/8" x 3-7/8".  Adhere these pieces as shown on the front sections and the inner card sides.

For the Bridge portion - cut one piece Thick Basic White cardstock 1.25" x 5.5" and one piece Basic Black cardstock 1" x 5.5".  Adhere the two pieces together. The Bridge will only be attached to the two front side sections.

With a 4" square piece of Basic White cardstock and using Memento Tuxedo Black Ink, stamp the Magnolia image. Use the matching Magnolia die to cut out with your die cut machine. Color carefully with the Stampin' Blends. Using Dimensionals affix the Magnolia so it only attaches to the bridge and right side section.

With a scrap of Basic White and Petal Pink cardstock, die cut the two circles for the tag. Stamp the greeting using the Memento Black ink. Adhere layers together. Raise with dimensionals on the left side of the bridge. Add the three embellishments. All Done!

Can you keep a secret? This card is for one of my team members who is celebrating her 10th Stampaversary very soon! I'm so happy for her!

Comments about this design are most appreciated. Leave a little love :-)


Friday, March 4, 2022

Picture This Die in Black and White

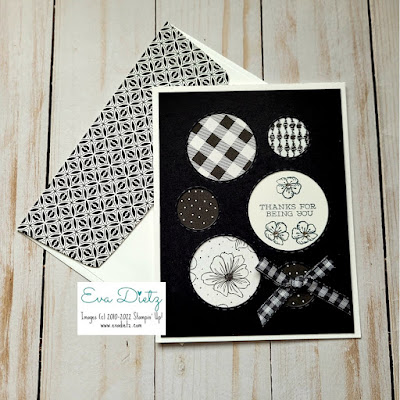
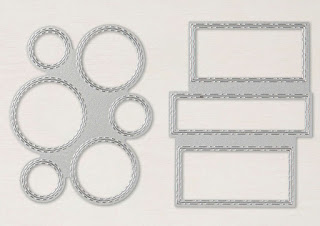
Have you tried the Picture This Dies from the 2021-2022 Annual Catalog? I just love the creative possibilities with these two dies. I have to say I enjoy working with the circle die the most because there are six possible ways to fill the circles versus the three ways to fill the rectangles. These two dies will be a keeper in my stamp room for a long time to come.

The card I'm sharing with you today is a study in Black and White patterns. I was inspired by Robin Armbrecht's design. Using the Pattern Party Designer Series Paper you have a lot of pattern possibilities!


155559 Picture This Dies $34.00 USD

Supplies Used in this Card:

Basic White cardstock card base 5-1/2" x 8-1/2", scored at 4-1/4"

Basic Black cardstock cut 4" x 5-1/4" and die cut with the Picture This Die 
and your Cut and Emboss Machine

A scrap of Basic White for Thank You stamped with the Free as a Bird stamp set and
Memento Tuxedo Black Ink

Pattern Party Designer Series Paper - assorted designs, refer to photo

1/4" Black and White Gingham ribbon tied in a bow and attached with a glue dot.

Rhinestone Jewels for the center of the three stamped flower images.

Adhesives of your choice - glue dots and scotch tape for securing the B&W paper behind the windows so the patterns will show through.

Basic White Envelope with 2-3/8" x 6" piece of matching Designer Series Paper adhered on the exterior flap and trimmed on the edges.

Tools: Take Your Pick Tool, Paper Snips, Simply Shammy, Die Cut Machine

That's all there is to this card. You could make a bunch and use up scraps of a variety of Designer Series Paper for unique-looking cards. Give it a try!

If you'd like to order these products just click on the yellow box below and use the search function in the store - that's the easiest way to find things. Thanks so much!


Thursday, February 17, 2022

Stepped-Up Diagonal Joy Fold Card

Wasn't that Simple Diagonal Joy Fold Card fun to make yesterday? Today's stepped-up version only has one additional layer of die-cut cardstock. Plus the iridescent sequins were placed on the scalloped rectangle instead of the heart. These two small changes sure make the card fancier.

 However, in order to keep the card from becoming too thick to mail, I did not add my closing mechanism to this card. If you have some mini self-sticking velcro, you could cut a small piece and attach them to the upper right corner of the Scalloped Rectangle to keep the card closed. 


The photo below helps you to see how the two pieces of the Flirty Flamingo cardstock are assembled. The two back sections are overlapped and glued together.
 

Products needed to make this card:

Two pieces of Flirty Flamingo Cardstock - cut 4 1/4" x 11 and score both at 5-1/2." Then using the photo as a guide you will cut the triangular front sections by using your paper trimmer cutting channel to line up the top of the scoreline with the opposite diagonal corner. After double-checking, you are well lined up, make the cut with your paper trimmer,  Repeat for the second piece of cardstock. Then burnish your fold lines with your bone folder.  Slide the two card base pieces together to see how the front lines up. When you are happy, then you can adhere the two card backs together.

Two pieces of Pattern Party Designer Series Paper -  cut 4" x 5-1/4", then trim 3/8" off the side that will be next to the fold to get the triangle to fit perfectly with equal borders. Affix each piece to each of the triangle card fronts.

Flirty Flamingo Cardstock - a piece 4-1/4" x 5-1/2" die cut with the largest solid scalloped rectangle die from the Scalloped Contours Dies. Make sure the scalloped rectangle has an even border on all sides of the card front. Hint - you may want to draw a light pencil line on the backside of the rectangle for ease in gluing. Adhere flat to the lower triangle section only.   

Basic White Cardstock - for inner card layer, cut 4" x 5-1/4".

Heart paper piece and sequins from the January 2022 Paper Pumpkin kit or use a heart die-cut to make your own.
Happy and Heartfelt stamp set for the greeting of your choice
Flirty Flamingo ink to stamp the greeting
Raise stamped heart up on dimensionals on the lower front triangle piece.

Make a bow with retired 1/8" gold ribbon or something similar, affix with Glue Dots on the heart as shown.

Cut a matching piece of the Pattern Party Designer Series Paper for your Basic White Envelope flap 
 2-3/8" x 6", adhere with tape runner or liquid glue to the exterior of the envelope flap. When dry, trim off excess.

This Diagonal Joy Fun Fold sure makes a card look fantastic. I hope you'll give both cards a try.

Happy Creating,


#stampinwitheva #paperpumpkin

Wednesday, February 16, 2022

Simple Diagonal Joy Fold Card

If you are a Stampin' Up! Paper Pumpkin Monthly Subscription Kit Subscriber you know you sometimes have leftover pieces that you just don't know how you want to use them. I had a ton of fun with the January 2022 Kit called Kisses and Hugs. From the kit that was supposed to make 9 cards, I ended up with 24 cards. You can see the cards I made in this post by clicking here.

One of the pieces I had leftover was the white heart with a gold border. As I was surfing the internet I spied an idea using the Diagonal Joy Fun Fold. "That's it!" I thought to myself. So I whipped up this card to share with all of you. I hope it inspires you!


Three things to know about this fun fold:

1) The back of this card will be two layers of cardstock thick.

2) When you cut your Designer Series Paper for the card front, you will have enough pieces to make two cards of this fun fold. Come back tomorrow to this blog to see a stepped-up version of this fun fold.

3) I have added a way to close the card. All you have to do is raise the heart up on dimensionals.
Punch 1-1/4" circle out of Poppy Parade. Place it inside the space created by the heart, add some liquid glue to the top half of the circle that is exposed, be careful to not have any spill out and accidentally glue the card shut! then just close the front piece of the card and let it dry.


Products needed to make this card:

Two pieces of Poppy Parade Cardstock - cut 4 1/4" x 11 and score both at 5-1/2." Then using the photo as a guide you will cut the triangular front sections by using your paper trimmer cutting channel to line up the top of the scoreline with the opposite diagonal corner. After double-checking, you are well lined up, make the cut with your paper trimmer,  Repeat for the second piece of cardstock. Then burnish your fold lines with your bone folder.  Slide the two card base pieces together to see how the front has lined up. When you are happy, then you can adhere the two card backs together.

Basic White Cardstock - for inner card layer, cut 4" x 5-1/4"

Two pieces of Pattern Party Designer Series Paper -  cut 4" x 5-1/4", then trim 3/8" off the side that will be next to the fold to get the triangle to fit perfectly with equal borders.

A scrap of Poppy Parade Cardstock for 1-1/4" circle punch for the closing mechanism.
Follow the directions above for how to assemble. 

Heart paper piece and sequins from the January 2022 Paper Pumpkin kit or use a heart die-cut to make your own.
Happy and Heartfelt stamp set for the greeting of your choice
Flirty Flamingo ink to stamp the greeting
Raise stamped heart up on dimensionals on the lower front triangle piece. Only the lower half of the heart receives dimensionals.

Make a bow with retired 1/8" gold ribbon or something similar, affix with Glue Dots on the heart as shown.

Cut a matching piece of the Pattern Party Designer Series Paper for your Basic White Envelope flap 
 2-3/8" x 6", adhere with tape runner or liquid glue to the exterior of the envelope flap. When dry, trim off excess.

Come back tomorrow to view the stepped-up version of this fun fold. I'd love to read your comments if you've ever heard of or made this fun fold before.

Happy Stamping,


#stampinwitheva #paperpumpkin

Thursday, February 10, 2022

Paper Quilt Block Card You Should Try

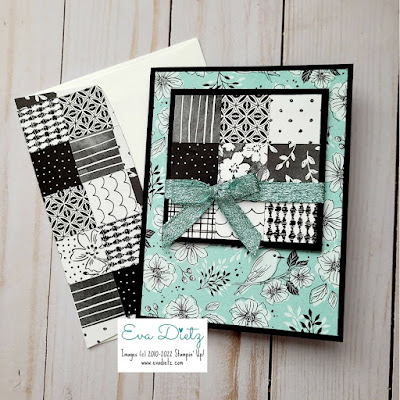
One-inch Designer Series Paper squares are fun to design with. Give it a try!

Here's another one of my creations made during my friend, Lori's Zoom class at the end of January. 


This card can be whatever occasion you want because there is no greeting on the front. The inside is blank for your personal message.

Here's how to make this card:

Cut a good amount of assorted 1" squares from the black and white side of the 
Pattern Party Designer Series Paper.

Cardbase - Basic Black 5-1/2" x 8-1/2", scored at 4-1/4" 
Friendly Hello Designer Series Paper layer cut 4" x 5-1/4" and adhered to the card front
Basic Black 3-1/4" square
Basic White 3" square that you adhere your 1" squares upon.
Adhere the quilt square to the Basic Black square.
Select a matching ribbon and tie it around the two layers ending with a bow on the front.
 Raise on dimensionals and apply to the card front.

Add Basic White inner card layer cut 4" x 5-1/4" and affix inside.

Apply quilt squares to your envelope flap as shown in the photo. Trim off excess.

Voila! You have made a lovely card and matching envelope for whatever occasion you need. 

Come back tomorrow for one more quilt square card, I think you will really love it!

Happy Paper Quilting!


#stampinwitheva #paperquilts

Wednesday, February 9, 2022

Try the One Inch Square Patchwork Technique

Do you like puzzles? Or maybe you are a quilter and love to play with fabric. But did you know you can quilt with paper? You can, and it is totally fun! 

Another demo I hang out with is Lori Perez. She has a nice group of customers that gather online once a month and she invites me to play along. So at the end of January, we played with 1" pieces of Designer Series Paper to make some cards. 

Over the next three days, I'll be sharing what I made during Lori's Zoom time.


I decided I would play with Black and White squares from the Pattern Party Designer Series Paper that is a Host option in the back of the 2021-22 Annual Catalog.

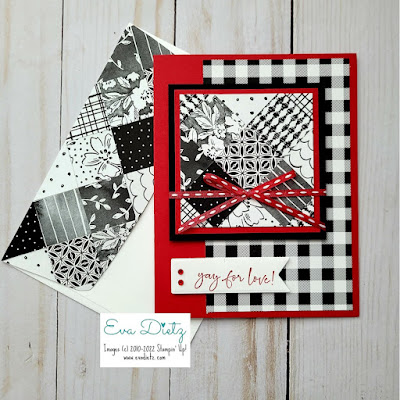
Since I am also a quilter, the idea of turning the square on point seemed like a good place to start. I had one already stamped tag that had Real Red ink on it, so that's the other color I chose for this card.

To build your quilt, start with a 2-3/4" square piece of Basic White. Find the middle of the square and draw a pencil line horizontally and vertically. That line will help you get started gluing your squares down. With this diagonal pattern build from the middle out and then whatever is hanging over the edge of the Basic White, just trim off with paper snips.

Mount the mini quilt on a 3" square of Real Red, and a 3-1/4" square of Basic Black. Wrap the Real Red ribbon around that set and tie a bow on the front.

The Real Red card base was 5-1/2" x 8-1/2", scored at 4-1/4".

The Black and White Gingham paper is 3" x 5-1/4" adhered to the card front.

Then mount the quilt block on dimensionals to the card front.

I added my pre-made tag plus two red rhinestones, raised on dimensionals.

For the inner card, cut a 4" x 5-1/4" piece of Basic White to glue inside.

For the Envelope Flap, measure to find the middle of the flap, make a pencil tick mark, and you'll start by gluing one square on point so it touches the top edge of the flap. Then you'll continue to build out from that square. Trim off all the excess paper from the flap when you are finished with your design.

I hope I've inspired you to give this idea a try. It is a great way to use up some scraps of matching Designer Series Paper you may have been accumulating. I have a bunch, and I bet you do too!

Be creative!


#stampinwitheva #patchworkcards

Monday, January 31, 2022

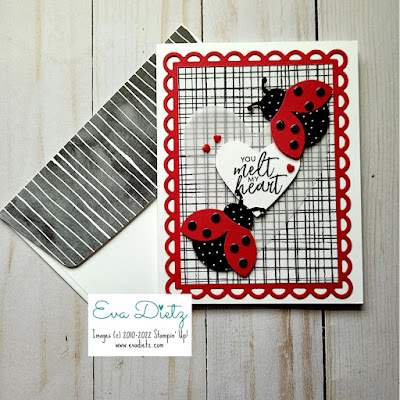
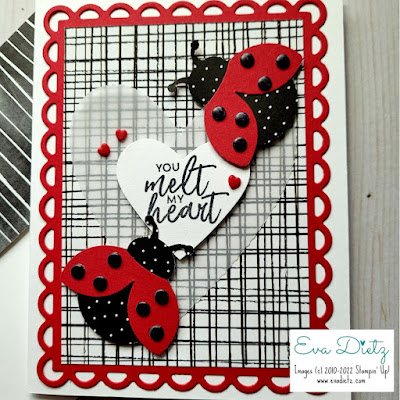
Hello Ladybug Valentine to Melt For

Have you ever caught a ladybug? These Ladybugs are easy to catch and make into a beautiful card. 

Ladybugs are a promise that spring is just around the corner. But in the meantime, they sure make a fun Valentine to give family or friends. This card was inspired by Christie Redding but I made it my own with a different greeting and different black dots on the wings.


Don't you just love the bold color combination of Black, White and RED? It is one of my favorites!


Products used in creating this card:

Basic White cardstock for card base
Real Red cardstock for layer and ladybug wings
Scalloped Contour Dies
Ladybug Builder Punch
Pattern Party Designer Series Paper for plaid layer (3-1/4" x 4-9/16") and ladybug bodies
Cardstock Vellum
Retired Stitched Be Mine Dies
Sweet Ice Cream stamp set for greeting
Memento Tuxedo Black Ink
Retired Heart Punch
Resin Hearts embellishments
Mini and Regular Dimensionals
Paper Trimmer
Take Your Pick Tool
Paper Snips for trimming Vellum Heart
Your favorite Adhesives

Envelope Flap - 2-3/8" x 6" piece of Hand Penned Designer Series Paper


A little story...

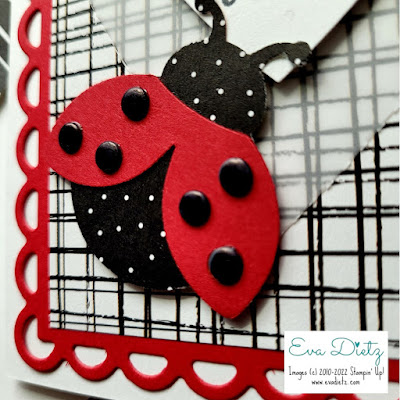
This ladybug's spots are actually very retired flat metal adhesive dots that came in a variety of color families at least 7-8 years ago when I was a newish demonstrator. As the years have passed, I have used a few here and there, but for this class card I needed 12 dots per card and my customers wanted a total of 22 cards over those three class sessions I had last weekend. So I needed 264 dots! I didn't have 264 black dots! So what did I do? I pulled out my black Sharpie pen and started coloring those dots. That worked perfectly! So I solved two problems at once - use up some old dots and create plenty of black ones for those ladybugs! Once again - Sharpies came to the rescue!

I encourage you to give this card layout a try and make it your own! The majority of the products used in this card are current and available at my online store at the yellow box link below.

Happy Stamping!


#stampinwitheva #sudemo

Monday, November 8, 2021

Senior Years Birthday Card

 Do you ever need a sassy birthday card for an "old" friend? This layout would be perfect for you to give! Any Designer Series Paper would work for this layout and it's a good way to use up what you have!

You'll need two card bases - one that's 5-1/2" x 8-1/2", scored at 4-1/4", then a slightly smaller second base that is 5" x 8", scored at 4".


Adhere the 4" x 5-1/4" Designer Series Paper to the larger card front. Using the Layering Ovals Dies cut out the largest oval. Save the cut-out pieces.


Stamp your "lady" from the Senior Years stamp set on a piece of Basic White. Die-cut out with next smallest oval.  On the smaller card front, adhere it to the inside of the larger card base with the fold on the right side. Adhere a 3-3/4 x 4-3/4" piece of Designer Series Paper to the front of the smaller card. Now close the card completely and place your white stamped oval on dimensionals centering it in the largest oval.


Last you'll stamp your sentiment on the inner Basic White layer in Memento Black ink. Then adhere your cut-out front oval to the inside of the smaller card as shown in the photo. Add the small Happy Birthday tag to card front. Add pearl embellishments and you are all set!

Products Use to Make this Card:

Layering Ovals

Petal Pink cardstock 5-1/2" x 8-1/2" scored at 4-1/4"

You're a Peach DSP 4" x 5-1/4"

Die Cut Largest oval our of front

Petal Pink Inner card 5" x 8" scored at 4"

Basic White  with 3" tall oval die cut

Senior Years stamp set with Memento Tuxedo Black Ink for image

raise with dimensionals

Pattern Party striped DSP 4-3/4" x 3-3/4"

Basic White for inside card for message 4-3/4" x 3-3/4"  and glue cut out oval layers from front of main card to inner right flap.

1/2" x 1-1/2" Basic White tag stamped with greeting, then sponge dauber with Petal Pink ink all over.

Add Pearl Jewels to ears and necklace only


So when you have a sassy friend who needs a sassy birthday card, this design is a great choice to make. Give it a try!


#stampinwitheva #sudemo
#stampinup #happybirthdaycard