
Do you like puzzles? Or maybe you are a quilter and love to play with fabric. But did you know you can quilt with paper? You can, and it is totally fun!
Another demo I hang out with is Lori Perez. She has a nice group of customers that gather online once a month and she invites me to play along. So at the end of January, we played with 1" pieces of Designer Series Paper to make some cards.
Over the next three days, I'll be sharing what I made during Lori's Zoom time.
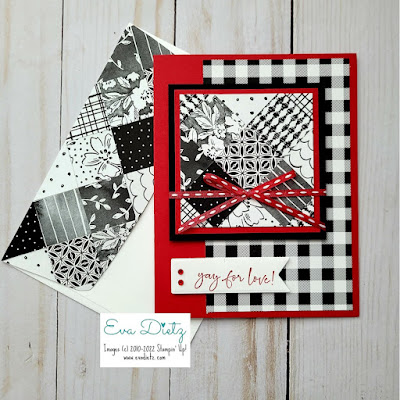
I decided I would play with Black and White squares from the Pattern Party Designer Series Paper that is a Host option in the back of the 2021-22 Annual Catalog.
Since I am also a quilter, the idea of turning the square on point seemed like a good place to start. I had one already stamped tag that had Real Red ink on it, so that's the other color I chose for this card.
To build your quilt, start with a 2-3/4" square piece of Basic White. Find the middle of the square and draw a pencil line horizontally and vertically. That line will help you get started gluing your squares down. With this diagonal pattern build from the middle out and then whatever is hanging over the edge of the Basic White, just trim off with paper snips.
Mount the mini quilt on a 3" square of Real Red, and a 3-1/4" square of Basic Black. Wrap the Real Red ribbon around that set and tie a bow on the front.
The Real Red card base was 5-1/2" x 8-1/2", scored at 4-1/4".
The Black and White Gingham paper is 3" x 5-1/4" adhered to the card front.
Then mount the quilt block on dimensionals to the card front.
I added my pre-made tag plus two red rhinestones, raised on dimensionals.
For the inner card, cut a 4" x 5-1/4" piece of Basic White to glue inside.
For the Envelope Flap, measure to find the middle of the flap, make a pencil tick mark, and you'll start by gluing one square on point so it touches the top edge of the flap. Then you'll continue to build out from that square. Trim off all the excess paper from the flap when you are finished with your design.
I hope I've inspired you to give this idea a try. It is a great way to use up some scraps of matching Designer Series Paper you may have been accumulating. I have a bunch, and I bet you do too!
Be creative!

#stampinwitheva #patchworkcards
No comments:
Post a Comment
Thanks for taking the time to leave me a comment! I appreciate hearing from my readers. If you have a question or anything I can help with please let me know. Have a wonderful day!