Pages

Tuesday, December 8, 2020

10th Anniversary Projects #5 & #6

 Here's an easy gift card holder you can make. Isn't it great how the choice of Designer Series Paper makes all the difference in how a card can look? 


Supplies for Plaid Card:
Cherry Cobbler Cardstock and Ink
Shaded Spruce Cardstock
Whisper White Cardstock
Memento Tuxedo Black Ink
Gift Wrapped Stamp Set
Gift Bow Builder Punch
Wrapped in Plaid Designer Series Paper (DSP)
Perfectly Plaid Stamp Set
Pine Tree Punch
Largest Square/Stitched Shapes Dies
Cut & Emboss Machine
Stampin' Seal adhesive
1-1/2" Circle Punch
Tear and Tape
Dimensionals
Gilded Germs


Cutting Dimensions for Both Gift Cards:
Cardstock Base: 4-1/4" x 11", scored at 5-1/2" and 9"
DSP or Whisper White Inner Liner - 4" x 5-1/4" 
Plaid DSP strip - 3/4" x 5-1/4"
Scrap for punched Pine Tree

Front of Card: Plaid DSP or Whisper White 3-1/4" x 4"
Feels like Frost DSP layer 3" x 3-3/4"
Scrap for Gift Bow about 2-1/4" Square
Whisper White 2-1/4" Square
2-3/4" square for Stitched Shape Square Die


Supplies for Feels like Frost DSP:
Balmy Blue Cardstock and Ink
Whisper White Cardstock
Feels Like Frost 6 x 6 Designer Series Paper Stack
Gift Wrapped Stamp Set
Gift Bow Builder Punch
Memento Tuxedo Black Ink
Highland Heather Blends Markers
Largest Square/Stitched Shapes Dies
Cut & Emboss Machine
1-1/2" Circle Punch
Blue Adhesive Backs Gems
Snowflake Sequins
Dimensionals
Tear and Tape
Stampin' Seal adhesive


These Gift Cards are fast to make. You can do a bunch at a time and use up retired holiday Designer Series Paper if you so desire. 

If you would like to order any of these items, just visit my online store at the link below
and search for the item names and they will come right up. Sign up for a free account and select your demonstrator and you will be all set!


Thanks for stopping by and I hope your holiday plans are taking shape nicely!


Sunday, December 6, 2020

10th Anniversary Project #4

Here's a fun way to use the Mini Paper Pumpkin box in the Annual Catalog for your gift giving needs. I cased this idea but didn't write down the designer. So Sorry, if this is your design please let me know. I want to give you credit.


Supplies used:
Mini Paper Pumpkin box
Coming Home Stamp Set with Memento Black Ink
2" Circle Punch
Home Together Dies for house and tree
Crumb Cake cardstock for tree
Whisper White for house
House and Gingerbread person raised with mini Dimensionals.
Little Gingerbread person fussy cut from last year's Yummy Christmas stamp set. Then colored with the Ivory Blends Markers.
24" piece of 3/8" Cherry Cobbler retired ribbon from last year's Holiday catalog.


The box holds two Mrs. Fields Chocolate Chip cookies from the Dollar Tree store. You get 3 cookies for $1, but two fit best to enable the box to close.  The box has a inner coating to make it food safe.

Thanks for stopping by to see this cute gift box. I love to read your comments, just click on the linked box below.


Have a blessed day!


Holiday One Sheet Wonder Part 2

Welcome Back for the second half of our One Sheet Wonder Holiday Cards 8-14.
If you need to refer to the 12 x 12 DSP Cutting Diagram, it was part of yesterday's post.


Card 8:

Very Vanilla Card Base 5-1/2” x 8-1/2”, scored at 4-1/4”

Mossy Meadow Layer 1-3/4” x 4-1/4”

DSP 1-1/2” x 4”

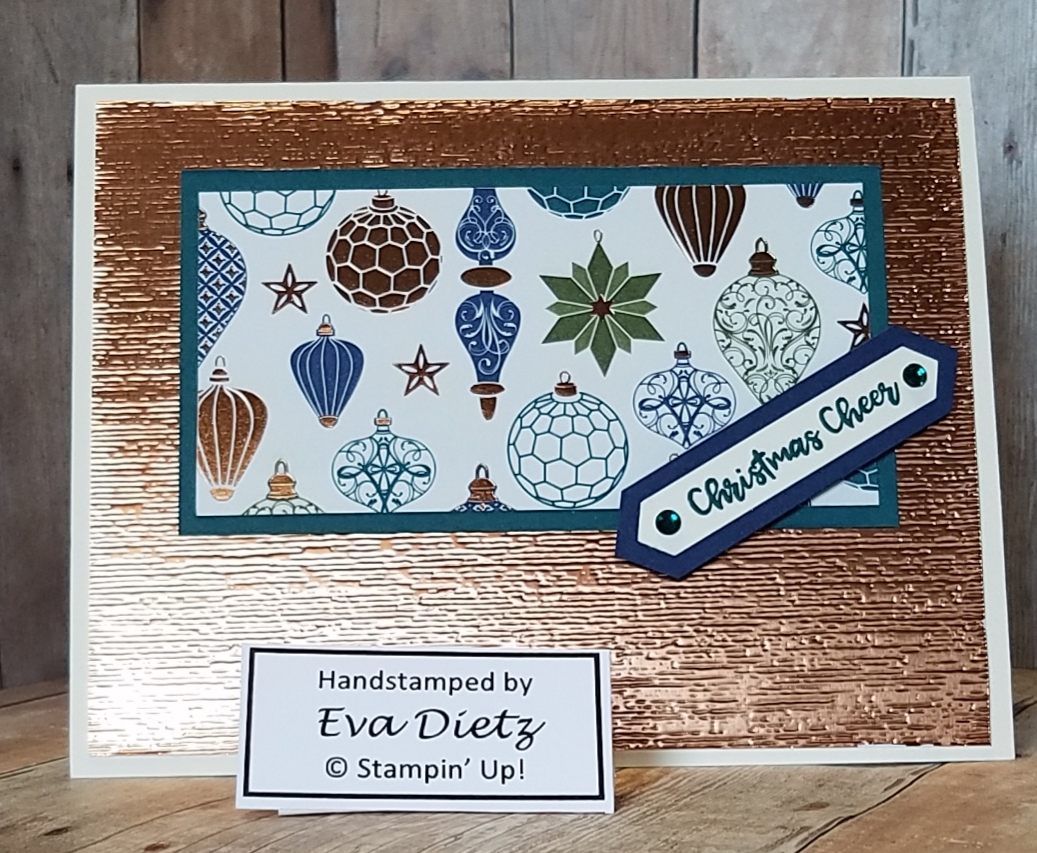
Copper Foil 2-1/4” square

DSP 2” square (Raised on Dimensionals)

Itty Bitty Christmas Stamp Set stamped with Mossy Meadow Ink

2 Rhinestones


Card 9:

Very Vanilla Card Base 5-1/2” x 8-1/2”, scored at 4-1/4”

Copper Foil 4” x 5-1/4”

Embossing Folder of your choice

Pretty Peacock Layer 2-1/4” x  4-1/4”

DSP Layer 2” x 4”

Very Vanilla punched with Classic Label Punch

Itty Bitty Christmas Stamp Set stamped in Pretty Peacock Ink

Mount on Night of Navy and trim edges to match photo

(Raise Tag on Dimensionals)

2 Rhinestones


Card 10:

Very Vanilla Card Base 5-1/2” x  8-1/2”, scored at 4-1/4”

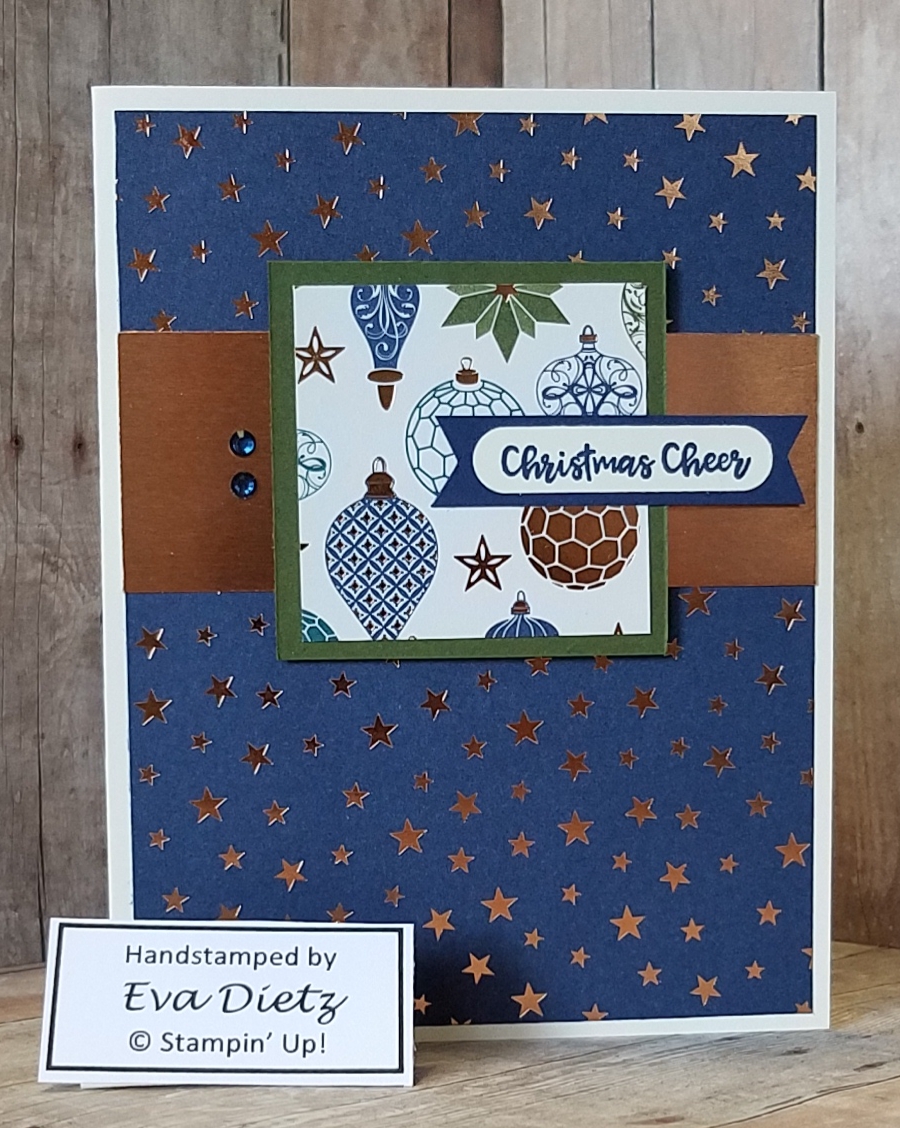
DSP Layer 4” x 5-1/4”

Copper Foil 2-1/4” x 5-1/2”

DSP Layer 3” x 4-1/2”

Night of Navy Tag 1-1/2” x 4-1/4”

Very Vanilla Tag 1-1/4” x 5”

Wrapped in Christmas Stamp Set stamped in Night of Navy Ink

Raise Tag with Dimensionals


2 Rhinestones


Card 11:

Very Vanilla Card Base 5-1/2” x 8-1/2”, scored at 4-1/4”

Mossy Meadow Layer 3-1/4” x 4-3/4” cut diagonally

DSP Layer 3” x 4-1/2” cut diagonally

Perfectly Plaid Stamp Set stamped in Mossy Meadow Ink

4 Rhinestones


Card 12:

Very Vanilla Card Base 5-1/2” x 8-1/2”, scored at 4-1/4”

Pretty Peacock Layer 4” x 4-3/4” cut diagonally

DSP Layer 3-3/4” x 4-1/2” cut diagonally

Pretty Peacock Tag 1-1/2” x 2-1/8”

Copper Foil punch with Rectangular Postage Stamp Punch

Very Vanilla Tag 1” x 1-5/8”

Itty Bitty Christmas Stamp Set stamped in Pretty Peacock Ink

Raise Tag with Dimensionals

2 Rhinestones


Card 13:

Very Vanilla Card Base 5-1/2” x 8-1/2”, scored at 4-1/4”

DSP Layer 4” x 5-1/4”

Copper Foil 1-1/2” x 4”

Mossy Meadow Tag 2-1/4” square

DSP Layer 2” square

Tag Raised with Dimensionals

Night of Navy Tag

Very Vanilla punched with Word Window

Itty Bitty Christmas Stamp Set stamped in Night of Navy Ink

Adhere small tag flat to 2” square raised tag

2 Rhinestones


Card 14:

Very Vanilla Card Base 5-1/2” x 8-1/2”, scored at 4-1/4”

Copper Foil 4” x 5-1/4”

Embossing folder of your choice

Night of Navy Tag 2-1/4” x 3”

DSP 2” square

Very Vanilla Tag 5/8” x 2”

Itty Bitty Christmas Stamp Set stamped in Night of Navy Ink

Tag Raised with Dimensionals

2 Rhinestones


Well, there you go! Happy Cardmaking!

I love reading your comments, just click the link below.


Have a fabulous Sunday!


Saturday, December 5, 2020

Holiday One Sheet Wonder Part 1

Taking a weekend break between Holiday Gift packaging to share today and tomorrow a One Sheet Wonder project where you can make 14 cards from one sheet of 12x12 Designer Series Paper. 

I used the Brightly Gleaming Specialty Designer Series Paper for this, but you can use whatever you have. You don't have to make Christmas cards like I did, you can do a bunch of Birthday cards, etc. I was inspired by Debbie Henderson's ideas, but have made them my own.


Here's a picture of the 12 sides of the Brightly Gleaming Specialty Designer Series Paper.
In directions - referred to as DSP.

Designer Series Paper Cutting Diagram


Card 1: 

Very Vanilla Card Base 5-1/2” x 8-1/2”, scored at 4-1/4”

Night of Navy Layer 2-1/4” x 5-1/4”

DSP Layer 2” x 5”

Itty Bitty Christmas Stamp Set done in Night of Navy Ink

2 Holiday Rhinestones


Card 2:

Very Vanilla Card Base 5-1/2” x 8-1/2”, scored at 4-1/4”

2 pieces Night of Navy 1-1/2” x 5-1/4”

2 pieces DSP 1-1/4”” x 5”

Wrapped in Christmas Stamp Set Stamped on Very Vanilla 1-1/2” Circle Punch with Night of Navy Ink

Night of Navy 1-3/4” Circle Punch

Mossy Meadow 2” Circle Punch

Raise Circle Layers/ Greeting on Dimensionals

2 Rhinestone Jewels


Card 3:

Very Vanilla Card Base 5-1/2” x

8-1/2”, scored at 4-1/4”

2 pieces of Night of Navy

2-1/4” x 2-3/4”

2 pieces of DSP 2” x 2-1/2”

2-1/4” square Copper Foil

DSP 2” x 2” (Raise center square on Dimensionals)

Wrapped in Christmas Stamp Set stamped with Night of Navy Ink

2 Rhinestone Jewels


Card 4:

Very Vanilla Card Base 5-1/2” x 8-1/2”, scored at 4-1/4”

Night of Navy Layer 2-3/4” x 5” cut diagonally

DSP Layer 2-1/2” x 4-3/4” cut diagonally

Copper Foil 1-3/4” x 2-3/4” 

Very Vanilla 1-1/2” x 2-1/2” (Raise center rectangle on Dimensionals)

Wrapped in Christmas Stamp Set stamped with Night of Navy Ink

2 Rhinestone Jewels


Card 5:

Very Vanilla Card Base 5-1/2” x  8-1/2”, scored at 4-1/4

Copper Foil 4” x 5-1/4”

Embossing Folder of your choice, I used Tin Tile  Folder

Pretty Peacock Layer 3-1/4” square

DSP Layer 3” square

Pretty Peacock 1-1/2” x 2-1/8”

Rectangular Postage Stamp Punch in Very Vanilla (Tag raised on Dimensionals)

Perfectly Plaid Stamp Set

Pretty Peacock Ink


2 Rhinestones


Card 6:

Very Vanilla Card Base 5-1/2” x 8-1/2”, scored at 4-1/4

Copper Foil 4” x 5-1/4”

Embossing Folder of your choice

Mossy Meadow Layer 3-1/4” square

DSP Layer 3” square

Night of Navy Tag 3/4” x 2-3/4”

Very Vanilla Tag 3/8” x 2-1/2”

(Tag raised on Dimensionals)

Wrapped in Christmas Stamp Set

Night of Navy Ink

1 Rhinestone


Card 7:

Very Vanilla Card Base 5-1/2” x    8-1/2”, scored at 4-1/4”

Pretty Peacock Layer 1-3/4” x 4-1/4”

DSP 1-1/2” x 4”

Wrapped in Christmas Stamp Set

Pretty Peacock Ink

2 Rhinestones


Come back tomorrow for Cards 8-14!


I love to read your comments, please click the link above.

Have a fabulous day!


Thursday, December 3, 2020

10th Anniversary Projects #3

 I did a direct CASE of Karin's Papercrafts Window Box Project because it was so cute, I just had to try it for myself. I did select different patterns from the same package of Heartwarming Hugs Designer Series Paper that she used. So now you have two looks to decide between.


Here is Karin's Papercrafts You Tube Video - Why mess with greatness? Her idea was genius!


Thanks for stopping by today for another gift giving option to use during this holiday season.


Wednesday, December 2, 2020

10th Anniversary Projects #1 and #2

My 10th Stampaversary Event got caboshed by pandemic changes in my state, so I thought I would share my Holiday Gift projects here with you. I will share all 10 projects over the next week or so. It's not too late to make some for yourself to give friends and co-workers.


Project #1 - is a Dollar Tree Candle with the scent of Hot Cocoa and Cream. I thought a mug tag would be appropriate. The two stamp sets I used are retired but maybe you have them in your collection - Hug in a Mug and Cup of Christmas, along with Cup of Cheer Dies.

The Supplies are: Cinnamon Cider Ink and Cardstock, Whisper White Cardstock, Real Red ink, and 20" of 1/8" All the Trimmings Ribbon Combo Pack in Real Red. I used Multipurpose Liquid Glue, and a non SU Slot Hole Punch to thread the ribbon through the tag to tie around the candle lid.


Project #2 - A Belly Band for the 3 x 3 Acetate Box, that I filled with 6 Reese's Peanut Butter Cups but you can fill the container with whatever holiday candy you like best. I was inspired by multiple Demos for this stocking stuffer project.

The materials I used were - Garden Green Cardstock, Retired Santa's Workshop Designer Series Paper (DSP), Everything Essential Stamp Set, Essential Tag Punch, Gray Granite Ink, one Red Rhinestone, and  20" of non SU 1/8" satin ribbon.

Belly Band Cutting and Scoring Measurements:
Garden Green Cardstock - 2-1/4" x 11", scored at 3-1/8", 3-7/8", 7" and 7-3/4"
Santa's Workshop DSP - 2" x 11", scored at intervals of 3-3/16" and 13/16" and repeat one more interval set.

I used Tear and Tape to affix both layers to themselves after they were wrapped around the acetate box. That way they would slide easy off and on the box. Then the tag was stamped, hole punched with a normal hand held 1/4" hole punch and the red ribbon was tied around the filled box. So Cute!


I hope you have enjoyed these two easy projects. Many of the materials are available to order at my online store at www.evadietz.stampinup.net

I'd love to read your comments, so please share your thoughts about these projects.


Happy Start of December! Happy Crafting! Thanks for visiting!


Tuesday, December 1, 2020

Reminder to Sign Up

Don't miss out on the December Paper Pumpkin Kit. Sign up today!
12 cards and matching envelopes!