Pages

Showing posts with label stitched so sweetly dies. Show all posts

Tuesday, February 1, 2022

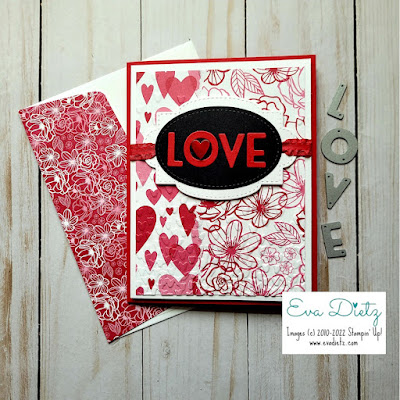
You Are Going To LOVE This Card

 Need a Valentine? How about an Anniversary Card? Maybe even a Wedding Card? This card layout solves this problem with whatever occasion you need it for.

Even though the layout looks simple, there are some interesting techniques and tricks in this card. Let's take a closer look by viewing all the photos below.

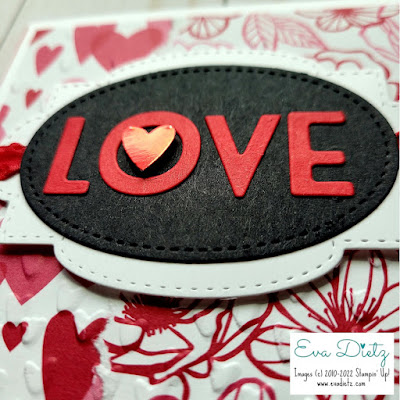
You can really spell any four-letter word with the Playful Alphabet Dies. They die cut so easy. A little liquid glue on the back and they will be dry in no time. I used a little piece of washi tape as my ruler to set the letters against as I glued on the black oval. There is also a trick of starting in the middle of your tag and working your way out to the edges. So I glued the O and V down first, then the L and E so the word would be centered in the tag.


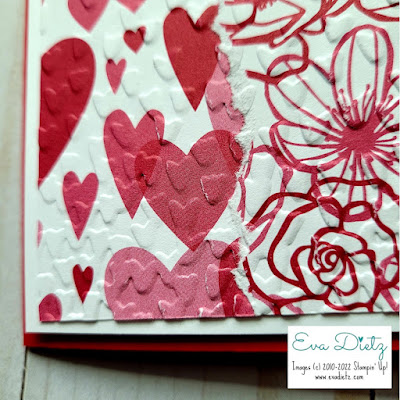
See the Details! Close up of torn edge technique, the two sides of Designer Series Paper showing, and then finishing off with the retired Falling Petals embossing folder for some texture and dimension.


Close up of the "LOVE" tag with the raised Red Foil Heart.
Using a regular hole punch, punch two holes one at each tab of the Stitched So Sweetly Dies cut from Basic White cardstock. Thread the ribbon from the back to the front then wrap the ends around the attached Designer Series Paper and Basic White layers, then scotch tape the ribbon ends to the back side before raising the double layers up with dimensionals from the card front.


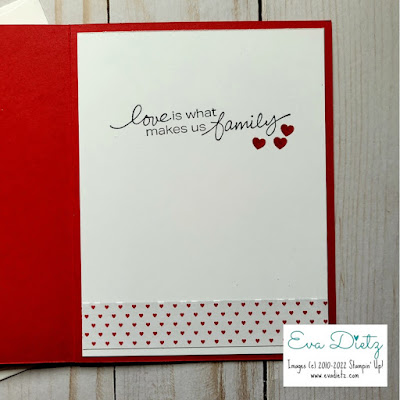
Problem Solved! I managed to stamp the greeting crooked, but I think I rescued it with the mini hearts stamped in Real Red ink to balance it all out!

Products used to create this card:

Real Red cardstock base 5-1/2" x 8-1/2", scored at 4-1/4"
2 pieces Basic White cardstock layer cut 4" x 5-1/4" (outer and inner layers) and extra for tag
Basic Black scrap for oval tag
Retired All My Love Designer Series Paper: 1 piece 3-3/4" x 5", 
a second piece for the torn edge effect 2-1/4" x 5"
Retired Falling Petals embossing folder
Die Cut Machine
Retired 3/8" Real Red mini ruffled ribbon
Paper Hole punch
Retired Stitched Shape Dies
Retired Playful Alphabet Dies
Stitched So Sweetly Dies
Retired Triple Heart Punch
Retired Red Foil
Lovely You stamp set in Memento Tuxedo Black ink
Cherry Cobbler ink for the mini heart stamp (use whatever you have)
Adhesives, Paper Trimmer, Paper Snips and other Tools you like
Feel free to add a 3/4" strip of any coordinating Designer Series Paper at the inner bottom of your card.
Don't forget to cover your envelope flap too! 2-3/8" x 6" glue to 
the outside of the flap and trim off the excess.

All done and ready to share with family or friends!

Don't forget to snatch up my free 14 card tutorial when you subscribe to my email list HERE!


#stampinwitheva #stampinup

Wednesday, January 13, 2021

Sharing An Original Design with You!

Welcome, I am glad you stopped by! I had so much fun creating the two cards I'm sharing today! These original designs use products in the new January-June Mini Catalog and the 2020 Annual Catalog.

First up is a baby card made Kangaroo & Company stamp set and Kangaroo Dies. The dies cut the slit in the kangaroo pouch so you can make an interactive card. That bunch of hearts can be pulled up and reveal "Just for You" on the tab that holds it in the pouch. So clever! Stampin' Up! hasn't done anything like this that I remember in the 10 years I have been a demonstrator. So Fun!


Inside the card, I went ahead and stamped the greeting and added the baby kangaroo. In my head I keep thinking Kanga and Roo from Winne the Pooh, but I know they aren't. They just remind me of my childhood when I would read and listen to all things Disney.

Don't forget to stamp the envelope! Either the back flap or the lower left front corner. 
Makes the set complete!


Here's the Products I used with Links provided to my 
Stampin' Up! Online Store so you can online shop with me.

Peaceful Moments stamp set for greeting
Soft Suede cardstock  4-1/4" x 11", scored at 5-1/2"
Petal Pink cardstock 4" x 5-1/4"
Woodgrain In Good Taste Designer Series Paper 3-3/4" x 5"
Pink "Blanket" In Good Taste Designer Series Paper 2-3/4" x 4"
Basic White cardstock for kangaroo, balloon, and card liner
Love You Always Foil Sheets small amount for balloons
Memento Tuxedo Black Ink

Stampin' Blends pens in the following colors:


Non Stampin' Up! items - 1/8" Red Satin Ribbon, 
scotch tape to secure the twine to the back of the balloon.


Here's the bundle below


Up Close of the Stamp Set


So I hope you've fallen in love with this baby card. I enjoyed designing it for you.
Whomever you made it for would keep it forever and display it in a special place!

I'd love to read your comments about this card design. Just click the link below to add your comments.


I'd love you have you as a follower, just click "Follow" over in the right margin. Or Sign up for my email list, to get emails about what is going on here and with Stampin' Up!

Thanks so much for stopping by today. I hope you'll come back again soon!

Friday, November 20, 2020

Gift Wrapped Gift Card Holders

Here's an easy Gift Card Holder using Plaid Tidings Designer Series Paper and the Gift Wrapped Stamp set with Bow Punch. I was inspired by Jan Musselman's design. However, you can take whatever you have in your holiday paper stash and crank these gift card holders out very quickly. Your gift recipients will be thrilled to receive this fun fold card.


Inside View

Cutting Dimensions:
Card Base - Crumb Cake - 4-1/4" X 5-1/2"
Layer - Shaded Spruce  - 4" x 5-1/4"
Layer - Plaid Tidings DSP - 3-3/4" x 5"

For Gift Card Top Section:
Cherry Cobbler - 3-1/8" x 10-1/2", score at 4-1/4" and 8-1/2"
Strip of Plaid Tidings 1" wide x 3-1/4" adhered to Whisper White prior to die cutting
Stitched So Sweetly Dies - Scalloped Rectangle with Whisper White 3-1/4" x 4-1/4"
Then emboss with Tasteful Textures Embossing Folder
Shaded Spruce 2-1/2" square for Bow stamp in Memento Ink and punched out. Raise with Dimensionals and add Rhinestones.

For Gift Card Liner:
Whisper White 2-7/8" x 4", stamped as shown with Cherry Cobbler and Shaded Spruce inks
For Gift Card Pocket front -  Plaid Tidings DSP 1-3/4" x 2-7/8" then punch out small section with 1-3/4" circle punch. Then use Tear and Tape to affix pocket closed along both side seams.


Close up to see the Tasteful Textures Embossing Folder on the front.

Products used in today's Project can be purchased at my online store by clicking the photo link. 
1-3/4" Circle Scallop Punch
[119854]
$18.00
Paper Snips
[103579]
$10.00

Need a card? Ask me and I can create one for you. I do custom orders too. Sign up for my email updates in the right margin if you'd like to hear about new tips and product samples. Have a Blessed Day!


Wednesday, November 11, 2020

Peony Diorama Card CASE

Have you ever made a Diorama card? I hadn't, so that is why I CASED this card by the talented Patty Bennett. I only changed up the greeting on the front. I don't use the color Merry Merlot often enough, so this card gave me another excuse to work with it. I also love the "messy" sponging technique that is so easy to do.

To cut the card base, you'll need a piece of Merry Merlot that is 5-1/2" x 10-3/4". On the long side, score it at 3-5/8", 6-7/8", 7-1/4" and 10-1/2". Run a piece of Tear and Tape next to the 10-1/2" score line and the edge of the cardstock. With your bone folder, fold on each score line and crease well. 

Then grab the Peony Dies and use the scalloped edge die to run through your die cutting machine on the starting edge. Select the Layering Square Dies and use the 2-1/2" scalloped square to die cut where you want the "diorama window" to be. Then cut another scalloped square from Whisper White.


Cut a piece of Whisper White for the card front 3-1/4" x 5-1/2", then die cut the same scalloped edge as you did on the Merry Merlot.

Using the Stitched So Sweetly Dies, cut a scalloped rectangle that measures 2" x 3-1/8" from a piece of Whisper White. 

Using the Prized Peony stamp set and the verse "Thinking of You" from the Good Morning Magnolia stamp set, it's time to start stamping! 

Piece #1 - Scalloped Rectangle, using Merry Merlot ink, stamp two individual peony blooms and the greeting.

Piece #2 - Card Front on Whisper White - randomly stamp the larger Peony flower with leaves in Memento Tuxedo Black ink. Then with a sponge dauber and Merry Merlot ink, lightly sponge the flowers as shown. Accent with Cherry Cobbler ink. With your Just Jade Stampin' Blends pens, color the leaves.

Piece #3 - Stamp the larger Peony flower on a 3-1/4" x 3-3/4" piece of Whisper White in Memento Tuxedo Black ink. Repeat the sponge dauber technique on the flower, finishing with the Just Jade Stampin' Blends pens on the leaves. Die cut out with the Peony Die.

Piece #4 - Stamp your inner greeting on the scalloped square in Merry Merlot ink, making sure to stamp it on the top half of the square.


Now it's time to assemble all the pieces. Start by removing the Tear and Tape and create the diorama window for the card inside. 

Adhere the scalloped square inside the window, while you are holding the card open at 90 degrees like shown above. 

Practice positioning the peony, then note where you need to apply adhesive, so you won't accidentally get any adhesive too high on the flower.

Adhere the card front, then finish by raising the scalloped rectangle up with Dimensionals. If you so desire, you may use a Wink of Stella pin to add a shimmer effect on the inner peony.

Now you have a gorgeous card to give to someone special! All of the products used can be purchased through my online store just CLICK HERE.


“Life is good when you are happy, 
but much better when others are happy because of you.” (by Pope Francis)

Thanks for stopping by today. Don't forget to sign up for my email list in the right column, too!