Pages

Tuesday, February 9, 2021

Valentine's Week of Cards #2

I have been so in love with the True Love Designer Series Paper in the Jan.-June 2021 Mini Catalog, I just had to make a friendly Valentine.  Isn't the Black, White & Red beautiful together?

This original card is very easy to make 6 pieces of paper, stamp, ink, one punch and ribbon!


Here's the Products and Sizing for Today's Card:

Smoky Slate cardstock, cut 4-1/4" x 11", scored at 5-1/2"

Basic White inner layer - 4" x 5-1/4"

retired - B&W stripe from Sale-a-Bration Golden Honey Specialty Designer Series Paper 
from last year  - 4-1/4" x 3"

Basic Black cardstock cut 3-1/4' x 4-1/4"

True Love Designer Series Paper cut  3" x 4"

Scallop Heart Punch from Heart Punch Pack

retired - From My Heart Designer Series Specialty Paper to punch out the heart

Greeting from Heartfelt stamp set

Memento Tuxedo Black ink for greeting

retired - 3/8" Real Red Organza Ribbon

adhesive and dimensionals

-----------------------------------------------------------


Thanks for stopping by my blog today. Happy Stamping!
 

If you enjoyed this post, please be sure to…

Leave a comment, I love to read them! 

You Bet! I’ll Be a Follower of this Blog

Sure I’ll Connect with your Newsletter and Receive a FREE PDF tutorial

Yes!  I’m Ready to Shop to Earn Loyalty Points for FREE Products!

Stop by Facebook to Visit homemadewithheartstampinwitheva       

See What I’m Up to on Instagram at stampinwitheva

Discover My Pinterest Boards at Homemade with Heart—Stampin’ with Eva

Watch Informative You Tube Videos at Homemade with Heart-Stampin' with Eva  

Buy on Etsy at homemadewithheartUS

Monday, February 8, 2021

Valentine's Week Worth of Cards #1

Valentine's is almost here! This week I'll be sharing some cards I made for you to celebrate the holiday. I used some retired products, but the layout ideas are good forever!

This card idea was inspired by Nedine Hunter DuPree.

In case you have some of this wonderful, retired All My Love Designer Series Paper
 in your collection, here's what I used to create today's card:

Flirty Flamingo, Blushing Bride, and Basic White Cardstock
Meant To Be stamp set
Real Red ink
retired Red Foil
Heart Punch Pack
Layering Squares Dies
non-SU 1/8" satin ribbon
Resin Heart embellishments
glue dots and dimensionals
die cutting machine

Cutting Dimensions:
Card base 5-1/2" x 8-1/2", scored at 4-1/4", then trim off 1/16" from 
the card front to allow the heart flap to lay down when attached. 
Designer Series Paper - 4" x 5-1/4" and scrap to punch heart.
Basic White inside card layer - 4" x 5-1/4" 
Red Foil scrap to punch scalloped heart
3-1/4" squares for the Blushing Bride square and the Flirty Flamingo scalloped square die cuts

The part you can't see is you'll need a  piece 2-3/4" x 3-3/4" of Flirty Flamingo with a 1" score across the 2-3/4" width, so you can adhere that 1" section to the card base inside, which will then be covered with the Basic White inner card layer. The remaining piece will be what you adhere the scalloped square layer to after you have assembled the 2 heart layers. and the Blushing Bride square.


Thanks for stopping by today. Happy Stamping! Come back tomorrow!

If you enjoyed this post, please be sure to…

Leave a comment, I love to read them! 


You Bet! I’ll Be a Follower of this Blog

Sure I’ll Connect with your Newsletter and Receive a FREE PDF tutorial

Yes!  I’m Ready to Shop to Earn Loyalty Points for FREE Products!

Stop by Facebook to Visit homemadewithheartstampinwitheva       

See What I’m Up to on Instagram at stampinwitheva

Discover My Pinterest Boards at Homemade with Heart—Stampin’ with Eva

Watch Informative You Tube Videos at Homemade with Heart-Stampin' with Eva  

Buy on Etsy at homemadewithheartUS

Thursday, February 4, 2021

Berry Blessings Stamps and Berry Delightful Designer Series Paper are Awesome!

 Continuing with the Berry theme from yesterday's blog post which I hope you enjoyed - today we have raspberry and blueberry card designs for you!  The raspberry design is an original.


A peek of the card opening for you.


Here's the Products used in the Raspberry Card and are available to purchase at my online store:

Blackberry Bliss cardstock cut at 5-1/2" x 7", scored at 2-3/4" 
plus a 3-1/2" square scored at 3/4" to create the flap which is secured to the base before adding the Basic White inner layer

Basic White inner layer 4" x 5-1/4"

Berry Delightful Designer Series Paper - 2-1/2" x 5-1/4" for left front panel, 
plus 2-1/2" x 3-1/4" for front flap

Granny Apple Green and Basic White cardstock die cut with the Stitched So Sweetly Dies, then stamped with Blackberry Bliss ink with greeting from the Sweet Strawberry stamp set

Blackberry Bliss and Granny Apple Green inks for stamping the raspberries 
on scraps of Basic White and fussy cutting out

Retired Blackberry Bliss Faceted Dots

Paper Snips, Dimensionals and Seal adhesives

----------------------------------------------

This Blueberry Card was inspired by many fellow demonstrators - a compilation of many great ideas.

I had in my stash some retired Blueberry Bushel cardstock and wanted to try it out on this design. 

Items also used in the making of this card:

 Berry Delightful Designer Series Paper (DSP) cut 4'x 5-1/4"
Second largest Stitched So Sweetly dies cutting the 3" x 4" DSP piece
2" circle punch from  Basic White stamped with a greeting from Berry Blessings stamp set
Linen thread wrapped around DSP twice
 Pacific Point and Garden Green inks for tag and fruit
 The blueberries and leaves image were fussy cut out. 
Dimensionals were used to raise up the circle and fruit/leaves layer.


Below is the Sale-a-Bration freebie when you order $100 of products before shipping and tax. 
It is such a gorgeous set of Berry Blessings stamp set and Berry Delightful Designer Series Paper.


So will you be making these cards soon? I hope so, they are so fun to create!

Thanks for stopping by and have a day full of happiness!

If you enjoyed this post, please be sure to…

 Leave a comment, I love to read them! 

You Bet! I’ll Be a Follower of this Blog

 Sure I’ll Connect with your Newsletter and Receive a FREE PDF tutorial

Yes!  I’m Ready to Shop to Earn Loyalty Points for FREE Products!

Stop by Facebook to Visit homemadewithheartstampinwitheva       

See What I’m Up to on Instagram at stampinwitheva

Discover My Pinterest Boards at Homemade with Heart—Stampin’ with Eva

Watch Informative You Tube Videos at Homemade with Heart-Stampin' with Eva  

Buy on Etsy at homemadewithheartUS

Wednesday, February 3, 2021

Sweet Strawberry Bundle & Berry Delightful Designer Series Paper

The minute I saw the Sweet Strawberry Bundle in the Jan.-June 2021 Mini Catalog and then saw the Berry Blessings stamp set and Berry Delightful Designer Series Paper in the Jan-Feb. 2021 Sale-a-Bration brochure I knew I HAD to have them both, because they reminded me of SUMMER, my GARDEN area, and the Triple Berry Cherry Yogurt that I adore to eat in June and July.

I grow strawberries in part of my raised garden beds that my wonderful hubby built for me about 5 years ago. They are the two far right beds. At the far left are blueberry and raspberry plants. So when summer comes each year, I love having a breakfast that includes filling a bowl with home grown sliced strawberries, blueberries, and raspberries that I've mixed with Dannon Greek Light & Fit Cherry flavored yogurt. YUMMMM! 


Sweet Strawberry Bundle (above)
 

Level 2 Sale-a-Bration Reward for a $100 order before shipping and tax.
Berry Blessings Stamp Set
Berry Delightful Designer Series Paper


The Triple Strawberry card layout was inspired by Su Mohr, but I changed it up a bit with using the strawberry piece of the Designer Series Paper behind the largest Stitched So Sweetly rectangular scalloped die. Then I used the Basic Black Stampin' Write Marker to highlight the "seeds" on the three strawberries.

Additional supplies included Garden Green card base, Garden Green ink, Poppy Parade ink, the third largest Stitched So Sweetly rectangular scalloped die in Basic White along with the Sweet Strawberry Bundle.


Multiple Demonstrator's have shared their Corner Flip cards online lately, and since I had never tried one, I decided to use the Strawberry "collection" to make a couple. As you'll see below, what a difference in how a card looks when you flip the same sheet of Designer Series Paper over! LOL!  It just depends on what look you desire.


These two cards above are not too hard to make, but there is a trick to conserve Designer Series Paper (DSP) and get the side you want to show cut correctly!

1) Start with a 5-1/2" x 8-1/2" card base, score at 4-1/4".

2) With a ruler and pencil mark 3-1/2" lightly from the top right corner when the card is folded, in both vertical and horizontal directions. Those two tick marks laid on the cutting line of your paper trimmer,  then run the SCORING blade from end to end to create the diagonal fold. Burnish with a bone folder.  (Don't glue down yet!)

3)  Cut a 4" x 5-1/4" piece of the chosen DSP. Decide which side you want on the card front. THEN flip the paper over and place the approx. 2-7/8" (outside frame measurement) Layering Square die in the upper right corner. Run through your die cutting machine.

4) Adhere the remainder piece of DSP to the card front, just trimming with paper snips the small portions that cross over the diagonal score line. Then you may glue down the diagonal flap. Set a weight on it to dry.

5) While the card front is drying. Cut the 3" (outside frame measurement) Layering Square Scalloped Die from the contrasting cardstock that you will mount the DSP square on. Pay attention to which side you want up!

6)  Cut a 3" square of matching cardstock and adhere the two layers you made in step 3 and 5.

7) Adhere the 3 square layers to the diagonal flap making sure left and bottom edges line up, but only placing glue on the flap portion, not the full square or else you'll have a mess!

8) Cut a 4" x 5-1/4" card liner from Basic White. Adhere inside card.

9) Cut a 4-1/4" x 1/2" strip of cardstock and adhere to card front as shown in photo.

10) Select greeting of your choice and punches or dies that will give you a two layer tag you can raise up with Dimensionals to finish the card.

Have fun with these products and making these cards!

Happy Stamping!

If you enjoyed this post, please be sure to…


Leave a comment, I love to read them! 

You Bet! I’ll Be a Follower of this Blog

Sure I’ll Connect with your Newsletter and Receive a FREE PDF tutorial

Yes!  I’m Ready to Shop to Earn Loyalty Points for FREE Products!

Stop by Facebook to Visit homemadewithheartstampinwitheva       

See What I’m Up to on Instagram at stampinwitheva

Discover My Pinterest Boards at Homemade with Heart—Stampin’ with Eva

Watch Informative You Tube Videos at Homemade with Heart-Stampin' with Eva  

Buy on Etsy at homemadewithheartUS


Tuesday, February 2, 2021

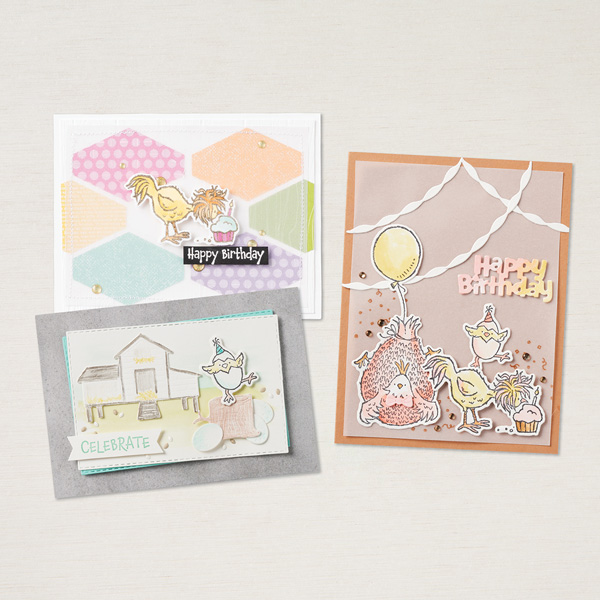
Hey Chick & Hey Birthday Chick Now Available

During Sale-A-Bration 2017, Stampin' Up! was blown away by how much you all loved the Hey Chick Stamp Set. So they decided to bring it back—along with coordinating dies and a completely new bundle created in the same style. These two bundles are only available for a limited time, June 30, 2021. Scroll down to see ordering numbers and card ideas from Stampin' Up!


These two bundles plus the separated stamp sets and die sets are now available in my online store.

Which bundle will you get first? They are so, so cute!

Thanks for stopping by today!


If you enjoyed this post, please be sure to…

Leave a comment 

Be a Follower of this Blog

Subscribe to my Newsletter and Receive a FREE PDF tutorial

Shop with me—Earn Loyalty Points for FREE Products

Follow me on Facebook homemadewithheartstampinwitheva       

Follow me on Instagram stampinwitheva

Subscribe to You Tube Homemade with Heart-Stampin' with Eva  

Shop at Etsy with homemadewithheartUS

Monday, February 1, 2021

Calendar Idea for Now or Next Year

It is still not too late to make yourself a little calendar for 2021. Or if you are a craft fair vendor you can get a head start on some of these for fall sales or as friend gifts for the next new year.

The great part is you can use up items from your papercrafting stash. I used Stampin' Up!s Flower and Field Designer Series Paper from the current Sale-a-Bration brochure that ends on February 28th.
 But you can use whatever you have on hand.

My Mini Calendars come from Taylored Expressions. Click Here


Here's how you make the Calendar Easel with a piece of 5-1/2" x 8-1/2" Cardstock


Designer Series Paper of your Choice - cut 1" x 5-1/4",  2 pieces 3/4" x 2-3/4"
Cardstock to mount Mini Calendar - 2-1/2" x 3-1/4"
Be sure to use strong adhesive to hold the calendar to the cardstock and the cardstock to the easel.

Punch the Basic White tag with the Timeless Label Punch
Stamp the greeting from the Inspiring Iris set in Memento Tuxedo Black Ink.

Use any embellishments you find pleasing to you.

The Cardstock colors I used in my samples were Bumblebee, Petal Pink, Shaded Spruce, So Saffron, Pumpkin Pie, Pool Party, Just Jade, and Misty Moonlight.

I hope you'll try this easel calendar. Once you get going they are easy to mass produce.

The majority of these items are currently available at my online store.

Happy Creating and Stamping!
If you enjoyed this post, please be sure to…

Leave a comment 

Be a Follower of this Blog

Subscribe to my Newsletter and Receive a FREE PDF tutorial

Shop with me—Earn Loyalty Points for FREE Products

Follow me on Facebook homemadewithheartstampinwitheva       

Follow me on Instagram stampinwitheva

Subscribe to You Tube Homemade with Heart-Stampin' with Eva  

Shop at Etsy with homemadewithheartUS