Pages

Showing posts with label true love designer series paper. Show all posts

Wednesday, April 28, 2021

Pretty Perennials Happy Cards

On June 30th, the Spring Mini Catalog will be ending. It has definitely been one of the greats!  I encourage you to purchase the True Love Designer Series Paper and the Pretty Perennials stamp set before they are gone. There are so many options you can do with these two products, especially if you like to color. These cards use what I call the negative effect. You color the background so the black and white flowers POP!

Patty Bennett gets credit for the first card layout using the True Love Designer Series Paper with the Pool Party coloration with the Stampin' Blends. But I made the rest of the cards my own by using the Pretty Perennials Stamp Set and another Stampin' Blends colors or changed up the card direction.

Cutting Directions:
Cardbase - 5-1/2" x 5-1/2", scored at 4-1/4"
First True Love layer - 3-3/4" x 5-1/2"
Colored True Love layer - 3-1/2x 5-1/4
True Love Strip - 1-1/4" x 3-3/4"

Vertical Mint Macaron black and white floral You Make Me Happy Card


Sending Lots of Happy card made with Mint Macaron cardstock and Black and White True Love Designer Series Paper Pretty Perennials stamp set Card


Seaside Spray cardstock with Pretty Perennials  stamp set true love designer series paper Happy Birthday Card


Seaside Spray cardstock card that says Happy for You stamped with Pretty Perennials stamp set includes true love designer series paper

I also had fun learning to use my Silhouette Cameo cutting machine to cut out the word happy because there are no dies for that stamp.  I am happy with the happy word and how it turned out.

I also had fun using the variety of word combinations to go with happy.

Pretty Perennials Stamp Set from Stampin' Up!


Stampin' Up! True Love Designer Series Paper


Think about giving these card designs a go. They are fun to assemble and you can put your twist on it easily. Practically any color of Stampin' Blends alcohol markers would look fab with this paper.

 Happy creating!

If you enjoyed this post, please be sure to click on the buttons below…


#stampinwitheva #stampinupproducts  

Thursday, February 11, 2021

Valentine's Week of Cards #4

Since Valentine's Day isn't far off now, here's an easy card layout to make for your loved ones. 

Today's post is a two-fer of Valentine ideas. My purpose is to demonstrate how different the 
same layout can look when you combine different color combinations. 

I cased this Double Point card layout from Jackie Bultje. I wanted to try it for myself. It is another good way to use up scraps of your Designer Series Papers.


The first card is assembled from all current products:
  • Basic Black Cardstock Card Base - 5-1/2" x 8-1/2", scored at 4-1/4"
  • Basic White Cardstock - two pieces (one for card front, the other card inside) 4" x 5-1/4"
  • Lace Embossing Folder - to run the center die cut heart through - then you'll reassemble with lots of mini dimensionals to hold the edge and heart together to apply to card front.
  • Cut & Emboss Machine
  • Blushing Bride 3/8" Metallic Ribbon - 8" piece
  • Mini Dimensionals
  • Paper Trimmer
  • Paper Snips
  • Seal Adhesive
  • Glue Dots
  • Basic White Envelopes
The second card was made with some retired products in it. 
Design tip - See how cute the envelope can look when you adhere a 2-3/8" x 6" piece of Designer Series Paper to it and trim off the excess. That way you don't have a "naked" envelope to give someone.

Current:
Flirty Flamingo Cardstock
Basic White Cardstock
Basic White Envelope

Retired:
All My Love Designer Series Paper
Lovely Lipstick Foil from Sale-a-Bration a couple years ago
Stamp was from a Paper Pumpkin kit from a couple years ago

The ribbon on this card is not a Stampin' Up! product, just a piece I had in my ribbon jar.


All the current products can be purchased at my online store, just click the Shop to Earn link below. 

I hope you'll give the Double Point card layout a try. It's really perfect for any occasion!

Be Creative! Happy Stamping!


 If you enjoyed this post, please be sure to…

Leave a comment, I love to read them! 

You Bet! I’ll Be a Follower of this Blog

Sure I’ll Connect with your Newsletter and Receive a FREE PDF tutorial

Yes!  I’m Ready to Shop to Earn Loyalty Points for FREE Products!

Stop by Facebook to Visit homemadewithheartstampinwitheva       

See What I’m Up to on Instagram at stampinwitheva

Discover My Pinterest Boards at Homemade with Heart—Stampin’ with Eva

Watch Informative You Tube Videos at Homemade with Heart-Stampin' with Eva  

Buy on Etsy at homemadewithheartUS

Tuesday, February 9, 2021

Valentine's Week of Cards #2

I have been so in love with the True Love Designer Series Paper in the Jan.-June 2021 Mini Catalog, I just had to make a friendly Valentine.  Isn't the Black, White & Red beautiful together?

This original card is very easy to make 6 pieces of paper, stamp, ink, one punch and ribbon!


Here's the Products and Sizing for Today's Card:

Smoky Slate cardstock, cut 4-1/4" x 11", scored at 5-1/2"

Basic White inner layer - 4" x 5-1/4"

retired - B&W stripe from Sale-a-Bration Golden Honey Specialty Designer Series Paper 
from last year  - 4-1/4" x 3"

Basic Black cardstock cut 3-1/4' x 4-1/4"

True Love Designer Series Paper cut  3" x 4"

Scallop Heart Punch from Heart Punch Pack

retired - From My Heart Designer Series Specialty Paper to punch out the heart

Greeting from Heartfelt stamp set

Memento Tuxedo Black ink for greeting

retired - 3/8" Real Red Organza Ribbon

adhesive and dimensionals

-----------------------------------------------------------


Thanks for stopping by my blog today. Happy Stamping!
 

If you enjoyed this post, please be sure to…

Leave a comment, I love to read them! 

You Bet! I’ll Be a Follower of this Blog

Sure I’ll Connect with your Newsletter and Receive a FREE PDF tutorial

Yes!  I’m Ready to Shop to Earn Loyalty Points for FREE Products!

Stop by Facebook to Visit homemadewithheartstampinwitheva       

See What I’m Up to on Instagram at stampinwitheva

Discover My Pinterest Boards at Homemade with Heart—Stampin’ with Eva

Watch Informative You Tube Videos at Homemade with Heart-Stampin' with Eva  

Buy on Etsy at homemadewithheartUS

Friday, January 22, 2021

Fun Idea for the Treat Boxes

Stampin' Up! has a fun matchbox style treat box you can assemble and make wonderful Valentine gifts for all your friends. 

4" long x 2-3/4" wide x 1-1/2" tall is a generous size to fill with treats. Ten boxes per package.

They are even better when you double the volume and put two together. That's so easy to do with the Seal+ adhesive. 

Today I'm showing you three original and slightly different ways to decorate these boxes, but first I wanted a way to easily slide open the box drawer. I used a retired 3/4" circle punch to create the pull opening after I had assembled the drawer.


Click on the Hyperlinks to purchase these items at my online store.

Products used to create these Valentines:
Love You Always Treat Boxes
4" x 12" True Love Designer Series Paper
Blushing Bride 3/8" Metallic Ribbon - 23" long piece
2" x 4" piece of Love You Always Foil in  Blushing Bride
Regular Cut & Emboss Machine
If desired Tasteful Textile Embossing Folder
Rainbow Glimmer Paper Heart cut with Stitched Be Mine dies
Fussy Cut Flower from True Love Designer Series Paper
1/2" x 2" Basic White for tag
Banners Pick a Punch for end of tag
So Sentimental Set for greeting
Memento Tuxedo Black Ink
Wink of Stella for flower centers

Flower Coloring:
1) Left Plain
2)  Blushing Bride Ink with Blending Brush
3)  Blushing Bride Ink followed by Rococo Rose Ink with Blending Brushes
leaves are Mint Macaron Blends pen

Additional Tools Needed:
Seal + Adhesive
3/4" circle punch - retired


I plan to fill my gifts with Lindt Chocolate Balls and Hershey's Nuggets. There will be plenty to enjoy in each drawer!

Have fun making these treat gift boxes! Happy Stamping!

If you enjoyed this post, please be sure to…

Leave a comment 

Subscribe to my Newsletter and Receive a FREE PDF tutorial.

Follow me on Facebook homemadewithheartstampinwitheva       

Follow me on Instagram stampinwitheva

Subscribe to You Tube Homemade with Heart-Stampin' with Eva  

Shop at Etsy with homemadewithheartUS


Thursday, January 21, 2021

Valentines Card Ideas using True Love DSP

I am just amazed at how versatile the True Love Designer Series Paper (DSP) is. Black and White goes with almost everything. It's been really fun to create these original projects for you this week. Both these cards would fall in the Avid card maker category since there are many steps, but they really aren't that difficult. Just think of it as "Me Time!"

The first Valentines Card is made from a 5-1/4" x 12" strip of the True Love DSP. It's all in the scoring to make this card. Score at 2", 4", 8" and 10". You mount the Gate Folded True Love DSP piece on a flat 4-1/4" x 5-1/2" Basic Black piece. Inside goes a Basic White piece 3-7/8" x 5" which you can decorate as you'd like.

The Belly Band is a 1-1/2" x 11" piece of Basic Black, wrapped around the card, but not super tight. We want it to be able to slide up and down with just a little bit of friction. You can use Seal + adhesive to adhere the overlapping flaps together in the back.

Using the Stitched Be Mine Dies, cut the scalloped border out of Melon Mambo, trim to front band width and use Multipurpose Liquid Glue to add those strips to the inner front side of the belly band.

On Basic White with Melon Mambo ink, stamp the Happy Valentines Day from the Heartfelt stamp set and punch it out with the smaller heart of the Heart Punch Pack, and mount it on the scallop heart punched from the Heart Punch Pack out of the Love You Always Foil sheets. 

Using the Playful Alphabet Dies, I thought it would be fun to add some "hugs and kisses" with X and O die cut out of Melon Mambo cardstock scraps. Use Multipurpose Liquid Glue to adhere the letters down. Use Dimensionals to raise up the heart on the front of the belly band. Embellish with Resin Hearts in white.

Finish by adding a 2-3/8" x 6" piece of the True Love DSP to the flap of a Basic White Envelope and with Paper Snips trim off the excess. 


Peek Inside - So Cute!  A different heart was die cut with the Stitched Be Mine Dies out of Rainbow Glimmer Paper and placed with Liquid Glue. Using Melon Mambo ink, stamp the greeting from the Heartfelt stamp set.


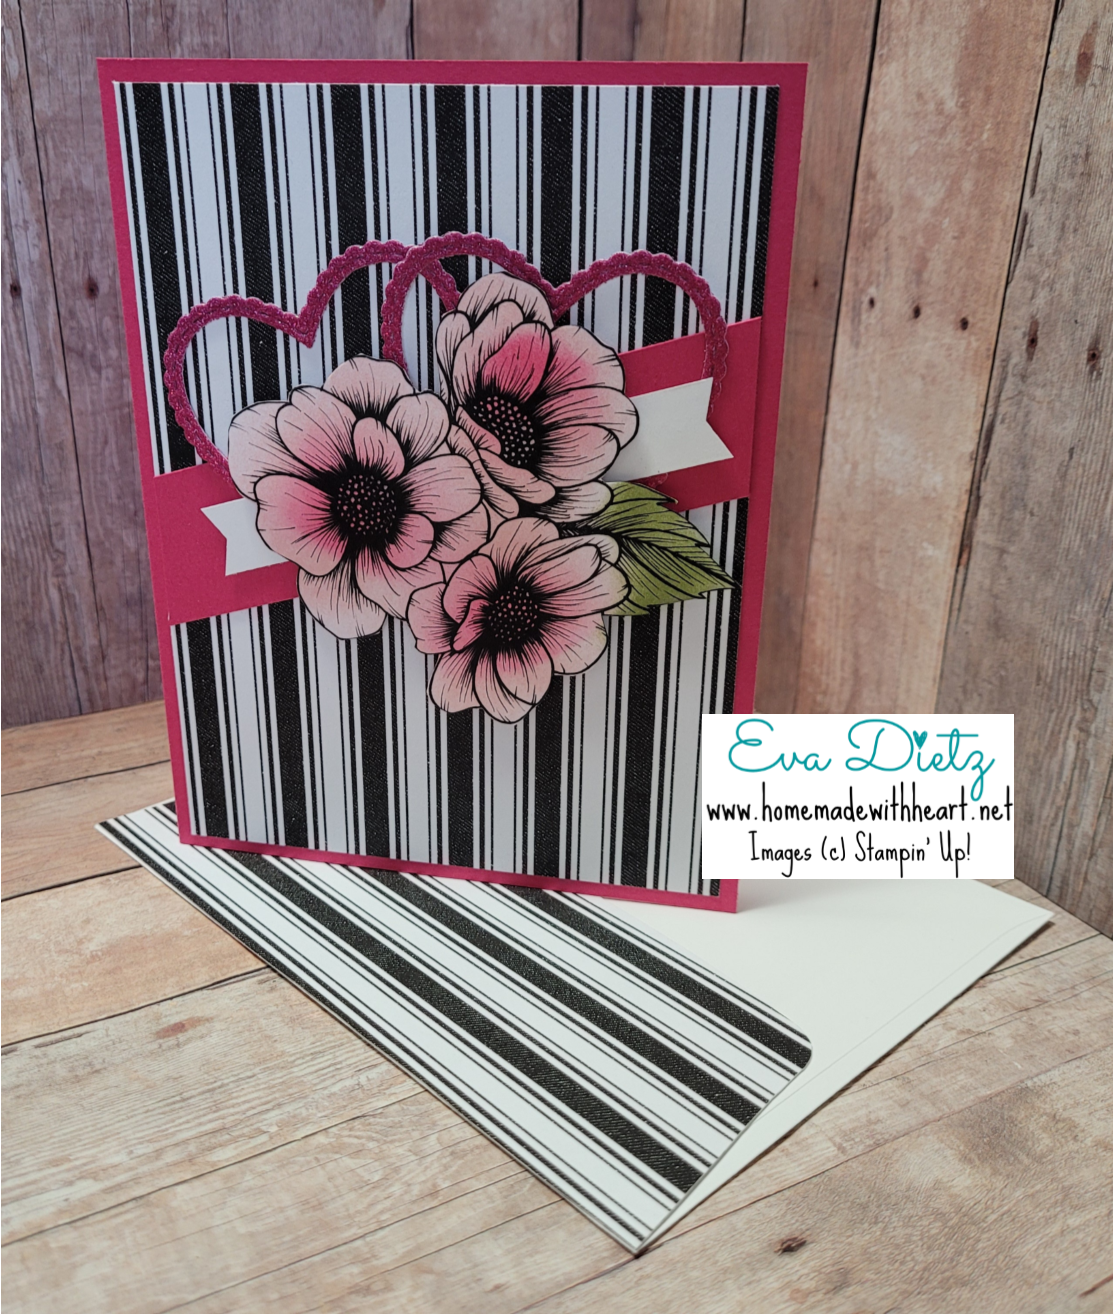
The second card I'm sharing today could definitely be a Valentines card, but it could also be a Wedding or Anniversary card depending on what greeting you stamp inside. 

Start with a Melon Mambo 5-1/2" x 8-1/2" card base, scored at 4-1/4".
Cut a 4" x 5-1/4" piece of True Love DSP.
Cut a 1" x 5" strip of Melon Mambo and adhere diagonally to front of DSP with edges hanging off. Trim off excess, then adhere layer to card front.

I've used the blending brushes again that I introduced yesterday here on my blog to color the fussy cut flowers from the True Love DSP.  I started with Blushing Bride Ink then added a smidge of Melon Mambo. Dimensionals were placed on the back.

I had die cut out two more hearts with the Stitched Be Mine Dies out of Rainbow Glimmer Paper and scotched taped them together, but it is hidden under the flower bunch. I also used liquid glue to affix the lower portion of the connected hearts to the Melon Mambo strip. Next I glued down a 1/2" x 4" Basic White piece that had it's ends punched with the Banners Pick a Punch.

Now add the Flower Bunch on top.  

Inside the card was a Basic White layer 4" x 5-1/4" with one fussy cut flower affixed down.

Finish by adding a 2-3/8" x 6" piece of the True Love DSP to the flap of a Basic White Envelope and with Paper Snips trim off the excess. 


Here's another close up of the True Love Designer Series Paper - so gorgeous!


So are you thinking of how you might use these card designs? I hope so. Your Valentine would love, love, love to receive one of these lovely cards.

Happy Stamping!

 If you enjoyed this post, please be sure to…

Leave a comment 

Subscribe to my Newsletter and Receive a FREE PDF tutorial.

Follow me on Facebook  homemadewithheartstampinwitheva       

Follow me on Instagram stampinwitheva

Subscribe to You Tube Homemade with Heart-Stampin' with Eva  

Shop at Etsy with homemadewithheartUS


Wednesday, January 20, 2021

New Blending Brushes Used on the True Love DSP

One of the new products that was revealed in the Jan. - June Mini Catalog was a set of 3 Blending Brushes. Wow, they are amazing! 

I'm so glad I purchased a set. I had ordered some from Amazon a while back before I knew Stampin' Up! was coming out with them, but like usual, Stampin' Up!s quality far surpasses the competition!  The handle is more substantial, easy to grip, and the bristles are soft as a baby's bottom! Stampin' Up! classic ink washes out with water and you can dry the brush on a clean washcloth rag. You do need time to let it dry, but it doesn't take long if you don't drown the brush in water.

The two cards I'm sharing today both have the blending brushes used on them.

Again I was inspired by Caroline's Creative Designs cut of the angle Designer Series Paper, but the rest of the card design and layout is mine.

The card below could be considered for an Advanced Beginner or Casual Cardmaker.


Each one of these hyperlinks will take you to my online store to purchase.

Products Used to Make this Card and Matching Envelope:
Rococo Rose Card Base 5-1/2" x 8-1/2", scored at 4-1/4"
Basic White cardstock Layer 4" x 5-1/4"
True Love Designer Series Paper - 2 pieces
for card 3-3/4" x 5" then split diagonally where you want. (You have an extra piece for another card!)
2-3/8" x 6" piece for envelope flap
Love You Always Foil Sheet - Rococo Rose 1/2" x 6" embossed with your favorite embossing folder
Sweet Ice Cream stamp set for greeting

Additional Products Needed:
Simply Shammy to clean your stamp
Adhesives - Dimensionals, Seal or Multipurpose Liquid Glue
Basic White Envelopes


The card below is for an Avid Cardmaker, as it has several steps required to make it. Some color, some texture, some fussy cutting, and some heat embossing. The works as I like to say!


Products Used to Make this Card and Matching Envelope:
Basic White Card Base 5-1/2" x 8-1/2", scored at 4-1/4"
Basic Black cardstock Layer 4" x 5-1/4"
True Love Designer Series Paper - 2 pieces
for card 3-3/4" x 5" then split diagonally where you want. (You have an extra piece for another card!)
2-3/8" x 6" piece for envelope flap
Love You Always Foil Sheet - Rococo Rose 1/2" x 6"
Snailed It stamp set for greeting

Additional Products Needed:
Simply Shammy to clean your stamp
Regular Size Cut & Emboss Machine
Wrapped in Texture Embossing Folder - retired
Adhesives - Dimensionals, Seal or Multipurpose Liquid Glue
Basic White Envelopes


New Set of  3 Blending Brushes 
They feel so good in your hand. The bristles are super soft. Just work the brush in a circular motion on both the ink pad and paper for amazing results.  Easy to clean too, just a little water and an old washcloth will remove the majority of the ink. Let dry before using again.


True Love Designer Series Paper

Have fun with these cards, they are sure to please whomever receives them! 
Happy Stamping!


If you enjoyed this post, please be sure to... 

Subscribe to my Newsletter and Receive a FREE PDF tutorial.

Follow me on Facebook homemadewithheartstampinwitheva     

Follow me on Instagram stampinwitheva

Subscribe to You Tube - Homemade with Heart-Stampin' with Eva 

Shop at Etsy with homemadewithheartUS