Pages

Showing posts with label berry burst. Show all posts

Wednesday, August 9, 2023

Stampin' Up!s Trucking Along Bundle Paired with the Biggest Wish Stamp Set Makes Fun, Bold Feminine Birthday Card

 With the latest release of new products in the Online Store, called Online Exclusives, included was the Trucking Along Bundle (stamp set and punch - save 10%) that is just so cute I had to have it. 

I was feeling nostalgic because there has been a pickup truck in my life for a lot of years! First my childhood truck was a Chevy, and then my husband's love of Fords (with one GMC thrown in for good measure.) He has had the whole Ford line up from one time to another, an F-150, F-250, and now we have an F-350 that has been with us the longest. 

Even though I don't really know which manufacturer inspired the concept artist who drew this truck, it definitely gives a feeling of nostalgia.

Birthday Cards are always a needed item when you love to send cards like I do, so I thought let's make a bold birthday card, and this was my result. I love how it POPS! The colors are Bubble Bath, Berry Burst, and Basic White. (I almost called this a Barbie card since I saw the movie recently with so much PINK in it!)


Main Products Used

Trucking Along Bundle

Images © Stampin' Up!

Biggest Wish Stamp Set

Bright and Beautiful 6" x 6" Designer Series Paper (DSP)

Images © Stampin' Up!

Tinsel Gems 4 Pack
Images © Stampin' Up!


If you look closed at the Truck Builder Punch above you'll see a circle as part of the designs. Now I think that might actually supposed to be a tire, but since I was using the Bright and Beautiful DSP, I thought those dots would look great as an inner card decoration. Do you agree?


As always I encourage you to add a piece of the DSP to your envelope flap for a glam card set to send to a loved one or dear friend.


I hand colored the tires and axle with a Basic Black Stampin' Write Marker. There is a stamp for this purpose, but I find I don't always line the little pieces up well, so I decided hand coloring would be easier for me.

Did you see the Masculine Version of this Card? Click Here

Free Trucking Card Tutorial for both cards HERE 

As a bonus for you if you live in the USA - I have prepared a product shopping list, just click the blue bar below. You can uncheck any item on the list you already have, or say add all to the cart if you are a newer card maker. 


If you are looking for a demonstrator to help you, I would be happy to mentor you and provide you with guidance and support through my bi-monthly newsletter. Please subscribe HERE.

Wednesday, July 26, 2023

Just My Type and Masterfully Made Designer Series Paper Make a Great Colorful Combination

When I saw the Just My Type stamp set my memory went right back to High School where I learned to type the correctly for speed. My memories also went to my mother who had a large Royal brand typewriter that she used all the time at our house. The round Hello below in the stamp set image reminded me of the letter keys with the little ridge around the edge so your fingers had a little place to rest without slipping off the key entirely. Typing definitely took more finger strength than today's computer keyboards.

Today's card set uses the Masterfully Made Designer Series Paper (DSP) and the Soft Shimmer Specialty Paper in each one along with the color coordinated "Hello". The cards look rich and elegant but they were easy to put together. Just stamps, ink and paper (plus a few brass butterflies!)

Because of how the Masterfully Made DSP was made with a torn edge look, I decided to imitate that look in my card designs. It helps to have some fingernails when tearing a narrow edge so the inside white of the paper will show through.


Just My Type Photopolymer Stamp Set

Images © Stampin' Up!
Masterfully Made Designer Series Paper

The colors used in these cards were Pretty Peacock, Lost Lagoon, Berry Burst, and Lemon Lime Twist. I just love these bright bold colors! I hope you do too!

As I was designing the first three cards shown here, I thought it would be fun to have the Hello near the top of the card. But then, you know what happened? Then I said to myself, what if I try the Hello near the bottom of the card? So I did and you have three more cards to view below. 

As you view the six cards, explore my different color combinations. Which one do you prefer? I'm in love with them all!


Berry Burst card base and Pretty Peacock Shimmer Layer.


Lemon Lime Twist card base and Berry Burst Shimmer Layer.


Pretty Peacock card base and Lost Lagoon Shimmer Layer.


Pretty Peacock card base and Berry Burst Shimmer Layer.
This card base was 4 1/4" x 11", scored at 5 1/2".


Lost Lagoon card base and Shimmer layer.


Lemon Lime Twist card base and Pretty Peacock Shimmer Layer.

You're probably wondering, did she fussy cut out all those circular letters? No, I have a very retired 3/4" circle punch that worked perfectly. But you can use a small circle die too if you'd rather. Each letter was raised up on one regular sized dimensional to given the card a little "pop"!

Cutting dimensions were:

Card base 5 1/2" x 8 1/2", scored at 4 1/4"
Shimmer Layer and Inner Layer of Basic White were 4" x 5 1/4"
Masterfully Made DSP was 3 3/4" x 5"
Torn strip of DSP that the letters sit on were 1" x 3 3/4"
Envelope Flap of DSP was 2 3/8" x 6"

I hope you'll give these easy bright cards a try. They are so cheery your friends will LOVE them!

Supplies Used:

Just My Type Stamp Set
Masterfully Made Designer Series Paper
Soft Shimmer Specialty Paper
Cardstock and Inks - Pretty Peacock, Lemon Lime Twist, Berry Burst, Lost Lagoon
Basic White cardstock and Medium Envelopes
Brass Butterflies

Shop with Me Here!


If you enjoyed this post, please be sure to . . . 

  • Leave Kind comments below.
  • Subscribe to my twice monthly newsletter here, and in my thank you email, you can download a FREE 14 Card One Sheet Wonder PDF tutorial. 
  • Click for my Monthly Host Code and how you can earn up to a $40 shopping spree with my Loyal Shopper Rewards.
  • Check out my Online Store clearance rack and save up to 70%.
  • Save 10% on coordinating product bundles!
  • The $99 Starter Kit is the best deal of ALL! Discounts & benefits here. I'd love to have you join my growing team.
  • Explore all the blog posts here for over 1,000 paper crafting and greeting card ideas to enjoy.
  • Follow me on PinterestFacebook, & Instagram
  • Subscribe to my YouTube paper crafting video tutorials.
  • If you don't already have your own Stampin' Up! Independent Demonstrator, I'd be honored to be yours! Let me help you be creative and proud of your cards that you make and send.
  • Please contact me if you have any questions about products, techniques, or card designs. 

Sunday, July 2, 2023

Create With Stampin' Up!s Share a Milkshake Stamp Set to Make the Sweetest and Most Delicious Gate Fun Fold Card with a Mega Belly Band

 I am having such fun creating with the Share a Milkshake Bundle. Today's creative idea for you is a Gate Fun Fold Card with Mega Belly Band!

The secret to making a Belly Band is to not wrap the cardstock band around the card too tightly. You want it to be snug, but still able to slip easily without having to bend the cardbase too much. With today's card there is about an 1/8" gap between the ends of my belly band that the large die cut elongated hexagon covers quite nicely.


The Share a Milkshake Bundle includes the Photopolymer stamp set and matching dies of the same name.

Let's make this fun fold!


Start with the following:

Bubble Bath cardstock - cut 5 1/2" x 8 1/2", score at 2 1/8" and 6 3/8"

Glorious Gingham Designer Series Paper (DSP) - 2 pieces of Berry Burst cut 1 7/8" x 5 1/4"

Belly Band of Berry Burst cardstock - 1" x 8 1/2", score at 2 1/8" and 6 3/8"


For the Inner Card Layer to write your personal message wishing the recipient a Happy Birthday:

Basic White cardstock inner layer cut 4" x 5 1/4"

Stamp Happy Birthday greeting from Best Family Ever in Berry Burst ink.

Stamp dish of ice cream in lower right hand corner using ink in Gray Granite, 
 Berry Burst, and Bubble Bath. Stamp the bowl first in Gray Granite. Add the Decorative design stamp in Berry Burst. Finish with the ice cream mound in Bubble Bath.

On a scrap of Basic White, stamp the spoon image in Gray Granite and die cut out 
using the Share a Milkshake Dies. Adhere as shown.


Adhere inner layer inside cardbase.


Cut a Bubble Bath cardstock piece 2 1/2" x 5 1/2", then die cut out with 2nd to the largest elongated hexagon from the Nested Essentials Dies.


Wrap Belly Band around card so the ends will hide under the Bubble Bath hexagon, adhere with Stampin' Seal adhesive.

Preparing the pieces for the complete milkshake next:

Start with Basic White piece cut at 1 1/2" x 2 3/4". Then stamp in Gray Granite ink only the decorative portion of the glass. Then die cut out the glass.

Cut piece of  Bubble Bath color - Soft Shimmer Specialty Paper 1 1/4" x 2 1/4"
Cut piece of  Berry Burst color - Soft Shimmer Specialty Paper 1 1/4" x 2 1/4"
Then die cut out the two scoops.

For the Straws:
You will only stamp the diagonal lines image on a scrap of Basic White. Stamp once in Berry Burst ink and a second time with Gray Granite ink. Die cut out the straw. You will probably need a post it note or a piece of washi tape to hold the die in place as it is sooooo tiny.

Assembling the Milkshake:
Insert the two straws in the Bubble Bath scoop slit and secure with a small piece of scotch tape on the reverse. Then add the Berry Burst scoop and secure with a small piece of scotch tape on the reverse. Finally you will put the scoop/straw portion coming over the top of the glass, just a little bit, and secure with a small piece of scotch tape on the reverse. Finish with applying  multiple Mini Dimensionals.


For the Tag:

Basic White cardstock cut 3/4" x 4"

Stamp "Celebrate" in Berry Burst ink

Banners Pick a Punch - carefully punch pennant ends on both ends until desired length is achieved. May take 2-3 punches on each end to attain desired length of about 3".

Before the Milkshake is applied to the Belly Band, do the following:

8" Basic White Baker's Twine - color it with Dark Berry Burst Stampin' Blend Alcohol Maker while it lays flat on your grid paper. Roll it over lengthwise and color the other side. Use a kleenex to remove excess ink, then use heat gun to dry twine before tying the bow around the base of the milkshake glass.


To Finish:

Remove the backing from the mini dimensionals to raise up completed milkshake onto elongated hexagon shape.

Apply Celebrate tag with a mini dimensional at each end and Stampin' Seal in the middle.


Add 2 Bubble Bath colored embellishments from the Tinsel Gems 4 pack.

For a matching Envelope flap, cut a 2 3/8" x 6" piece of the matching Berry Burst Glorious Gingham Designer Series Paper. Adhere to exterior flap and trim off excess. You are done!

Sit back and admire your creation for a bit! 


As a bonus for you if you live in the USA - I have prepared a product shopping list at this LINK. You can uncheck any item on the list you already have, or say add all to the cart if you are a newer card maker. 

----------------------------
If you don't already have your own Stampin' Up! Independent Demonstrator, I'd be honored to be yours! Let me help you be creative and proud of your cards that you make and send.

Learn how to get more done in less time by signing up for my exclusive "Insider" bi-monthly newsletter. Twice a month the news will share card class information, Stampin' Up! promotions, hot tips from me, and free tutorials! Subscribe to my Bi-Monthly Newsletter today. Plus you’ll receive a FREE 14 Card One Sheet Wonder Tutorial to download when you receive my thank you email for signing up.

Join Stampin' Up! I'd love to have you be part of my growing team.

Please contact me or email me at stampinwitheva@gmail.com if you have any questions about products, techniques, or card designs. 

Comments below are appreciated and welcome too!

Thursday, May 11, 2023

3 More Fun Cards to Create Using Stampin' Up!s Bright & Beautiful Designer Series Paper and the Crafting with You Bundle

As a continuation from yesterday's blog post, here is the rest of the set of five cards I made with the Crafting with You Bundle along with the Bright & Beautiful Designer Series Paper. These couple projects will give you endless hours of crafting fun!


Card base color is new color Azure Afternoon, Bright & Beautiful Designer Series Paper with opposite side color as a thin accent strip. Cut & Emboss Machine is stamped in returning Berry Burst ink color and die cut out with the coordinating dies, then raised up on Dimensionals. Sentiment stamped in Memento Tuxedo Black Ink.


Card base color is new color Lemon Lolly, Bright & Beautiful Designer Series Paper with opposite side color as a thin accent strip. Cut & Emboss Machine is stamped in returning Berry Burst ink color and die cut out with the coordinating dies, then raised up on Dimensionals. Sentiment stamped in Memento Tuxedo Black Ink.


Card base color is returning Fresh Freesia, Bright & Beautiful Designer Series Paper with opposite side color as a thin accent strip. Cut & Emboss Machine is stamped in returning Blueberry Bushel ink color and die cut out with the coordinating dies, then raised up on Dimensionals. Sentiment stamped in Memento Tuxedo Black Ink.

EACH PHOTO IS A CLICKABLE LINK TO MY ONLINE STORE 

Images © 2023 Stampin' Up!

Crafting with You Stamp Set #161219  $21.00

Images © 2023 Stampin' Up!

Images © 2023 Stampin' Up!

Crafting with You Dies #161225  $39.00

Images © 2023 Stampin' Up!

Crafting with You Bundle Set #161226 $54.00 (Save 10%)

Images © 2023 Stampin' Up!
Noow
Bright & Beautiful Designer Series Paper #161449  $12.50

Now that you've seen the 5 cute cards you can make from yesterday's post and today's, here are the dimensions you'll need to create your own set or a similar set to your liking.

Card Base 5 1/2" x 8 1/2", scored at 4 1/4"
Bright & Beautiful Designer Series Paper upper piece 2 1/2" x 5 1/4"
Bright & Beautiful Designer Series Paper skinny piece 1/2" x 5 1/4"
Basic White Inner Card Layer 4" x 5 1/4"

Now that you've enjoyed yesterday's and today's Bright & Beautiful cards, which one is your favorite? Let me know in the comments below.

In case you missed yesterday's post, visit it here.

If you don't already have your own Stampin' Up! Independent Demonstrator, I'd love to be yours!

Learn how to get more done in less time by signing up for my exclusive "Insider" bi-monthly newsletter. Twice a month the news will share card class information, Stampin' Up! promotions, hot tips from me, and free tutorials! Subscribe to my Bi-Monthly Newsletter today. Plus you’ll receive a FREE 14 Card One Sheet Wonder Tutorial to download when you receive my thank you email for signing up.


Please contact me or email me at stampinwitheva@gmail.com if you have any questions about products, techniques, or card designs. Comments below are welcome too!

Wednesday, May 10, 2023

Enjoy this New Stampin' Up! Photopolymer Set "Crafting with You" Paired with the Bright & Beautiful Designer Series Paper. Make These 2 Cards for All Your Friends!

If crafty is your lifestyle, you need the Crafting with You Stamp Set! This photopolymer set features the things crafters love: paintbrushes, an easel, knitting needles, yarn, a basket, a sewing machine, even a Stampin’ Cut & Emboss Machine. The crafting-themed sentiments will speak to you as well as those who receive your handmade cards. When you’re ready to send hugs, love, and encouragement, reach for this set and start crafting! I'm so glad I've added it to my stamp library! So many possibilities with this set!


Card base color is returning Blueberry Bushel, Bright & Beautiful Designer Series Paper with opposite side color as a thin accent strip. Cut & Emboss Machine is stamped in returning Berry Burst ink color and die cut out with the coordinating dies, then raised up on Dimensionals. Sentiment stamped in Memento Tuxedo Black Ink.


Card base color is returning color Berry Burst, Bright & Beautiful Designer Series Paper with opposite side color as a thin accent strip. Cut & Emboss Machine is stamped in returning Blueberry Bushel ink color and die cut out with the coordinating dies, then raised up on Dimensionals. Sentiment stamped in Memento Tuxedo Black Ink.

EACH PHOTO IN THIS POST IS A CLICKABLE LINK TO MY ONLINE STORE 


Images © 2023 Stampin' Up!

Crafting with You Stamp Set #161219  $21.00

Images © 2023 Stampin' Up!

Images © 2023 Stampin' Up!

Crafting with You Dies #161225  $39.00

Images © 2023 Stampin' Up!

Crafting with You Bundle Set #161226 $54.00 (Save 10%)

Images © 2023 Stampin' Up!

Bright & Beautiful Designer Series Paper #161449  $12.50

I encourage you to have a go with this awesome bundle! It is so much fun to be creative with.

See the rest of the similar cards here!

If you don't already have your own Stampin' Up! Independent Demonstrator, I'd love to be yours!

Learn how to get more done in less time by signing up for my exclusive "Insider" bi-monthly newsletter. Twice a month the news will share card class information, Stampin' Up! promotions, hot tips from me, and free tutorials! Subscribe to my Bi-Monthly Newsletter today. Plus you’ll receive a FREE 14 Card One Sheet Wonder Tutorial to download when you receive my thank you email for signing up.


Please contact me or email me at stampinwitheva@gmail.com if you have any questions about products, techniques, or card designs. Comments below are welcome too!

Tuesday, May 9, 2023

Sweetheart Global Collective May Blog Hop - Featuring the Newly Released Stamped with Love Stamp Set


WHO WE ARE:
Sweethearts Global Collective is an International group of Independent Stampin' Up! Demonstrators. We share our love of creativity with our customers, but also with one another. The May blog hop theme is "Anything Goes." We hope our projects and creativity will inspire you in your stamping and paper crafting. At the end of the post, please "hop" along with me to visit the other blogs and see the brilliant creativity from Demonstrators around the world! Don't forget to leave a comment and show your appreciation of their project.

LET'S GET STARTED:
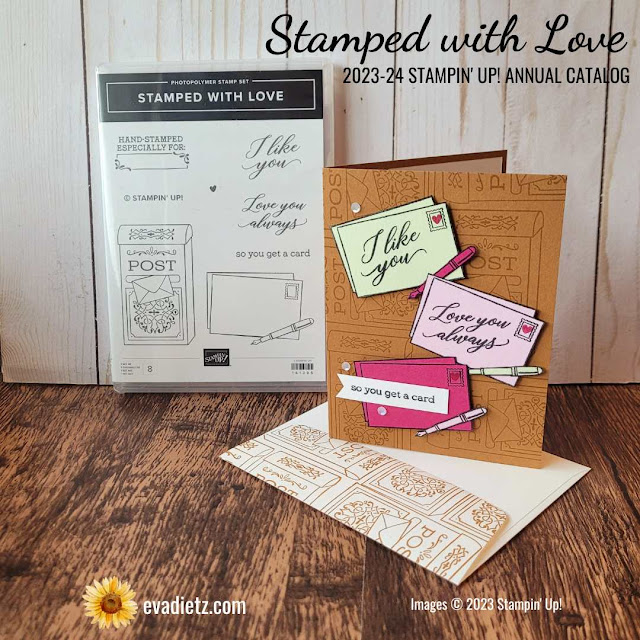
When I saw the Stamped with Love stamp set in the new 2023-24 Annual Catalog from Stampin' Up! I just had to have it. I thought to myself, "What a perfect stamp set for a card maker to design with!"
My card was inspired by a similar idea from Heather Klum, but I went a couple different ways with my inside greeting and the stamped envelope than she did.

Each photo below is linked to my online store for ease of shopping.


It was fun to apply the Post Boxes being stamped in Pecan Pie ink like a patterned design on the card front and the envelope flap.

Order #161395     $20.00 USD


This Birthday card uses two new colors introduced with this new Annual Catalog. The 5 1/2" x 8 1/2" card base, scored at 4 1/4" is Pecan Pie. The middle "Love You Always" envelope is Bubble Bath. The top "I Like You" envelope is continuing color Soft Sea Foam. The bottom envelope is a returning color called Berry Burst.

With each of the three envelope colors you will need a 2" x 3 1/2" piece of that color card stock. Stamp the full envelope and pen image to the left side of the piece and you'll have leftover room to stamp the fountain pen again, which will be fussy cut out and applied to another color of envelope.

Here's a bonus hint for you - You'll need to fussy cut out the envelopes as there are no matching dies. But you have my permission to cut off the pen tip and top of the fountain pen to make the cutting of the envelopes go faster. You'll have enough of the pen barrel stamped to know where to position it correctly and adhere the extra pen so it will contrast with the envelope.

The card front is finished with Adhesive Backed Sequins Trio, applying three white sequins as shown.


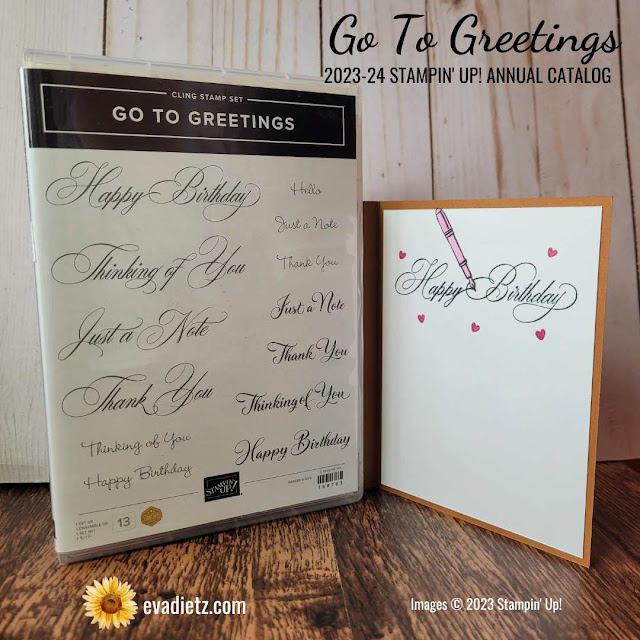
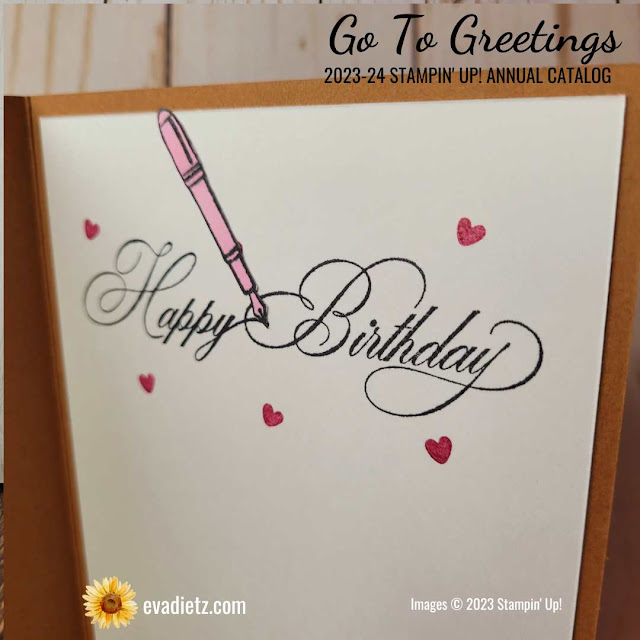
Since the front of the card had cursive on the mini enveloped, the inside layer "had" to as well. The Go To Greetings stamp set was perfect! I used a layer of Basic White cardstock cut at 4" x 5 1/4".

Order #158763     $24.00 USD


The mini hearts are stamped in Berry Burst ink. I stamped one extra ink pen in Memento Tuxedo Black ink on a scrap of Basic White card stock and colored it in with the Bubble Bath dark alcohol Blends marker. It's a little tricky to fussy cut out, but doable. I used a pair of tweezers to hold on to it, while applying the liquid glue, so it could look like it had just finished writing "Happy."

********************

********************
If you don't already have your own Stampin' Up! Independent Demonstrator, I'd love to be yours!

Learn how to get more done in less time by signing up for my exclusive "Insider" bi-monthly newsletter. Twice a month the news will share card class information, Stampin' Up! promotions, hot tips from me, and free tutorials! Subscribe to my Bi-Monthly Newsletter today. Plus you’ll receive a FREE 14 Card One Sheet Wonder Tutorial to download when you receive my thank you email for signing up.


Please contact me or email me at stampinwitheva@gmail.com if you have any questions about products, techniques, or card designs. Comments below are welcomed too!