Pages

Showing posts with label resin hearts. Show all posts

Wednesday, August 3, 2022

Candy Canes Galore with Sweetest Christmas Suite

Are you falling in love with the Sweetest Christmas Suite yet? I hope today's "sweet" card will encourage you do to so.

Like yesterday's Christmas Card layout I shared, today's is a little more advanced but still easy to make multiples of, to share with family and friends on a tray of cookies or fudge.  This card has torn Designer Series paper edges, die cut glimmer candy canes, ribbon wrapped around the candy canes and tied in a pretty bow, plus stamping directly on the card base.

Shall we get started?

Cut Real Red cardstock 5-1/2" x 8-1/2", score at 4-1/4"

Stamp greeting in lower right corner of card front in Memento Tuxedo Black Ink.

With the Sweetest Christmas Designer Series Paper (DSP), cut 3" x 6" polka dot strip and a 2" x 6" red and white candy cane strip. Gently tear the edges as shown in the photo below trying to not remove too much DSP. Glue the two layers together. Position and adhere on card front above the greeting. Trim off excess overhang on both sides.

Using the Candy Cane Dies, cut one white candy cane from a 2" x 5" piece of white glimmer paper. Repeat with red glimmer paper using the opposite direction die. Adhere the two candy canes together where they cross. Using Mini Dimensionals put some at the curved head of the cane and at the opposite end, but NOT in the middle because that is where the ribbon will go under and through.

With a 12" piece of Real Red ribbon slide an end under the candy cane combo and tie a lovely bow. Trim the ribbon ends in at an angle.

Add embellishments of your choice by the greeting.

Last step, add a 4" x 5-1/4" Basic White cardstock layer to the inside of the card for your own personal message for the holidays.

If you'd like a matching envelope, decorate your  Basic White Envelope flap with a 2-3/8" x 6" piece of matching Designer Series Paper adhered to the flap and trim off the excess with your paper snips.

Here are shopping links for your convenience.

The following products are retired:

You may be able to purchase them from Ebay or Etsy

Resin Hearts Embellishments

Retired Real Red Ribbon 3/8" 

Thanks for stopping by today. I'd love to read a comment if  you have time to leave one.

Wanna See More Card Ideas with Sweetest Christmas? 

Here's One!

Shop or Join at https://evadietz.stampinup.net/

Please contact me anytime if you have any questions 
or  email me at
stampinwitheva@gmail.com

Friday, April 23, 2021

Snailed It - Take 4

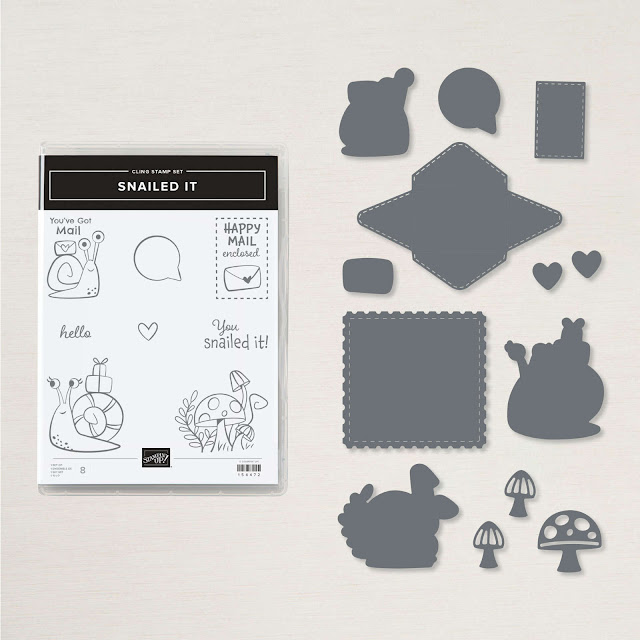
The Snailed It stamp set has the cutest collection of snail images. 
I definitely like escargots this way, but not to consume (icky!).

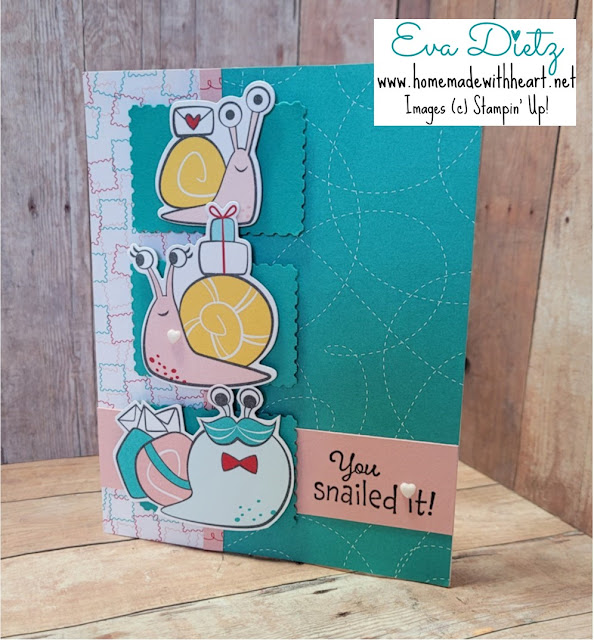
Here's an easy card to stamp and assemble with just a few tools. For someone with minimal tools available, all you need is a paper trimmer and the rectangular postage stamp punch. The cute snails can be fussy cut by hand with paper snips from the Snail Mail Designer Series Paper. Then stamp and ink the greeting. Assemble with some adhesive and dimensionals.

If you have a few more tools, like a Cut & Emboss Machine, then you'll use the Snail Dies to have a more "professional" cut look for these snails.

Saying "You Snailed It!" sure is a fun way to congratulate a friend or relative with an accomplishment they have achieved. 

Snail Trio Card
Card Inspired by Libby Fens


Snail It Stamp Set and Snail Dies

snail mail designer series paper

Products You'll Need to Make This Card:

Bermuda Bay cardstock base 5-1/2" x 8-1/2" scored at 4-1/4"
Blushing Bride Cardstock 1" x 4-1/4"
Snail Mail Designer Series Paper Bermuda Bay pattern cut 3" x 5-1/2", Postage Stamp design cut 1-1/2" x 5-1/2, and Blushing Bride piece 1/4" x 5-1/2"
Bermuda Bay for 3 rectangular postage stamp punches
From the Snailed It stamp set, stamp the You've Snailed It with Memento Tuxedo Black Ink on the Blushing Bride. Adhere that layer directly to the card front as shown in photo.
Then with the Snail Dies, cut the 3 snails or fussy cut if needed.
Then raise the snail images up with Dimensionals.
Finish with the Resin Heart Embellishment.  

Another cheery and fun card to make with this bundle. Give it a try!

Happy Stamping!


If you enjoyed this post, please be sure to click on the buttons below…


#stampinwitheva #stampinupproducts  

Thursday, April 22, 2021

Snailed It - Take 3

Once I got started playing with the Snail Mail Bundle, I couldn't stop! Here's another easy card idea that doesn't have any stamping on it! All Designer Series Paper and Cardstock! What could be easier? Give this layout a try!

Snailed It stamp set


Snailed It Bundle


Snail Maili Designer Series Paper

Products You'll Need to Make This Card:
Blushing Bride Cardstock base 5-1/2" x 8-1/2" scored at 4-1/4"
Real Red Cardstock cut at 4" x 5-1/4""
Snail Mail Designer Series Paper cut 3-3/4" x 5"
Real Red for postage stamp die 3" square
Playful Pets Ribbon Trim Combo Pack
Then with the Snail Dies, cut the snail and hello bubble from the Designer Series Paper
Then raise the snail image up with Dimensionals.
Finish with the Resin Heart Embellishments.  

Such a sweet card for a friend. Have fun making one today!

Happy Stamping!


If you enjoyed this post, please be sure to click on the buttons below…


#stampinwitheva #stampinupproducts  

Wednesday, February 10, 2021

Valentine's Week of Cards #3

How about a Triangular Valentine Card? I had purchased the Stitched Triangle Dies a while ago, but had not used them very much until I saw a layout by Sharon Davies. I changed it up quite I bit, 
but want to give inspiration credit where it is due.

If you love puzzles like I do, then these dies give you lots of options for making 
interesting card designs.


I used the equilaterial triangle shape for this design.  Fun fact - Did you know that every 
triangle always adds up to 180 degrees on it's perimeter? 


Products used in today's card:

Current products available at my online store:
Thick and Regular Basic White cardstock
Stitched Triangle Dies
Heartfelt Stamp Set
Heart Punch Pack
Resin Heart Embellishments
Dimensionals
Tear and Tape
Liquid Multipurpose glue - use sparingly

Retired:
Retired Lovely Lipstick cardstock and ink
Retired All My Love Designer Series Paper
Retired  All My Love Ribbon Combo Pack

Please note that you can decide how tightly or farther apart you want the triangles. After I made this sample, I received an order for two more cards. What I changed was instead of having a strip of white showing at the top and bottom of the glued triangles, I glued the triangles at the top and bottom edges of the white. When I glued the middle row, I placed them closer to the top row. This created about a 3/8" wide gap between the middle and bottom rows which the ribbon covered nicely. I did use the Tear and Tape in that gap to make sure the ribbon stayed put. 

Don't forget to add some Designer Series Paper to the envelope flap or stamp some hearts on the inside of the card for extra cuteness!

Happy Stamping!


If you enjoyed this post, please be sure to…

Leave a comment, I love to read them! 


You Bet! I’ll Be a Follower of this Blog

Sure I’ll Connect with your Newsletter and Receive a FREE PDF tutorial

Yes!  I’m Ready to Shop to Earn Loyalty Points for FREE Products!

Stop by Facebook to Visit homemadewithheartstampinwitheva       

See What I’m Up to on Instagram at stampinwitheva

Discover My Pinterest Boards at Homemade with Heart—Stampin’ with Eva

Watch Informative You Tube Videos at Homemade with Heart-Stampin' with Eva  

Buy on Etsy at homemadewithheartUS

Thursday, January 14, 2021

I "Snailed It" with Another Original for You!

 This snail image in the Snailed It Bundle is just the CUTEST! I had so much fun creating this card design for you. Minimal stamping, but lots of fun to send to a friend just to say Hello!  This card was inspired by Sandra Hernandez.  This Snail Mail Suite will give you a lot of mileage with the stamps and fun Designer Series Paper to use all year long! Lots of great value for the dollar!


All the products listed below are linked to my online store for easy purchase. 

Products You'll Need to Make This Card:
Blushing Bride Cardstock base 5-1/2" x 8-1/2" scored at 4-1/4"
Real Red Cardstock cut at 3-3/4" x 5"
Snail Mail Designer Series Paper  cut3-1/2" x 4-3/4"
Bermuda Bay for postage stamp die 3" square
Basic White also cut with postage stamp die but trimmed down afterwards to fit within the Bermuda Bay postage stamp frame. 
From the Snailed It stamp set, stamp the You've Got Mail snail with Memento Tuxedo Black Ink on the Basic White. Adhere those two layers together and raise them up with Dimensionals on the card front.
Then with the Snail Dies, cut the snail and envelope image from the Designer Series Paper
You can accent the Snail paper image with Stampin' Blends in the colors of Daffodil Delight and Rococo Rose if you would like.
Then raise the snail image up with Dimensionals.
Finish with the Resin Heart Embellishment.  All Done!


I hope you've enjoyed today''s quick card that you can make! I'd love to read your comments and thoughts about this card design. Just click on the Comment box.


If you like what you see here please follow me in the right margin, or sign up for my email newsletter. also in the right margin.

Happy Stamping!