Pages

Showing posts with label prized peony. Show all posts

Saturday, March 5, 2022

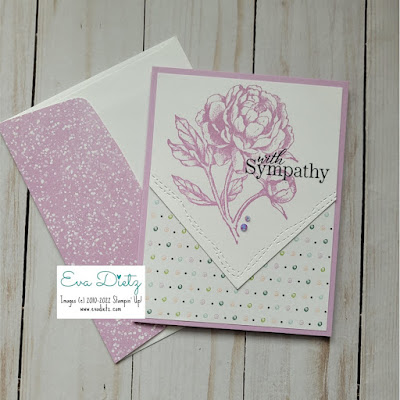
Fresh Freesia Prized Peony Sympathy Card

When I was designing the cards for my last stamp class I came up with a new edge effect using the largest Stitched with Whimsy Die. I'm calling it Easy Trick Point. I used my Paper Trimmer to cut the "V" point after I stamped the Peony and sentiment.

All you have to do is make sure only the two sides that need the stitching are under the die when you run it through your die-cutting machine. Make sure the top part of the basic white layer is threaded through the die and lays on top of the die so it won't accidentally get the stitching. You have a choice of which of the four corners of the die you use for your trick point. Each is a little different.

However, the ladies who made this card in class improved upon my idea. The ladies decided to fussy cut and mirror the stitched edge of the die. That result gave a much softer edge to this card design. So now you have two ways to do the edge on this card design. 


Products used to Create this Card:

Fresh Freesia cardstock card base cut at 5-1/2" x 8-1/2", scored at 4-1/4"

Basic White cardstock 4" x 4-1/2"  for the front image plus 4" x 5-1/2" piece for inner card layer stamped at shown with images from the Prized Peony stamp set

Stitched with Whimsy Dies - use largest one with your die-cutting machine

Friendly Hello Designer Series Paper 4" square

Prized Peony stamp set
Fresh Freesia ink
Special Moments stamp set for sympathy sentiment
Memento Tuxedo Black Ink

2021-23 In Color Jewels

Basic White Envelope with the exterior side of the flap having matching DSP- cut 2-3/8" x 6", adhere and trim off excess.

Make several of these cards to have on hand, as they will be flat to mail and ready at a moment's notice.  Thank you for stopping by today.

Thursday, April 8, 2021

Expanding Peony Cards to Make #3


I hope you are enjoying learning how you can use Designer Series Paper (DSP) in a new way. 
Today's card is my original design.

I think Stampin' Up! knocked it out of the park with this gorgeous DSP. If you love it as much as I do, you should buy another package before the current annual catalog ends on May 3, because after then, it's gone!


Quick disclaimer - even though the colors photographed differently due to the 
backgrounds I used, I assure you it is the same card. (What a difference a little extra
 lighting makes too!)


Let's Make this Card! 

1) Back Panel is Basic Gray 4-1/4" x 5-1/2"

2) DSP 5-1/4" x 12",  scored at 2", 5", 8"
plus one additional DSP strip 3/4" x 5-1/4" which goes on last.

3) Basic White 3-3/4" x 5" for inner card layer

4) Basic White piece 2-3/4" x 4" for Stitched So Sweetly scalloped rectangle die, then stamp birthday greeting from Sweet Ice Cream stamp set in Tuxedo Black Memento Ink diagonally, then the peony blossoms in Petal Pink.

5) Gray Granite 3" x 5-1/4", then use the decorative scalloped edge and cut off just a little bit of the cardstock to make the decorative edge. This piece of Gray Granite is attached behind the front DSP section all the way to the first fold line.

6) Even though I did not add any embellishments, you sure can!

7) Give the envelope flap a little color with a 2-3/8" x 6" piece of 
the matching DSP. Trim excess as needed.

So there you have it! Three days of easy DSP card designs that you can use with any DSP you have on hand. I always love how each piece of DSP gives a new look to the same layout. Give these a try!

Purchase these products in my online store at the button below.

Happy Stamping!


If you enjoyed this post, please be sure to click on the buttons below…


#stampinwitheva #stampinupproducts  

Wednesday, April 7, 2021

Expanding Peony Cards to Make #2

Hello! I hope you enjoyed yesterday's expanding card idea. Here's today's! It's similar but the card base is the Designer Series Paper with four additional cardstock pieces applied. Now that's a simple card with minimal supplies needed!


Quick disclaimer - even though the colors photographed differently due to the 
backgrounds I used, I assure you it is the same card. (What a difference a little extra
 lighting makes too!)


Let's Create this Easy Card!

1) Peony Garden Designer Series Paper (DSP) cut 5-1/2" x 12" and
scored at 3-3/4" and 7-3/4" 

2) Cut Gray Granite strip 3/4" x 5-1/2, then embossed with Tasteful Textile Embossing Folder. 
Adhere 1/2" from fold on front section of card.

3) Basic White inner layer 4" x 5-1/4"

4) Basic White 3-1/2" x 4" piece to stamp Peony image on, then die cut out, 
affix to card from with dimensionals.

5) Stamp Birthday greeting of your choice, then die cut out with 
Tasteful Labels Dies. Adhere to card front.

6) Embellish with Elegant Faceted Gems

7) Give the envelope flap a little color with a 2-3/8" x 6" piece of 
the matching DSP. Trim excess as needed.

All Done! Easy and Quick!

If you would like to purchase any of these items, just click on the Shop Online button below.

Come back tomorrow for Card #3 in this group. Happy Stamping!


If you enjoyed this post, please be sure to click on the buttons below…


#stampinwitheva #stampinupproducts  

Tuesday, April 6, 2021

Expanding Peony Cards to Make #1

I immediately fell in love with this stamp set the second I saw it in the Annual Catalog, since I grow peonies in my yard. I especially love the double petaled blossoms. 

Over the next three days, I will be sharing with you three cards highlighting the Peony Garden Suite in the 2020 Annual Catalog. I think this set is going to be a "keeper" in my forever collection of gorgeous stamps! The Prized Peony stamp set and Peony Dies will continue into the 2021 Annual Catalog. YAY! The Peony Garden Designer Series Paper (DSP) is retiring on May 3rd, so now is a good time to show you how to use up some of that DSP. 


Let's Create this Card!

1) Using a 5-1/4" x 12" DSP strip, score it at 2", 5" and 8". Fold on score lines.

2) Cut two pieces of Gray Granite cardstock - first piece is 4" x 5-1/4", second piece is 4-1/4" x 5-1/2".

3) For inner card layer, cut Basic Whtie 3-3/4" x 5".

4) If you happen to have a small matching piece of DSP cut a strip 3/4" x 5-1/4", if you don't its ok.

5) On Basic White cardstock 3-1/2" x 4", stamp the peony image in Tuxedo Black Memento ink, then die cut out with Peony Dies.

6) On the 4" x 5-1/4" piece of Gray Granite cardstock stamp your choice of Birthday greeting in Tuxedo Black Memento Ink in the lower right corner. I suggest keeping the width of the stamp in the 2" range.

7) To assemble card pieces begin with affixing the 4" wide section of DSP to the larger piece of Gray Granite. Next affix the smaller piece of Gray Granite to the back side of the 2" section to create the card front. Last, add the Basic White layer to the card inside as shown in photo and if you have the extra strip of DSP affix now.

8) Finish the card by attaching with dimensionals the Peony image slightly offset on card front. Add any embellishments if you desire.

Of course, you don't want a naked envelope so cut a 2-3/8" x 6" coordinating piece of DSP and adhere to the envelope flap.

I hope you enjoy making this card. It is for the advanced beginner or casual cardmaker. 
See you tomorrow for card #2!

Happy Stamping!

P.S. Please vote on my card entry from yesterday's post here.


If you enjoyed this post, please be sure to click on the buttons below…


#stampinwitheva #stampinupproducts  

Wednesday, November 11, 2020

Peony Diorama Card CASE

Have you ever made a Diorama card? I hadn't, so that is why I CASED this card by the talented Patty Bennett. I only changed up the greeting on the front. I don't use the color Merry Merlot often enough, so this card gave me another excuse to work with it. I also love the "messy" sponging technique that is so easy to do.

To cut the card base, you'll need a piece of Merry Merlot that is 5-1/2" x 10-3/4". On the long side, score it at 3-5/8", 6-7/8", 7-1/4" and 10-1/2". Run a piece of Tear and Tape next to the 10-1/2" score line and the edge of the cardstock. With your bone folder, fold on each score line and crease well. 

Then grab the Peony Dies and use the scalloped edge die to run through your die cutting machine on the starting edge. Select the Layering Square Dies and use the 2-1/2" scalloped square to die cut where you want the "diorama window" to be. Then cut another scalloped square from Whisper White.


Cut a piece of Whisper White for the card front 3-1/4" x 5-1/2", then die cut the same scalloped edge as you did on the Merry Merlot.

Using the Stitched So Sweetly Dies, cut a scalloped rectangle that measures 2" x 3-1/8" from a piece of Whisper White. 

Using the Prized Peony stamp set and the verse "Thinking of You" from the Good Morning Magnolia stamp set, it's time to start stamping! 

Piece #1 - Scalloped Rectangle, using Merry Merlot ink, stamp two individual peony blooms and the greeting.

Piece #2 - Card Front on Whisper White - randomly stamp the larger Peony flower with leaves in Memento Tuxedo Black ink. Then with a sponge dauber and Merry Merlot ink, lightly sponge the flowers as shown. Accent with Cherry Cobbler ink. With your Just Jade Stampin' Blends pens, color the leaves.

Piece #3 - Stamp the larger Peony flower on a 3-1/4" x 3-3/4" piece of Whisper White in Memento Tuxedo Black ink. Repeat the sponge dauber technique on the flower, finishing with the Just Jade Stampin' Blends pens on the leaves. Die cut out with the Peony Die.

Piece #4 - Stamp your inner greeting on the scalloped square in Merry Merlot ink, making sure to stamp it on the top half of the square.


Now it's time to assemble all the pieces. Start by removing the Tear and Tape and create the diorama window for the card inside. 

Adhere the scalloped square inside the window, while you are holding the card open at 90 degrees like shown above. 

Practice positioning the peony, then note where you need to apply adhesive, so you won't accidentally get any adhesive too high on the flower.

Adhere the card front, then finish by raising the scalloped rectangle up with Dimensionals. If you so desire, you may use a Wink of Stella pin to add a shimmer effect on the inner peony.

Now you have a gorgeous card to give to someone special! All of the products used can be purchased through my online store just CLICK HERE.


“Life is good when you are happy, 
but much better when others are happy because of you.” (by Pope Francis)

Thanks for stopping by today. Don't forget to sign up for my email list in the right column, too!