Pages

Showing posts with label granny apply green. Show all posts

Monday, May 29, 2023

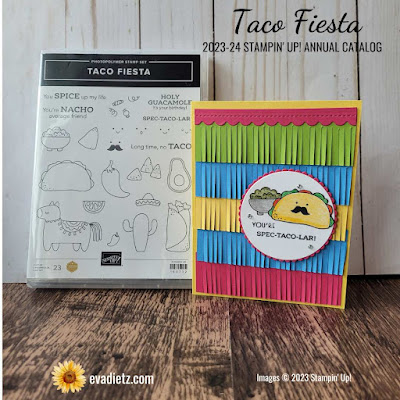
Let's Have a Stampin' Up! Taco Fiesta Fringe Card to Celebrate That You Are Spec-TACO-lar!

From Memorial Day to Labor Day, any time during summer is a great time to have a Taco Fiesta! Think about all the cute things you can create with this stamp set besides this darling fringe card which you could easily turn into a party invitation. You could do place cards, food signs, name tags, and whatever else you can think up! With the addition of the fun little face stamps you can customize this set with whatever personality you'd like. Your guests would love it!


Taco Fiesta Stamp Set #160732  $19.00


Taco Fiesta #160732  $19.00 USD
These images are perfect for coloring with either Stampin' Blends pens, Stampin' Write Markers, or Stampin' Up!s collection of Colored Pencils.


SUPPLIES YOU'LL NEED:

Card Base - Daffodil Delight cardstock 5 1/2" x 8 1/2", scored at 4 1/4"

Fringe Colors: Melon Mambo cardstock, Azure Afternoon cardstock, Granny Apple Green cardstock, and Daffodil Delight. Each strip is 4" x 1 1/4".

Tear and Tape adhesive - goes at the top of each fringe piece before cutting with the Fringe Scissors, as it will help you know where to stop.

Fringe Scissors (retired) but you substitute with the current Beautiful Balloons Dies (they have a fringe die as part of the set, or you can use Chive Scissors from your kitchen, or if you are desperate, regular paper snips will do. Start your fringe building from the bottom of the card and proceed up.

Scalloped Edge at card top - Penned Flowers Dies (retired) cut from Melon Mambo, strip size is 1/2" x 4".  Apply Tear and Tape to this scalloped edge and place at top of card.

Basic White cardstock for inner layer 4" x 5 1/4", front tag, and scrap for taco image that is fussy cut out and placed on top of the guacamole bowl stamp.

Melon Mambo cardstock for front tag

Layering Circles Dies (retired)

Taco Fiesta Stamp Set and assorted clear stamp blocks

Memento Tuxedo Black Ink 

YOU'RE stamp comes from the Nothings Better Than Stamp Set (retired) and you'll need a Basic Black Stampin' Write Marker to hand color just that word, since it is part of a sentiment stamp in that set.

Colored Pencils

Blender Pen - use after the colored pencil coloring to help it look a bit like watercolor.

3 Rhinestone Basic Jewels

Dimensionals for raising the 2 layered tag on the card front.

*********************

Have a blast experimenting with all the possibilities of this stamp set. You are going to love creating with it.I love a photopolymer stamp set you can see where you are stamping, and it makes the process so much easier. 

Be sure to order this stamp, cardstock, and current supplies from my online store here.
The retired supplies may be available through online sellers at Ebay, Etsy, and other websites.

If you don't already have your own Stampin' Up! Independent Demonstrator, I'd love to be yours!

Learn how to get more done in less time by signing up for my exclusive "Insider" bi-monthly newsletter. Twice a month the news will share card class information, Stampin' Up! promotions, hot tips from me, and free tutorials! Subscribe to my Bi-Monthly Newsletter today. Plus you’ll receive a FREE 14 Card One Sheet Wonder Tutorial to download when you receive my thank you email for signing up.
 
Please contact me or email me at stampinwitheva@gmail.com if you have any questions about products, techniques, or card designs. Comments below are welcome too!

Monday, August 2, 2021

Sweet Strawberry Summertime Card

This is the final card to share from my July Stamp and Chat Classes. Another fruity card, but this time Strawberries!  This layout was cased from the StampingNinja.com


These beauties came from my garden in July. The plants are going crazy with berries this year. I think they love the combination of warmer weather and consistent watering via our timer system.

The berries above look really close to the artist inspired berries on the Designer Series Paper below, don't you think?


Here's how to make this card!

Products Needed and Dimensions:

Poppy Parade Cardstock card base 5-1/2" x 8-1/2", scored at 4-1/4"
Basic White inner card layer 4" x 5-1/4"
Retired Berry Delightful Designer Series Paper 4" x 5-1/4" and 2-3/4" square
Basic White punched with 2-1/4" Circle Punch and another piece punched with 1" Circle Punch
4" piece of 2019 3/8" Sale-a-Bration Organza Ribbon in Granny Apple Green
Sweet Strawberry Stamp Set and Punch
Poppy Parade Ink for berries and Granny Apple Green in for leaves
Pearl Jewels for embellishment
------------------------------
Tomorrow is the Big Day - The new Fall Mini Catalog goes live and so does the Second Sale-a-Bration offering for this year. If you need catalogs be sure to let me know via the contact tab.
---------------------------------

Have a sunny summer day!


#stampinwitheva #stampinupproducts  

Wednesday, June 9, 2021

Ice Cream Corner Double Z Fold Card

Only one more Ice Cream Corner Card to share with you after today. This cute design was inspired by Anne Marie Hile, but her card opened vertically and wouldn't stand up by itself which is how I like my card designs to stand, so I changed the fun fold around so the card would stand by itself.


Specific Products needed:
Ice Cream Corner Suite or Sweet Ice Cream Stamp Set and Ice Cream  Cone Builder Punch
Ice Cream Corner Designer Series Paper (DSP)

Here's how you construct this card:

For the Z Fold Pieces
Blackberry Bliss 5-1/2" x 8-1/2", scored at 2-1/8 and 4-1/4 on the long side
Granny Apple Green 4-1/2" x 7-1/2", scored at 3" and 5-1/8" on the long side

Front of Card:
Striped Layer on Left - 1-7/8" x 5-1/4"
Attached Panel is Granny Apple Green 3-1/4" x 4-1/2"
Basic White 3" x 4-1/4"
Scraps of White for Scoop stamps in Pool Party, Bumblebee, and Petal Pink inks.
Ice Cream Cone Builder punch for the cones with DSP
Champagne Rhinestones

Inner Layer of Card:
Ice Cream Corner Designer Series Paper cut 4" x 5-1/4"
Granny Apple Green 3-1/4" x 4-1/2"
Basic White 3" x 4-1/4" with mini dots stamped in Terracotta Tile ink in upper and lower corners
Memento Tuxedo  Black Ink for Thank You greeting

Z Fold Inner Side Panel:
Ice Cream Corner Designer Series Paper cut 1-7/8" x 4-1/4"

Important Tip:
Attach the completed smaller back Thank You panel to the inner card back with good spacing all around, and then attach the front piece of the smaller Z Fold to your card front. On top of that attach your finished card front layers when the card is closed, so you know exactly where to add the adhesive on portions of the front panel and smaller Z fold panel to allow the entire card to open as shown in the photos and to precisely cover the inner panel as well.


Front Close Up


Top View
See how the front panel sticks out over the smaller Z Fold panel? Refer back to the Important Tip above if you don't quite understand the folding process.


Open View


Close up of layers


I hope you'll give this unique Z Fun Fold a try. It isn't that complicated if you compare your work to the photos above!  All the needed products can be ordered at my online store at the link below.

Have a "cool" day!


#stampinwitheva #stampinupproducts   


Thursday, February 4, 2021

Berry Blessings Stamps and Berry Delightful Designer Series Paper are Awesome!

 Continuing with the Berry theme from yesterday's blog post which I hope you enjoyed - today we have raspberry and blueberry card designs for you!  The raspberry design is an original.


A peek of the card opening for you.


Here's the Products used in the Raspberry Card and are available to purchase at my online store:

Blackberry Bliss cardstock cut at 5-1/2" x 7", scored at 2-3/4" 
plus a 3-1/2" square scored at 3/4" to create the flap which is secured to the base before adding the Basic White inner layer

Basic White inner layer 4" x 5-1/4"

Berry Delightful Designer Series Paper - 2-1/2" x 5-1/4" for left front panel, 
plus 2-1/2" x 3-1/4" for front flap

Granny Apple Green and Basic White cardstock die cut with the Stitched So Sweetly Dies, then stamped with Blackberry Bliss ink with greeting from the Sweet Strawberry stamp set

Blackberry Bliss and Granny Apple Green inks for stamping the raspberries 
on scraps of Basic White and fussy cutting out

Retired Blackberry Bliss Faceted Dots

Paper Snips, Dimensionals and Seal adhesives

----------------------------------------------

This Blueberry Card was inspired by many fellow demonstrators - a compilation of many great ideas.

I had in my stash some retired Blueberry Bushel cardstock and wanted to try it out on this design. 

Items also used in the making of this card:

 Berry Delightful Designer Series Paper (DSP) cut 4'x 5-1/4"
Second largest Stitched So Sweetly dies cutting the 3" x 4" DSP piece
2" circle punch from  Basic White stamped with a greeting from Berry Blessings stamp set
Linen thread wrapped around DSP twice
 Pacific Point and Garden Green inks for tag and fruit
 The blueberries and leaves image were fussy cut out. 
Dimensionals were used to raise up the circle and fruit/leaves layer.


Below is the Sale-a-Bration freebie when you order $100 of products before shipping and tax. 
It is such a gorgeous set of Berry Blessings stamp set and Berry Delightful Designer Series Paper.


So will you be making these cards soon? I hope so, they are so fun to create!

Thanks for stopping by and have a day full of happiness!

If you enjoyed this post, please be sure to…

 Leave a comment, I love to read them! 

You Bet! I’ll Be a Follower of this Blog

 Sure I’ll Connect with your Newsletter and Receive a FREE PDF tutorial

Yes!  I’m Ready to Shop to Earn Loyalty Points for FREE Products!

Stop by Facebook to Visit homemadewithheartstampinwitheva       

See What I’m Up to on Instagram at stampinwitheva

Discover My Pinterest Boards at Homemade with Heart—Stampin’ with Eva

Watch Informative You Tube Videos at Homemade with Heart-Stampin' with Eva  

Buy on Etsy at homemadewithheartUS

Monday, November 9, 2020

Using Retired Products Creatively

 As I was planning my cards for this weekend's In Home Card Classes, I decided to dive into my retired products (for the most part) and see what I could come up with. Here's a lovely Thanksgiving Card for the result! This card was inspired by Mary Knabe.

Starting with a Early Espresso base, I layered on strips of the retired Painted Autumn Designer Series Paper (DSP). The bottom piece is 2" x 4" and the top three strips are 1" x 4" spread out evenly. On top of that went a layer of Mango Melody 2-3/4" x 3-1/2", then a layer of Very Vanilla 2-1/2" x 3-1/4", From my very old wooden block stamp set, Teeny Tiny Wishes, went the greeting stamped in Mango Melody.


For the focal point, I started with the 3/8" Early Espresso Woven Ribbon (retired) wrapped around the two layers as shown. Then I fussy cut  the triple pumpkin image from the Painted Autumn DSP. Next was a die cut leaf from retired Seasonal Layer dies cut on Granny Apple Green. Then a Gold Foil leaf from the Nature's Roots Dies was prepared (cut and embossed). I layered those as shown, scotch taped it all together on the back side, then used Dimensionals to attach to the card front. Last step was adding the bow with glue dots.

I think the result looks great! You can use this layout idea with any combination of paper, ink and stamps. Go crazy and give it a try!

Thanks so much for stopping by today. I'd love to read your thoughts/comments on this design. You can comment at the end of this post. 

You are also invited to sign up for my email list in the right margin. I'd love to be in touch with you.